- 3.0 An Introduction to CRM
- 3.1 What is a CRM System?
- At 1CRM Systems we view 1CRM as a CRBM - a Customer Relationship and Business Management system. By this we mean a CRM which has extensive business management capabilities integrated within it - such as order management, project management, service management, and HR management. But before we go on to address these extended CRBM capabilities, let’s first get you comfortable with some CRM basics.
- If you are going to implement a CRM system, it is probably important that we first go over what a CRM system really is, and how it compares to some tools you may already be familiar with. A CRM System is just that – a system which Manages information and processes around your Relationship with your Customers. The sales aspect of that relationship, yes – but also the ongoing service and support aspects. The system should provide at least basic information about the companies you are doing business with, and the people you work with at those companies. Typically these are referred to as Accounts, and Contacts. Accounts can be your customers, but may also be your suppliers, your partners, and your sub-contractors.
- You are likely familiar with one or more simple contact management systems – such as Microsoft Outlook, ACT!, or Goldmine. Let’s talk a bit about Microsoft Outlook, as the one most people have seen and used. While it is used mostly as an email client, Outlook is also a contact manager. It keeps track of the people you know – often both personal and business contacts in one system. It lists for each person their phone number(s), email address(es), mailing address(es), and personal information such as birthday, and anniversary. It also records the organization they work for, as one of the data fields on their record. If you have a second person you know, who also works at that company, Outlook has functions that let you copy the first person’s information, so as not to have to re-enter all the company-related information.
- Unfortunately, if that company moves, or changes its fax number, that information is duplicated on the contact record for everyone you know at that company, and you will have to chase them all down individually to correct them.
- By contrast, one of the minimum features offered by a CRM is that the company, or Account, has information kept on it as an independent entity, and then has people you know, or Contacts, linked to it. In this way, the company information only gets changed in one place when it needs updating, and yet each Contact record easily brings up the information of the Account with which it is associated.
- In Microsoft Outlook, as well, there is no attempt to automatically link upcoming meetings, telephone calls, or tasks with the Contact or Account to which these activities relate, or to keep an organized history of past Account activity including emails and notes. Essentially any CRM can do this.
- These (Account records separate from Contact records, and the maintaining of Account and Contact history) are two of the fundamental features you should expect to see in any CRM, but there are many more, including:
- Salesforce automation – including lead capture, and the promotion of leads to Accounts/Contacts, and Opportunities;
- Opportunity tracking with sales stage and percentage likelihood;
- Sales pipeline tracking, with graphical charts that offer drill-down from the bar or segment of the chart to the data that underlies it;
- Definition of sales teams and territories, to manage information sharing, and track sales performance by territory;
- Lead source analysis of sales and opportunities;
- Flexible reporting, to extract precisely the information you want to see;
- Service case tracking, and other service/support capabilities such as tracking software bugs, and managing support subcontract renewals;
- Corporate calendar management, for arranging meetings;
- Corporate directory, for contacting fellow employees;
- Interface consolidation, bringing into the CRM environment additional everyday needs in order to make a company information resource that employees can ‘live in’ – including news feeds, stock quotes, weather forecasts, integration of external web links and applications, and integrated web-based email; and
- Document management and revision control, for managing and retaining reference copies of important corporate documents.
- A well-conceived CRM must also have a truly outstanding user interface, as the whole raison d’être for the system is to make the organization’s information accessible quickly, easily, and naturally. As the CRM software field has matured, many CRM systems have come to adopt similar solutions to navigating through the CRM. Let’s have a look at what it is like to use a CRM with a state of the art user interface, by having our first look at 1CRM.
- 3.2 What Does a CRM Look Like?
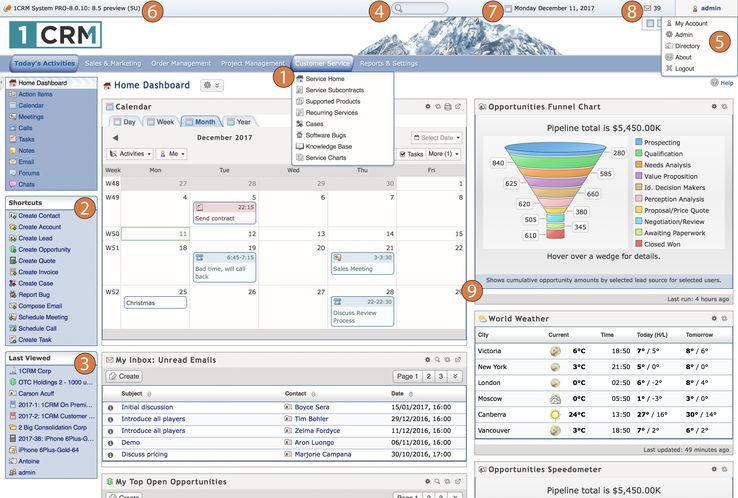
- In the figures below, you see the 1CRM Home Dashboard. It is the first thing you will see (after the login screen) once you start using the system. Various key elements of the screen layout are highlighted on Figures 15-18, as follows:
- Navigation Tabs: Click to choose desired module
- Navigation Shortcuts Box: Specific shortcuts useful within each module
- Last Viewed: A remarkably handy trail of recent records you have viewed
- Search Box: Search for a text string within all data held by 1CRM
- User Management Links (Admin link is only available to users marked as administrators)
- License Information: Shows the licensee name and user count, and links to the License Information screen
- Calendar Information: Shows today’s date, and links to Calendar Day, Week or Month views
- Mail Information: Shows the number of unread emails, and offers links to go to the Inbox, and to check for new emails
- Main Screen Body: On the Home Dashboard, the information presented is comprised of small frames of information called dashlets. Some of the dashlets available include your Calendar, Weather, News Feeds, Stock Quotes, plus dashlets for any module and any chart in the system. Users can choose what dashlets they want on their screen, and how they are arranged.

- Figure 15: The Home Dashboard (Claro Theme - Lead Green)
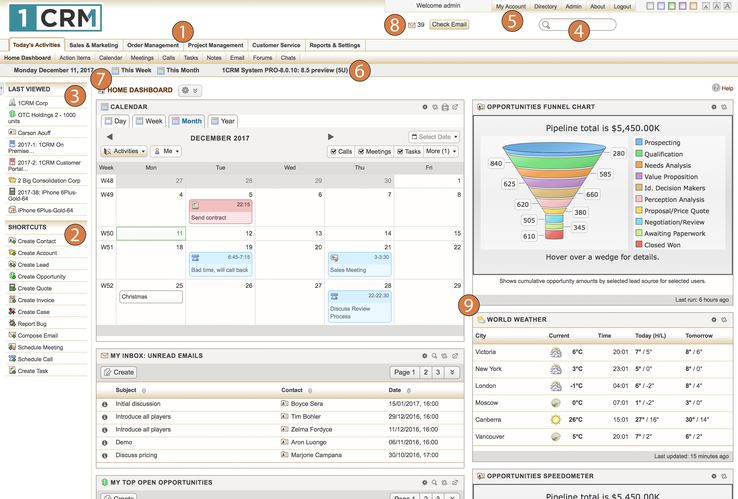
- Figure 16: The Home Dashboard (Delight Theme - Blue Ice)
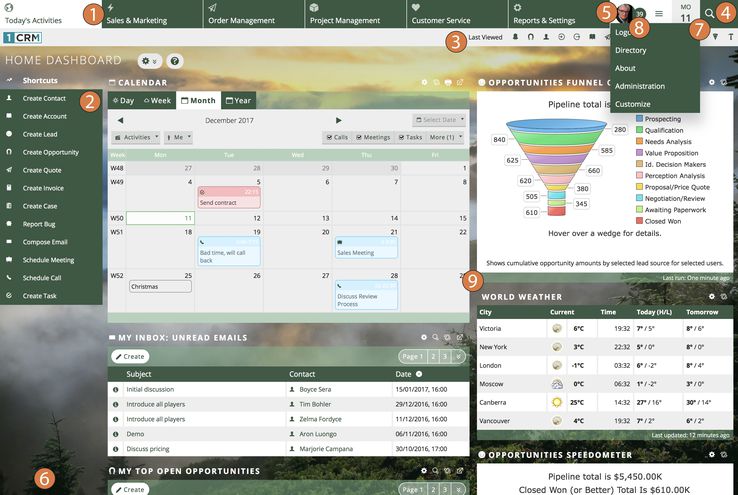
- Figure 17: The Home Dashboard (Spectrum Theme - Gold)
- Figure 18: The Home Dashboard (Flex Theme - Black Forest)
- Figures 15-18 above show the same information, and offer the same user interface controls, but in different ways. The differences are controlled by what are called Themes. You can choose which theme you want to use as you login, using the dropdown control on the login screen. Or you can change it at any time, using a dropdown control at the bottom of the screen.
- We have used the Home Dashboard screen as an example to explain the various elements of the 1CRM screen layout. That screen layout uses the same general layout as all of the other tabs. What you will see as you move to other tabs is that the Shortcuts (2) change according to what would be useful within the specific tab, and the Main Screen Body (9) displays the information indicated by the tab name.
- One special user interface feature of note is a small Collapse arrow on the top left corner of the Shortcuts box (or an icon to the left of the module name in the Claro theme). Clicking on this control allows you to collapse to the left the Shortcuts box, giving the Main Screen Body more screen real estate to work with. In this collapsed state, moving the cursor over the small remaining Restore arrow will provide access to the two functions – displaying them superimposed on the Main Screen Body. Clicking on the Restore arrow (or in Claro, clicking the icon again) brings the shortcuts box back into the screen layout.
- Note: When using some themes, it is the tab or module list that is collapsed to the side, not the Shortcuts box. The Collapsed (or not) status of each user’s interface is retained between sessions, and you may prefer to operate the system permanently in the collapsed state. On smaller screens you may find that the side panel collapses automatically to make more room for the main panels.
- 3.2.1 Theme Choices and Interface Changes
- 1CRM is supplied with four themes: Claro, Delight, Spectrum and Flex. Throughout this guide most illustrations use the Claro theme or the Flex theme.
- The Delight, and Spectrum themes support an important layout option in 1CRM, offering a choice of navigational paradigms - Grouped Modules or just Modules. The Modules paradigm simply means that all the modules in the system are listed linearly - whether it is across the top of the screen, or down the left side, depending on the theme. The Grouped Modules paradigm means that modules are grouped according to functional business areas, such as Sales & Marketing, Customer Service, or Order Management. This creates in effect a two-level menu system - first the user selects a Group such as Sales & Marketing, and then they select a Module from the set of modules within the Group such as Accounts or Contacts.
- Note: The Claro and Flex themes only support Grouped Modules navigation.
- Claro Theme
- The Claro theme (see Figure 15 above) is one of 1CRM’s most modern themes, with a clean and simple design plus a focus on more white space, modern font design and high resolution icons. It also offers a choice of colours with a control in the footer.
- A key aspect of using the Claro (and Delight) themes compared to the other themes is that a lot of the user controls are on a menu bar at the top edge of the browser window.
- License Info: Clicking on it goes right to the License Information screen within Admin if you have administrator rights, or to the About page if not.
- Search Box: Click on the search box to enter text to search for.
- Calendar Info: Clicking on this goes to Calendar Day. Hovering over it shows the links to go to Calendar Week and Month views.
- Mail Info: Clicking on this goes to the Inbox. Hovering over it shows links to Inbox and to Compose or Check Email.
- User Management Links: Clicking on this goes to your My Account page. Hovering over it shows you options for Admin (if you have administrator rights), My Account, Directory and Logout.
- The Claro theme shows group or section names across the top of the 1CRM screen, with the secondary menu of modules in a dropdown from the group name. These dropdowns may be used to navigate directly to a selected module at any time. As well, a ✚ icon to the right of most modules enables the user to quickly navigate to the create new item screen for that module at any time. Try it now - you’ll like it!
- A special feature unique to the Claro theme is that on Detail and Edit views, the top element of the sidebar is an expandable List view. You can set the default length of the list in Admin - System Settings. If you select an item on a List view to open in the Detail view, any filters in effect on the List view will also be in effect in the expandable list view in the sidebar, allowing you to browse through the filtered List view items using a two-panel interface.
- Delight Theme
- This theme (see Figure 16 above) offers the following theme controls in the top right of the screen:
- Colour Choice (four colour buttons, which also change the tab style, and top image)
- Texture (this button toggles texturing on and off)
- Font Size (three font size buttons)
- Some of the other key features of the Delight theme are:
- Support for navigation via the Grouped Modules or Modules paradigms (an option found in My Account, under Layout Options)
- Support for Shortcuts on top (an option found in My Account, under Layout Options)
- Support for Last Viewed on side (an option found in My Account, under Layout Options)
- The License Information, Search Box, Calendar Information, Mail Information and User Management links are in a menu bar at the top of the browser window, and stay there despite any scrolling of the screen
- The Delight theme shows group or section names across the top of the 1CRM screen, with the secondary menu of modules listed down the left side, and also in a dropdown from the group name. Like Claro, a feature of these dropdowns is that they may be used to navigate directly to a selected module at any time. Delight also offers the ✚ icon to the right of most modules, enabling the user to quickly navigate to the create new item screen for that module at any time.
- Spectrum Theme
- This theme (see Figure 17 above) offers the following theme controls in the top right of the screen:
- Colour Choice (five colour buttons)
- Font Size (three font size buttons)
- Some of the other key features of the Spectrum theme are:
- Support for navigation via the Grouped Modules or Modules paradigms (an option found in My Account, under Layout Options)
- Support for Shortcuts on top (an option found in My Account, under Layout Options)
- Support for Last Viewed on side (an option found in My Account, under Layout Options)
- The Spectrum theme shows group or section names across the top of the 1CRM screen, with the secondary menu of modules listed on a line underneath them. Using your mouse cursor, just hover over the menu group names to see the associated modules below.
- The Spectrum theme (and most of the other themes) offer the following user controls near the top of the screen.
- License Info: Clicking on it goes right to the License Information screen within Admin if you have administrator rights, or to the About page if not.
- Search Box: Click in the search box to enter text to search for. Click on the magnifying glass icon to select what modules are to be searched.
- Calendar Info: Click on today’s date to go to Calendar Day. Click on Week and Month links to go to Calendar Week and Month views.
- Mail Info: Click on the mail envelope icon or count of unread emails to go to the Inbox, or click on the Check Email link.
- User Management Links: Separate links are shown top right for My Account, Directory, Admin (if you have administrator rights) and Logout.
- Flex Theme
- This dramatically modern theme (see Figure 18 above) offers the following controls in the top right portion of the screen, in order from left to right:
- My Account link - shown as a vignette of the user’s photo - marked with callout 5
- Mail Info - marked with callout 8: displays your unopened email count, and links to the Inbox
- User Management links - the
 control is used to open and close the dropdown shown, which offers these links: Logout, Directory, About, Administration, and Customize.
- Note: License information (Callout 6) is shown in the page footer, unlike the other themes.
- The Flex theme shows group or section names across the top of the 1CRM screen, with the secondary menu of modules listed across a few lines underneath them. Using your cursor, just hover over a menu group name to see the associated modules below.
- The Flex theme is particularly notable for its range of customization. Click on the Customize link to see Figure 19 below:
- To set a background image for your theme, enter a full web address to an image file such as in the example shown, then click on Save. Use Remove to clear your background image.
- Click on any of the 12 colour schemes on offer. Some have default background images and some do not.
- Note: Each theme offers the option to click in the top part of its box, by the name, or in the bottom part of the box containing a contrast icon. You will notice subtle differences between the two that may better suit custom images.
- Once you select a colour scheme the customization popup disappears, and your new colour scheme is applied to the current 1CRM screen.
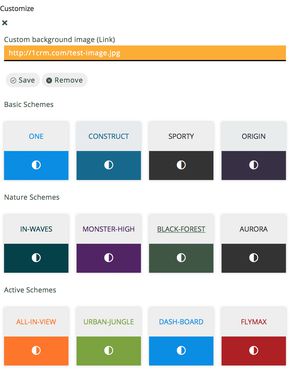
- Figure 19: Flex Theme Customization
- 3.2.2 Exploring the User Interface
- Using the Claro or Flex theme, scan across the menu system and the User Management Links, to get an idea of all the capabilities packaged together in this system. There are many of them, grouped into the functional areas shown on the top level of the menu system - Today’s Activities, Sales & Marketing, Order Management, Project Management, Customer Service, Reports & Settings.
- Each menu group on the top level of the menu system has a list of menu functions (or modules) on the lower level of the menu.
- For more information on the 1CRM user interface, we recommend you review the relevant videos in the 1CRM Video Learning Library.
- 3.3 What’s in a CRM?
- So – here we are – 1CRM!
- Let’s get a little more familiar with using the system. First, (and we will assume you are using the Claro or Flex theme from now on) try clicking on a few of the menu tabs – such as Accounts or Contacts within the Sales & Marketing menu group. The module (basically, different sets of information are organized within different modules, and each module has a tab you click on to use it) screens are displayed within your browser very promptly after you click on them – 1CRM is nice and fast! And your server and browser both cache (remember) certain portions of the screen displays for each module, so each screen gets even faster after the first time or two you access it.
- 1CRM 8.6 contains the following 63 modules, organized by these menu groups:
- Today’s Activities (11)
- Home Dashboard
- Action Items
- Calendar
- Meetings
- Calls
- Tasks
- Notes
- Email (and Email Templates)
- Forums
- Chats
- Sales & Marketing (11)
- Accounts
- Contacts
- Campaigns (and Targets, Target Lists)
- Leads
- Opportunities
- Partners
- Marketing Events
- Forecasts
- Documents
- Order Management (19)
- Quotes
- Sales Orders
- Invoices
- Credit Notes
- Shipping
- Payments
- Purchase Orders
- Bills
- Receiving
- Product Catalog
- Discounts
- Subscriptions (and Plans, Addons, Options, Coupons and Customer Levels)
- Commissions
- Price Books
- Project Management (7)
- Projects (and Project Tasks)
- Human Resources
- Booked Hours
- Timesheets
- Expense Reports
- Booking Categories
- Customer Service (9)
- Service Contracts
- Supported Products
- Recurring Services
- Cases
- Software Bugs (and Products, Releases)
- Knowledge Base (and Topics)
- Reports & Settings (6)
- Reports
- Dashboards
- Activity Log
- System Bulletins
- Data Privacy
- Administration (optionally, for those with administrator rights)
- Note: You will see a number of other menu options in several of the menu groups - such as Sales Home, or Sales Charts. These are additional Dashboard pages which will be discussed later on in the Dashboards section. Their display in flat menus like those used in the Spectrum or Delight themes when set for the Modules navigation paradigm (not Grouped Modules) may be enabled or disabled using a checkbox (Act as Flat Tab) on their entry in the Dashboards module. When using a flat menu system, the Home Dashboard has a Select Dashboard button at the top to view any dashboard page you choose.
- The System Administrator can control which users will be able to see and use which modules, so many users will not actually see all the modules listed above.
- From the Home Dashboard where the system ‘wakes up’, you can access any Module with which you want to work, by clicking on the tab that bears its name. Modules help you work more efficiently by grouping the tools and functions you need to perform specific tasks.
- Note: Not every module in the system has a tab, such as modules most often used in relation to another module, for example Email Templates, Targets, or Project Tasks.
- Here is a quick overview of the most important modules contained in 1CRM:
- Home Dashboard
- The Dashboards module in Reports & Settings allows you to create any number of Dashboard pages. By default, 1CRM creates two at the beginning of the Today’s Activities group - Home Dashboard and Action Items, and two more (one at the start and one at the end) in each of the other tab groups except Reports & Settings. Although any Dashboard page can contain any selected mix of dashlets and charts, this page, as the first page you will see when logging into 1CRM, initially contains your Calendar, the NotePad, Stock Prices and Weather dashlets, plus other items of general interest. The Home Dashboard also includes shortcuts to enter most sorts of data.
- Action Items
- Although any Dashboard page can contain any selected mix of dashlets and charts, this page initially contains your Email Inbox, plus dashlets for My Calls, My Meetings, My Open Tasks, and Updated Forum threads. Action Items also includes shortcuts to enter most sorts of data.
- Calendar
- View your (and optionally your colleagues’) calendar-based activities (by day, week, month or year), including Meetings, Tasks, Calls, Project Tasks and Events. Schedule new Calls or Meetings, check colleagues’ availability, schedule recurring meetings, and view a resource calendar (by day or week) to check for free meeting rooms etc.. Being able to share your calendar with your co-workers is a powerful tool for co-ordinating your daily activities.
- Meetings, Calls, Tasks, Notes
- Together with Emails, these four modules comprise what are called Activities in 1CRM. They offer the ability to create or update scheduled activities, or to search for existing activities. By managing Activities within the context of an Account, Contact, Lead, Opportunity, or Case, the true value of 1CRM comes to light. 1CRM allows you to manage the myriad of calls, meetings, notes, emails and tasks that you need to track in order to get your job done.
- Tasks are for tracking any action that needs to be managed to completion by a due date.
- Notes allow you to capture note information as well as upload file attachments.
- Calls allow you to track all of your phone calls with leads and customers.
- Meetings are like calls, but also allow you to track the location of the meeting.
- Email
- The Email module lets you compose and send emails from within 1CRM, and associate sent mail items with Contacts, Accounts, Projects, Leads, Cases, Opportunities, or Bugs. Incoming email may be received from one or more mailboxes via POP3 or IMAP, and filed in user-created personal email folders.
- Forums
- The Forums module provides the ability to create discussion threads, and attach them to most common items of information in 1CRM. Users can register for notifications for specific threads, and there is also a dashlet provided to show recently updated threads.
- Chats
- The Chats module holds Chats passed into the CRM from an integrated website chat system such as LiveChat. Completed Chats are displayed as part of the History sub-panel on Leads and Contacts, offering another useful source of information about a form of customer contact (often known as a customer Touch).
- Accounts
- View a paginated account list, or search for an account. You can click on a specific account to zoom in on the detailed account record. From a specific account record, you may link to related contacts, activities, leads, opportunities, cases, or member organizations.
- Accounts are the companies with which your organization does business. 1CRM allows you to track a variety of information about an account including website, main address, number of employees and other data. Business subsidiaries can be linked to parent businesses in order to show relationships between accounts.
- Contacts
- View a paginated contact list, or search for a contact. You can click on a specific contact to zoom in on the detailed contact record. From a specific contact record, you may link to the related account, or leads, opportunities, cases, or direct reports (related contacts).
- Contacts are the people with whom your organization does business. As with accounts, 1CRM allows you to track a variety of contact information such as title, email address, and other data. Contacts are usually linked to an account, although this is not required.
- Using selected sets of Contacts, you can perform a Mail Merge to create personalized letters in PDF format. Or you can perform Quick Campaigns to Email them personalized Emails from HTML templates.
- Campaigns
- You can create 1CRM marketing campaigns to track and manage your business’ marketing campaigns and targets. Email templates are used which support variable data substitution for sending personalized mass emails.
- Leads
- View a paginated list of leads, or search for a specific lead. You can click on an individual lead to zoom in on the lead information record. From that detailed lead record, you can link to all related activities, and see the activity history for the lead.
- Leads are the people or companies with whom your organization might do business in the future. Designed to track that first point of interaction with a potential customer, leads are usually the hand off between the marketing department and the sales department. Not to be confused with a contact or account, leads can often contain incomplete or inaccurate information whereas contacts and accounts stored in 1CRM are core to many business processes that require accurate data. Leads are often fed into 1CRM automatically from your website, trade show lists or other methods. However, you can also directly enter leads into 1CRM manually.
- Opportunities
- Opportunities track the process of selling a good or service to a potential customer. Once a selling process has commenced with a lead, a lead should be converted into a contact, an account and an opportunity. Opportunities help you manage your selling process by tracking attributes such as sales stages, probability of close, deal amount and other information.
- Use the Opportunities module to view a paginated list of opportunities, or search for a specific opportunity. You can click on an individual opportunity to zoom in on the opportunity information record. From that detailed opportunity record, you can link to all related activities, see the activity history for the opportunity, and link to related lead, account and contacts.
- Partners
- The Partners module defines your sales partners, which may be linked to Leads, Accounts, Opportunities, and Invoices – and helps track their role in finding and closing new business.
- Marketing Events
- The Marketing Events module defines Marketing Events, and tracks and manages the registration and attendance of Leads and Contacts (Accounts in B2C mode) at one or more sessions per event. Email reminders may be programmed in the run-up to the event.
- Forecasts
- The Forecasts module allows each sales person to review his or her opportunities which are due to close in a given forecasting period, and to commit a forecast for that period. Sales management can set sales quotas, and review opportunities, weighted opportunities, and opportunity totals classed as Pipeline, Best Case, and Commit. The roll-up of sales forecasts through the organizational hierarchy may be reviewed, and the reporting structure navigated through a drill-down interface.
- Documents
- Lets the user create, update, or search for and access all sorts of revision-controlled corporate documents, from HR policy documents, to sales price lists, and health claim forms.
- Quotes
- Quotes may be prepared for clients, using data from the Product Catalog. Prepared quotes may be converted to Acrobat PDF format, and emailed directly to the client. Quotes may also be converted to Sales Orders or Invoices.
- Sales Orders
- Sales Orders are an intermediate stage between Quotes and Invoices – and not all businesses will choose to use them. They are most useful for businesses that often have to manufacture products ordered from them, or frequently part-ship orders, and need an order desk to track when orders have been fully shipped. The Sales Orders module can prepare packing slips and sales orders in PDF format.
- Invoices
- Invoices may be prepared for clients, using data from the Product Catalog. Prepared invoices may be converted to Acrobat PDF format, and emailed directly to the client. A shortcut is available within this module to create Incoming Payments and apply them against invoices.
- Credit Notes
- Credit Notes are used to reduce the amount due from a client on one or more invoices. They may involve sending a cheque to a client as a full or partial refund, or simply reducing their balance due if payment has not already been received.
- Shipping
- The Shipping module manages full or partial shipment of sales orders or invoices, links quantity shipped to each line of Invoices, generates packing slips, tracks product serial numbers, and decreases stock levels automatically.
- Payments
- 1CRM records both incoming and outgoing payments. Incoming payments are linked to Invoices, and reduce the balance due (Receivable) on one or more Invoices. Outgoing payments re linked to Bills from Suppliers, and reduce the balance due (Payable) on one or more Bills.
- Purchase Orders
- Purchase Orders may be prepared for suppliers, using data from the Product Catalog. Once purchase orders are prepared, they may be converted to Acrobat PDF format, and emailed directly to the supplier.
- Bills
- Bills are used to record incoming Invoices from Suppliers. These bills may be the direct result of issuing a Purchase Order, or they may be some miscellaneous bill for which no P.O. was issued. To speed the process of creating a bill that results from a P.O., purchase orders have a Convert to Bill button to convert them into a bill. Shortcuts are available within this module to create Outgoing Payments and apply them against purchase orders, and to view a list of all outgoing payments.
- Receiving
- The Receiving module links quantity received to each line of Purchase Orders, links to the Sales Order (if any), and increases stock levels automatically.
- Product Catalog
- The Product Catalog contains details of Products and Assemblies (complex products specified as a set of simple products) which may be quoted and sold to customers.
(Note: Ad-hoc products may also be quoted and sold, so not all products must be in the catalog).
- Discounts
- Discounts may be defined as either Fixed discounts, or as Percentage discounts. In either case, a discount may be defined as applicable to all products, or as only applicable to a specified list of products from the catalog.
- Subscriptions
- The Subscriptions module lets you manage any subscription services you offer to clients. Define the Plans you offer, and track all your client Subscriptions over time. Clients may access the 1CRM Customer Connection Self-Service Portal to self-manage their subscriptions! Used within Subscriptions are the modules for Plans, Addons, Options, Coupons and Customer Levels.
- Commissions
- Commissions are used to track commissions earned by sales people, on either Sales Orders or Invoices. The system admin can set overall commission rates, and commission splits may be defined on a deal by deal basis.
- Price Books
- Define multiple price books, and assign a default price book to each client. Cater to a mix of retail and distribution clients, or smaller vs. larger clients, with a convenient price book for each pricing channel or level. Each client will get the pricing from their assigned price book for all quotes and invoices and as usual, users may override these default prices if permitted.
- Projects
- View a paginated list of projects, or search for a specific project. You can click on an individual project to zoom in on the project information record. From that detailed project record, you can link to all related activities, see the activity history for the project, view all related project tasks and documents, and link to project contacts.
- Human Resources
- The HR module records employee data such as salary, dependants, emergency contact info, as well as vacation and sick days taken. Note that it can keep records on employees marked as Info Only – who cannot login to 1CRM, but can still be documented for HR purposes.
- Booked Hours
- Booked Hours may be created in the Cases or Projects modules, or in the Calendar. They record time spent on Cases or Projects, or on other business tasks. Eventually every Booked Hours entry ends up as a line on a timesheet, regardless of where it was created.
- Timesheets
- Users may file timesheets weekly, bi-weekly, semi-monthly or monthly, to record the time they have spent on Project Tasks, service Cases, or other activities. All timesheet entries are automatically allocated to the related project or case if relevant, and project costs are tracked monthly and compared to estimates.
- Expense Reports
- Expense Reports are used to record personal expenses incurred on the business’ behalf, and to enable employees to claim those expenses back from the business.
- Booking Categories
- Booking Categories are a critical part of recording your time and expenses, as well as generating recurring invoices for Recurring Services. Each Booking Category has a Booking Class, the options for which are Billable Work, Non-Billable Work, Expenses and Recurring Services. These allow you to define Booking Categories to be used for hours booked to Cases and Projects (Billable or Not Billable), as well as for line items on Expense Reports and for the types of services you offer as Recurring Services.
- Service Subcontracts
- View a paginated list of service subcontracts, or search for a specific subcontract. The paginated list shows the expiry status of each subcontract. You can click on an individual service subcontract to zoom in on its detail record. Each subcontract detail record shows a list of what Supported Products are covered by that subcontract, and a list of any Cases which have occurred which are associated with that subcontract.
- Supported Products
- View a paginated list of supported products, or search for a specific product. You can click on an individual product to zoom in on the product information record. From that detailed product record, you can see the account which owns the supported product, and the service subcontract which covers the product, as well as supplier and pricing information.
- Recurring Services
- Define a service which is delivered over time, and for which a recurring invoice needs to be emailed to the client, as well as to an associated employee. Recurring Services work well for businesses with subscription models such as Internet Service Providers, or Managed Service Providers. Invoices may be generated monthly, quarterly or annually.
- Cases
- Cases are the handoff between the sales department and the customer support department. Cases help customer support representatives manage issues or inquiries to completion by tracking information for each case such as its status and priority, the service contract, asset description and serial number, the user assigned, as well as a full trail of all related open and completed activities and Booked Hours.
- Use this module to view a paginated list of cases, or search for a specific case. You can click on an individual case to zoom in on the case information record. From that detailed case record, you can link to all related activities, see the activity history for the case, and link to related contacts.
- Software Bugs
- Tracking software bugs is an important function of a customer support department. The Software Bugs module helps customer support representatives manage software-related support problems or inquiries to completion by tracking information for each bug such as its status and priority, its resolution, the user assigned, the release of software involved, its type (defect or feature) as well as a full trail of all related open and completed activities.
- This module lets you view a paginated list of reported software bugs. You can click on an individual bug to zoom in on the detailed bug report. From that detailed bug report, you can link to all related activities, see the activity history for the bug, and link to related Contacts, Accounts, and Cases.
- Knowledge Base
- The Knowledge Base module provides single-click article creation from Service Cases, plus the ability to use conventional detail and edit views to create and edit articles. Articles may be full-text searched, and binary files and 1CRM Documents may be linked to articles; checkboxes control if articles may be seen by clients in the 1CRM Customer Connection Self-Service Portal.
- Reports
- A report designer and generator is provided, which may be used to develop your own custom reports as desired. A number of standard reports are included as well to kick start reporting.
- Dashboards
- The Dashboard tab displays a list of definitions for Dashboard pages throughout the system. Ten are created by default, but you can have more or less. Each Dashboard can contain any mix you like of selected dashlets and charts. Dashboards may be prepared and yet not published until a later date if preferred. They can be individual to a user, or shared with all users. And once defined they may be moved around from one tab group to another, or within a tab group.
- Activity Log
- This module allows users to see who is doing what within 1CRM - and sometimes more importantly, who did what. A dashlet is provided to access Activity Log data, or you can prepare reports within the module itself.
- System Bulletins
- This module is used to post news messages to all system users about things such as system upgrades, planned outages, or any other upcoming changes. A dashlet is provided to make sure these messages are visible, and you can prepare messages using the module itself.
- Data Privacy
- This module is used to manage all 1CRM Data Privacy Activities. These include Request to View, Right to Erase, Consent to Process and Withdrawal of Consent. See more details in the 1CRM and GDPR document.
- Administration
- The Administration module is used by supervisory users to define a number of configuration settings that control the 1CRM experience for all the other users. Data access control, email settings, user management, system repairs and upgrades… these are all tasks addressed within the Administration module.
- 3.4 How Do I Operate a CRM?
- 3.4.1 Selecting a Module…
- 1CRM has several selectable themes, including Claro, Delight, Spectrum and Flex. All of these offer menus that consist of a series of tabs across the top of the screen (images in this User Guide typically show the Claro and Flex themes).
- From the Home Dashboard –
- Using the menu system offered by the theme you have selected, click on the tab that shows the name of the Module you wish to use. All of the Module screens use the same basic layout – making it easy for you to move from one area of the application to the next.
- 3.4.2 List View Screens and Module-Level Searching
- The main body of most Module screens (Dashboards, Calendar, and Administration are the main exceptions) have three main elements to them – a choice of layout tabs at the top, a list view of items below, and a collapsible Mass Update and Teams Assignment panel at the bottom. As an example, look ahead to Figure 23 (The Accounts Module). Usually the layout tabs include Browse All and Quick Filter tabs, as well as a Reports tab. Additional layouts tabs may be included as standard - such as the Customers and Suppliers tabs in the Accounts list view. And more layout tabs called Smart List tabs may be custom defined by the user. The Browse All tab includes a basic search capability, and the Quick Filters tab includes an extensive set of search options. You can see these Browse All and Quick Filter layout tabs on Figure 23.
- When working on the list view for a module, you can work with the complete list of all data for that module, or use a search filter to reduce it to a more manageable size. To use a search filter, simply select the Browse All or Quick Filter layout tab, type in one or more boxes, and click on the Apply Filter button below the search/filter panel.
- Text entered in search fields will match starting at any position in the field – for example fred will match Frederick, or Alfred, in a first name field. If text is entered, or a selection is made, in more than one filter field, then a record must match on all those fields to be included in the filtered list.
- 3.4.3 System-Level Searching
- Using the system level search box (see highlighted item 4 on Figures 15-18 above) is much the same, only it searches whichever of these modules you select: Accounts, Bills, Software Bugs, Contacts, Email, Leads, Calls, Cases, Expense Reports, Meetings, Notes, Opportunities, Partners, Payments, Projects, Project Tasks, Purchase Orders, Quotes, Sales Orders, Tasks and Users. It looks for the search text to match in selected fields for each module (the fields are defined in module metadata). Then all matching records are displayed in a series of successive lists.
- Note: You can select if search strings will match at any point in a field, or only from the beginning.
- Note: Each List View screen also has a
 Help icon to access the Online Guide for 1CRM.
- 3.4.4 Smart List Tabs
- Within the layout tabs on every list view screen you can also see a special tab at the far right labelled simply
 . Selecting this tab allows you to create your own custom layout tabs called Smart List tabs, using the settings of the current tab as a starting point.
- When defining a Smart List tab, the Edit Layout popup is displayed with tabs labelled General (to set the layout’s name and description), Filters (to filter which data items you want to see in this layout), Column Layout (to define the columns of data to be presented), and Sorting (to set one of more levels of data sorting). 1CRM has been designed in a manner such that these Smart List tabs on list views are actually very similar to reports. In fact, the Edit Layout popup is very similar to the popup for Edit Report, and so we will explain both of them in the same section later in this guide. (See section 9.1.2: Creating New Reports).
- As several Smart List tabs may be defined for any specific module, you can choose between them to see the same data presented a number of different ways. Simply click on the tab you want for any custom or standard layout.
- Note: 1CRM will remember your current layout tab for each module until your session ends.
- Arranging Smart List Tab Order
- Second from the end on the right of the layout tabs on each list view you will find a tab labelled
 . Click on this tab to change the order of your layout tabs. A popup dialog box is displayed which allows you to drag the tabs you have defined up and down in display order. Particularly useful is the ability to move a tab you have defined yourself to the top of the list, so it becomes this module’s new default list view. You can also mark tabs as Visible or not, letting you keep some definitions available but inactive if you like.
- 3.4.5 Keyboard Shortcuts
- To complement the normal 1CRM navigation using mouse, trackpad or touch screen, there are also a series of very useful keyboard shortcuts especially for those that use the system a lot:
- List View Keyboard Shortcuts
- a/z move up and down the list
- n/p move to the next or previous page
- N/P move to the last or first page
- +/- show more or fewer rows
- v view the currently selected list item
- c create a new list item
- m check/uncheck (mark) the current list item
- M mark/unmark page
- 1-9 select the corresponding list item
- / focus the text filter field
- ? focus the system search field (anywhere except in a text box)
- u toggle expand/collapse of mass-update panel
- l return to list
- A/Z mark row and move selection up/down
- <Up> <Up> <Down> <Down> <Left> <Right> <Left> <Right> ba <Enter> (Konami)
- Detail View Keyboard Shortcuts
- e edit the current item
- d duplicate the current item
- x delete the current item
- return to list view (like gmail)
- 3.4.6 Detail View Screens and Sub-panels
- From a module’s list view, clicking on any entry in the list will bring up the detail view for that item – for example the full details of a Contact, or an Account. This detail view shows more information than the list view for the specific item selected. It also shows all associated items of information, and lets you click on links to them. For example, the Accounts detail view screen lists all associated open Activities (tasks, meetings and calls that are not yet completed), History (notes, emails, plus completed tasks, meetings, & calls), Contacts, Member Organizations, Events, Cases, Documents, Threads, Software Bugs, Projects and Supported Products.
- Like a list view, a detail view can also have multiple tabs in the display, as for example the Accounts module does. The Accounts module offers a Sales Information tab (for Accounts that are Customers rather than Suppliers) with information panels for related Opportunities, Leads, Quotes, Sales Orders, Invoices and Expense Reports. These lists of related information are called sub-panels.
- This listing of associated items as sub-panels is really the fundamental power of the 1CRM system – the system associates and represents information in much the same way that your brain thinks, and lets you navigate or explore the information that way. Figure 20 below shows a sample detail view screen for the Accounts module.
- Each detail view screen layout includes several handy controls:
- Return to List – This link at the top right of each detail view may be used to return to the list view for that module.
- Action Button: This button
 offers several dropdown options:
- View Change Log – Each module’s change log tracks certain key field values on every record. A change log entry is automatically created each time any of these fields is changed, noting the field changed, the old and new values, the user that made the change, and the date of the change.
- Arrange Subpanels – Use this link to re-order the subpanels of any Detail View. This is a personal preference for the current user only, and also permits subpanels to be made Visible or Invisible. Note: Subpanels may also simply be dragged into your preferred order.
- Customize Tabs – Use this link to add, remove or re-order additional tabs on any Detail View. (See the Accounts module Sales Information tab for an example of additional tabs on a detail view.) Once new tabs have been added, admins may use the Layout Editor to manage the fields shown on the layout for each tab. Note: Only Admin users will be offered this link.
- Show Actions – This link will show you any pending workflow actions for this record.
- Edit Custom Fields – Use this link to define custom fields for the current module. Note: Only Admin users will be offered this link.
- Edit Layout – Use this link to alter the screen layout for the current module.
Note: Only Admin users will be offered this link.
- Create Mobile Layout – Use this link to create a custom mobile screen layout for the current module. Note: Only Admin users will be offered this link.
- Show/Hide Controls for each sub-panel – To the right of each sub-panel title, there is a chevron
 pointing up or down. This is used to show or hide the main body of the sub-panel, enabling the user to limit vertical screen scrolling, focus on the data that is important to them specifically, and to reduce bandwidth requirements of each screen (which will increase system performance). Click on it to hide the sub-panel main body, and to restore it.
- Each Detail View screen also has a
 Help icon to enable the user to access the Online Guide for 1CRM.
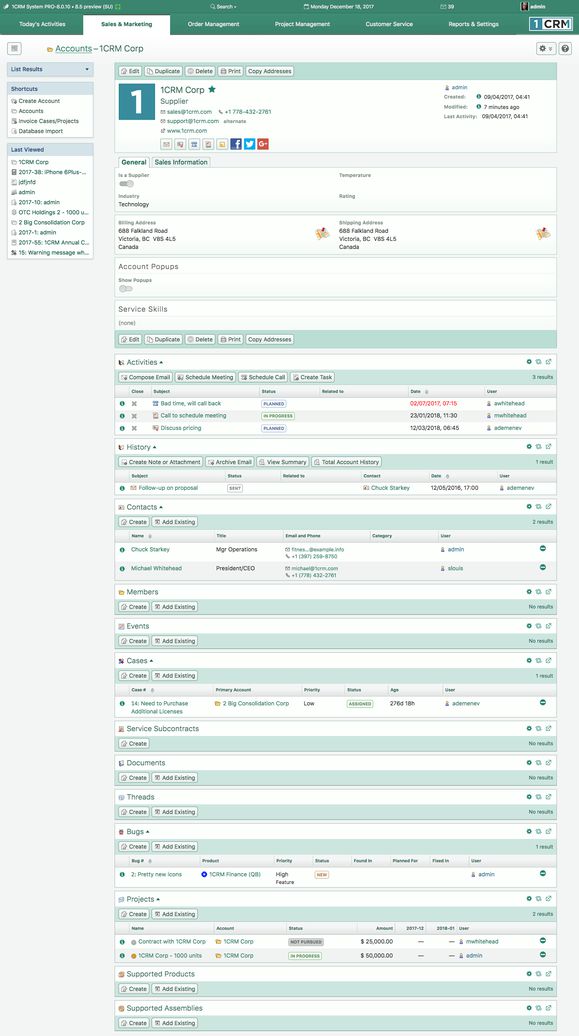
- Figure 20: The Account Detail Screen (Sidebar List View Expanded)
- 3.4.7 The 1CRM Online Guide
- Most List and Detail views in 1CRM offer a
 Help icon at the top right of the screen to access the Online Guide. The Online Guide contains the text and images from this User Guide, in an HTML format. When the Online Guide is displayed, it comes up in a new browser window. It offers a collapsible navigation tree in a panel on the left, with controls to Collapse all or Expand all branches.
- When you first open the Online Guide, if 1CRM can recognize what module you are using when you click on the
 Help icon, it will enter the Online Guide with the content for that module open. You can click on any right-pointing blue triangle to expand a branch, or click on a downward-pointing one to collapse a branch. Blue diamonds indicate the end of a branch - a leaf.
- There is a link at the top to download a PDF of the full 1CRM User Guide. As well, there is a Print icon to print the current section of the User Guide that you are reading in the Online Guide.
- You can access the information in the Online Guide by navigating to a specific section with the navigation tree on the left, then browsing the text in the main panel, as shown in the Figure below.
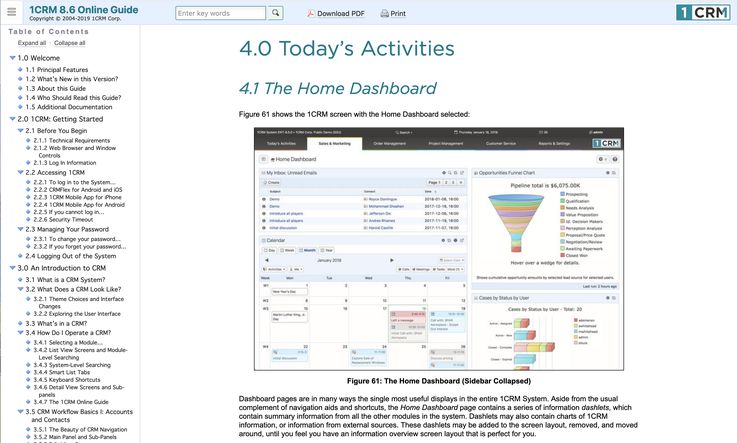
- Figure 21: Online Guide Navigation
- Alternatively you can enter search text in the search box, and click on the Search button, as shown in Figure 22. In this case, the navigation tree panel is replaced by the search results. You can click on any result to see the detailed content associated with it in the main panel. After you have clicked on at least one search result, you can click on the Next and Previous arrows to step through the search results forwards or backwards.
- When you have finished looking at a set of search results and want to return to normal navigation of the Online Guide, just click on Done Search.
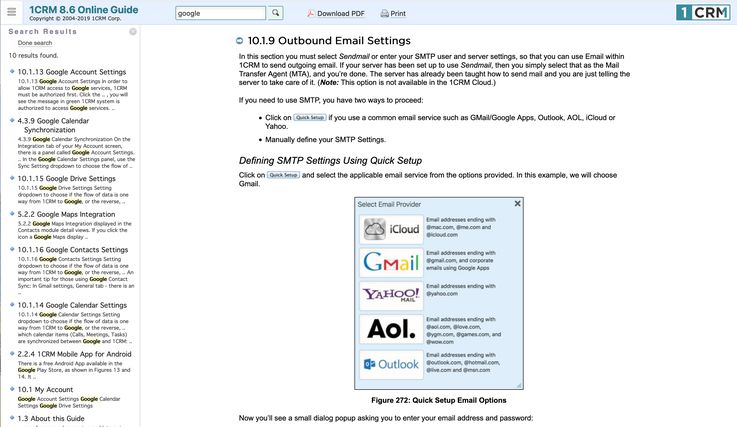
- Figure 22: Online Guide Search Mode
- 3.5 CRM Workflow Basics I: Accounts and Contacts
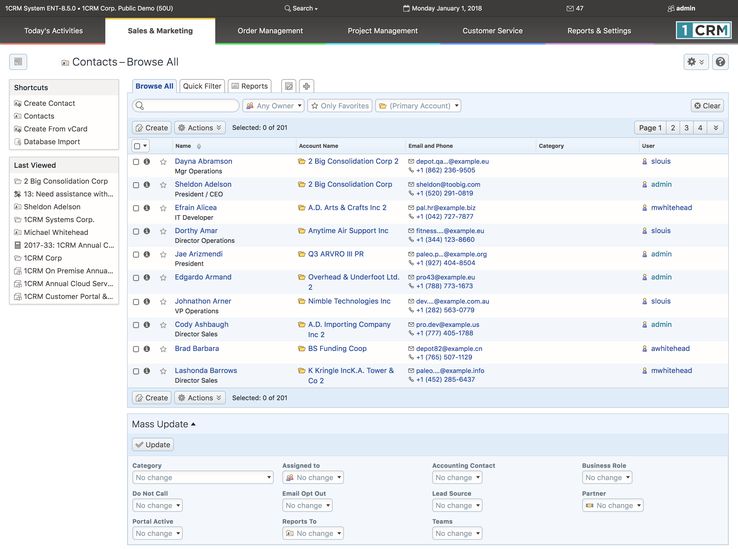
- Now – click on the Sales & Marketing tab in the menu system, and then on the Accounts module in the module list on the left side of the screen. This shows you a list of all Accounts in the system - we shall normally refer to this as the Accounts list view. If you have the 1CRM demo data installed your screen should look something like this:
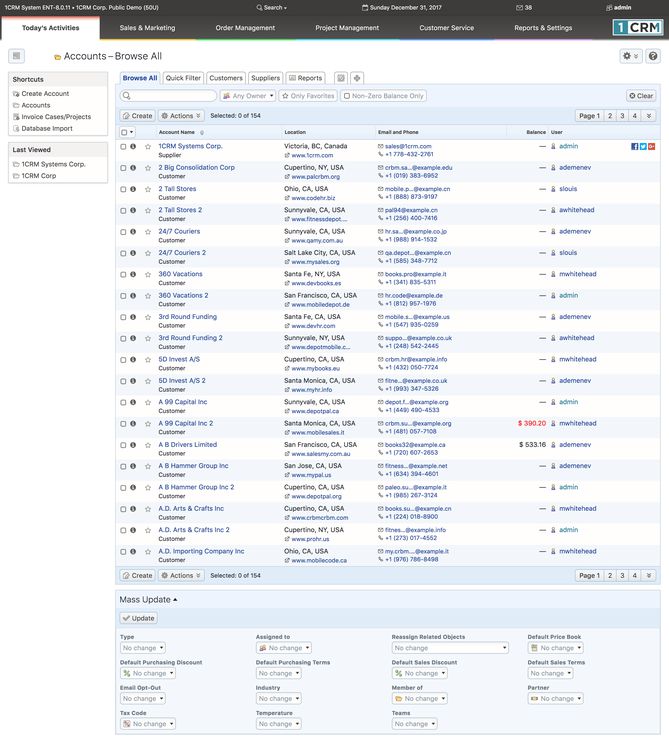
- Figure 23: The Accounts Module - List View
- The data we are showing here is our standard demonstration data - a sample set of accounts, contacts, leads, opportunities, etc.. Clearly, the company names are made up, as we can’t expose information about real companies here, but the sample data here has been created to demonstrate all the key capabilities of the system. Try to imagine that what we are looking at is a list of your accounts – for your organization.
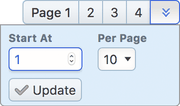
- Figure 24: Pagination Controls
- At the top of the list of accounts, you can see some controls and information that indicate that there are actually 155 accounts in the system, and that you are currently looking at page 1 of several pages of accounts. Page selection controls are provided to page through sections of the full list of accounts, as well as a control to go to the overall start of the list. And if you click on the chevron, you will see a box pop up (as shown) which lets you move your position in the list to wherever you like. Just enter any number for Start At. Optionally also select a new value on the Per Page dropdown control, to temporarily set a new value for the number of lines shown per page, and then just click on the Update button.
- When working on the Accounts list view, you can work with the complete list of all Accounts, or use a search filter to reduce it to a more manageable size or find a specific account. To use a search filter, simply select the Browse All or Quick Filter layout tab, type in one or more boxes, and click on the Apply Filter button below the search/filter panel. All the accounts will be listed which match the filter criteria. More than one limiting criterion may be applied – you could look for all accounts which start with a, and which are in New York City, and all accounts which satisfy those constraints will be listed. To go back to seeing the entire list of accounts, simply click on the Clear button in the search panel to remove all filter conditions.
- It is important to understand that the accounts list shown to you by default is the entire set of accounts in the system. For sales people using the system, they may wish to focus exclusively on their own accounts, which they may do by selecting the Assigned to Me value on the Owner dropdown filter on the Browse All tab. You may also filter with the Non-Zero Balance Only control, which will limit the Accounts list to those Accounts that owe you money.
- Favorites
- You can limit the Account list to only your favorites by clicking on the Only Favorites button. Favorites are a handy way to focus on the most important items in the list view. Each item in the list has a Favorite star you can click on to mark the item as a Favorite, or to remove the Favorite designation at a later date. The following modules offer the Favorites capability:
- Accounts
- Contacts
- Leads
- Opportunities
- Products
- Knowledge Base Articles
- Bugs
- Cases
- Documents
- Email Templates
- Projects
- Reports
- As you move your mouse pointer around within your browser window, you can see that each account name has a link on it, and also a small info icon
 to the left that you can hover over to preview more information from the record. The information preview popup also offers links to View or Edit the item. If you click on the name of an account, you will go to the detail view for that account. Let’s do that now, and click on any account you like. You should see something like the screen shown above in Figure 20.
- 3.5.1 The Beauty of CRM Navigation
- 1CRM is representative of the best CRM systems available in the market for the manner in which the system is used, or navigated. There is a menu system across the top for accessing the different types of information, such as Accounts, Contacts, Documents, Cases, Opportunities, and so on. More important, however, is how related items of information are linked together, and how the user follows those links. Figure 20 above shows an Account Detail screen within 1CRM. This is fairly representative of similar screens in other leading commercial web-based CRM systems you may have come across, such as salesforce.com, NetSuite, Microsoft CRM and SugarCRM.
- We see the top block of information displays the core information about the account – address, contact information, web site, company email address, number of employees, ownership, industry classification, etc..
- The following blocks of information show information that is related to this account, such as ongoing account activities, a history of past account activities, contacts, leads and opportunities within this account, plus ongoing cases (service issues) and projects within the account. Also shown are documents related to the account, products purchased by the account, and any software bugs reported by the account (should that be relevant to your business).
- The power of the system is the manner, and speed, with which it can be navigated. Once an account has been looked up and displayed, the user can click on a contact at that account to see their information. That contact record will include a list of related activities to be performed, and the user can click on those to update them. A related meeting may involve other contacts, and their information is listed, and the user can click on them to check current activities related to those contacts. Are there any ongoing cases? When was the last time we met with them? What products have they been buying from us?
- Each of these questions is answered with a mouse click. And as more and more of the background information of an account, or contact, or opportunity is revealed, the user may have more and more little questions that come to mind – and each of them can be answered with a mouse click too. Because information can be obtained so quickly and easily, and because that information is related and linked in a manner so similar to the way the user’s mind relates those items of information, employees now perform their tasks with a much higher level of knowledge about their customers.
- One particularly handy feature of the 1CRM user interface is the Last Viewed list of items the user has recently accessed – making it quick and easy to return to an item after following links to information it relates to.
- On Account detail view another handy feature is the Total Account History button in the History sub-panel. As opposed to the View Summary button beside it, which shows a list of Activities related to the Account in date order, this button shows a date-ordered list of Activities related to the Account, plus Activities related to Contacts, Projects, Opportunities, Cases or Bugs that are related to the Account, all merged together to give 100% of the Account history in a single view.
- Marshall McLuhan was quite right – the medium is the message. In this case, the medium of a web-based business application, with many linkages between related items of information, makes that information so easy to obtain that it is as if somehow the overall quality of that information has been improved.
- 3.5.2 Main Panel and Sub-Panels
- Examining the Account detail screen, we see a block of general information about the Account at the top, and a series of blocks of information below that with related information, such as Activities, History, Contacts, Opportunities, Leads, Cases, and so on.
- Note: We also see something special on the Account detail view - that is another tab labelled Sales Information, in addition to the default General tab. In effect, the Account detail view has two tabs which together offer the full set of main panel information. And the sub-panels which relate to Sales are shown below the Sales Information tab when it is selected.
- To repeat this key principle, the block of general information at the top is referred to as the main panel. The blocks of related information below that are called sub-panels – so we see a sub-panel for Activities, one for History, another for Contacts, etc..
- We also see a few buttons just above the main panel – Edit, Duplicate, Delete, Print and Copy Addresses. These buttons act on this specific account record, allowing us to Edit it, Duplicate it (to create a similar account), Delete it, generate a statement or PDF account details for it, or Copy account addresses to records in related modules.
- Just above each sub-panel, we also see a number of buttons. Let’s look at the Activities sub-panel as a specific example. This sub-panel offers buttons for Create Task, Schedule Meeting, Schedule Call, and Compose Email. While we will discuss these different activities in more detail shortly, for now it is enough to understand that these buttons allow you to add new activities into this detail view screen, which are automatically linked to, or associated with, this particular account.
- Within the Activities sub-panel, notice that there are links on the Subject and Related To fields within each activity. Clicking on these links will take us to the detail view of the activity or the related account (oops – we’re already there!). This is your first glimpse of the enormous power of the links within a CRM that speed navigation between related items of information.
- For each of the other sub-panels, these similar principals apply – buttons and links are provided to create new items of information related to the current account, to edit or delete those items of information, or to go to the full detail view of those related items of information.
- As well, on sub-panels like Contacts for example (and Projects, Bugs, Cases, etc..), to the right of each Contact listed, notice the link
 for removing the relationship between each Contact and the Account.
- 3.5.3 Edit View Screens
- If you look on the left hand side of your screen, you will see the navigation Shortcuts box. Also notice that in the Figure below, you can see the Last Viewed items listed on the left side, rather than at the top. This is configurable using a setting in the My Account screen, in the Display Options section.
- From the Shortcuts menu, click on the Create Account shortcut. You will see the Account edit view screen:
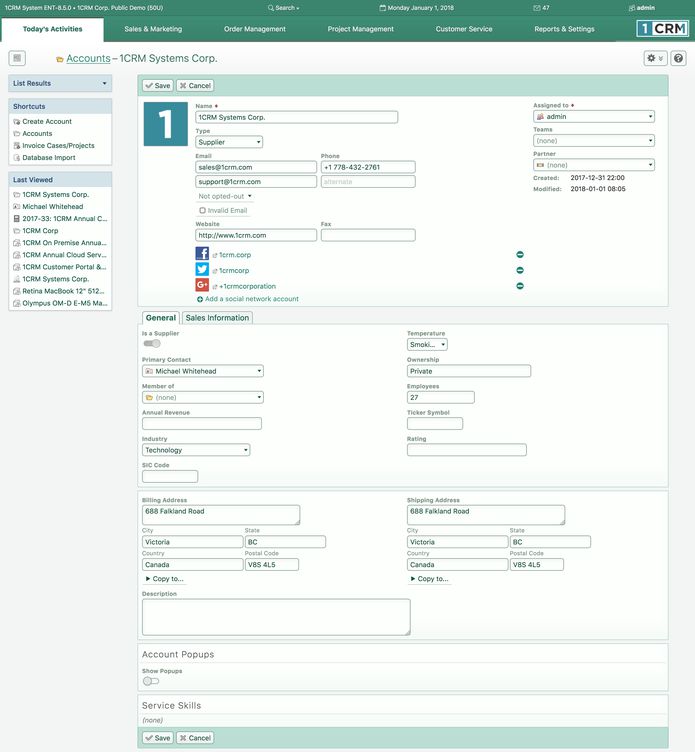
- Figure 25: The Accounts Module - Edit View
- For some first-hand experience we are going to create a sample account for 2 Big Consolidation Corp. Similar to the sample screen shown above for 1CRM Systems Corp., enter the data for the 2 Big business, and then click on the Save button. You will be directed to the account detail view screen for the 2 Big account once you finish.
- Working with Different Field Types
- As you enter data in the edit view, notice that not all fields behave the same way. This is because they contain different types of data. Some of the different field types are:
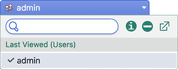
- Lookup Fields: Several of them, such as Member Of, Via Partner?, and Assigned To are Lookup fields
 such as this. Note the micro-icon at the start of the field and the down arrow at the end. The micro-icon is designed to let you know the field type - in this case, a user.
- Figure 26: A Lookup Field
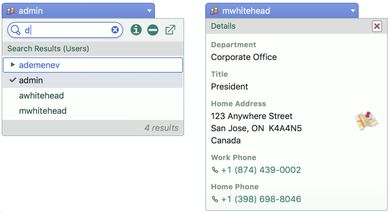
- Clicking on the down arrow reveals the expanded view of the lookup field as shown above. This expanded view includes:
- A search field: Simply start typing in it to see a dynamic list of search results filtered from the complete set of values.
- An info icon
 to see more details about the currently selected item (in this case, a user).
- A remove icon
 to clear the current value.
- A goto-module icon
 to show a full lookup dialog box for this module, and
- The most recently viewed items for the module involved (in this case Users).
- Figure 27: Using Lookup Fields
- Required Fields: Some fields (Name, Assigned To) have an indicator
 just to the right of the field name. This means that the field is a required field, and must have a value before you can Save.
- Dropdown Fields: Several fields (Tax Code, Business Role, ..) look like this
 , with a down arrowhead at the end. These fields are dropdown fields. Click on the field to show a dropdown list of options, as seen to the right. Simply select one and the list goes away, and the dropdown field value is updated.
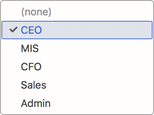
- Figure 28: A Dropdown Field
- There are also Phone Number, URL and Email field types - but these look like Text fields on the Edit view. On the Detail view, however, they have a mini-icon at the start to indicate the field type, and typically may be clicked to perform an action such as visiting the URL, writing an email, or calling the phone number. The Live Business Card section on a Contact detail view to the right shows several of these types of fields.
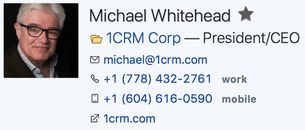
- Figure 29: The Live Business Card
- Multi-Select Fields: These rather unique fields, such as Category, allow multiple selections to be made from a dropdown list. When one or zero values have been selected, they resemble a dropdown field on the edit view.
- Once there are multiple selections, they look as seen at the right. Click on the down arrow to see the selection management view, where categories may be added or removed. The remove icon
 is available to remove all values quickly.
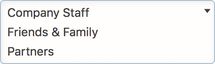
- Figure 30: Multi-select Field with Multiple Values
- The Shift key, or Command Key on the Mac, may be used to Add or Remove multiple items from the list of Categories quickly, one after another.
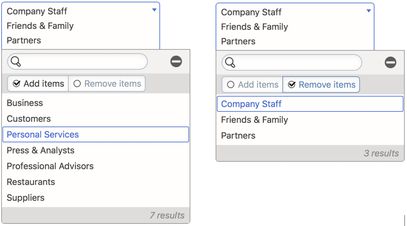
- Figure 31: Using MultiSelect Fields
- Additional field types include simple Text fields (Rating), Large Text fields (Description) and Toggle fields (Is a Supplier).
- Date/Time Fields: These fields are found on items that appear on your Calendar, such as Calls, Meetings, and Tasks. On the Edit view screens they look like this
 . Once you click on the down arrow to edit the values, you’ll see an expanded view as shown below.
- On the calendar month view there are arrows to move months or years forwards or backwards. Then simply click on a date to select it, and move on to selecting the time of day. If the date is already correct, you can move directly to setting the time using the clock icon. And here too the remove icon
 is available to clear the field value entirely.
- The time view will have two or three controls depending on the user’s selected time format - 24-hour or AM/PM.
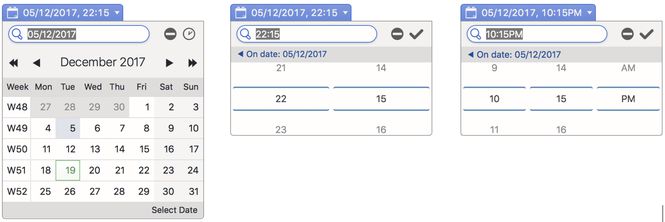
- Figure 32: Using Date/Time Fields
- One important note once you finish is that you have now saved some data within 1CRM for the first time. In a browser-based system like 1CRM, that data has not been saved on the PC or laptop you are using, but on the 1CRM server instead, from which anyone in your company can retrieve that information (if they are permitted). The beauty of this is that no matter where you are, if you can get access to an Internet-connected device with a browser on it, you can access your 1CRM system, and all the CRM data your company possesses. The device you use to access the system does not have to have anything special installed on it – just a browser. Nor does the use of the system save any data on the device used, other than a few user preferences such as browser cookies.
- Now – click on the Create button in the Contacts sub-panel – we are going to add a new Contact at 2 Big. The system will show you a brief Contacts popup superimposed on the Account detail view. This type of popup using the Create button on a sub-panel is frequently useful to quickly add the basics for a new related item of information, but remain on the current screen while you do it.
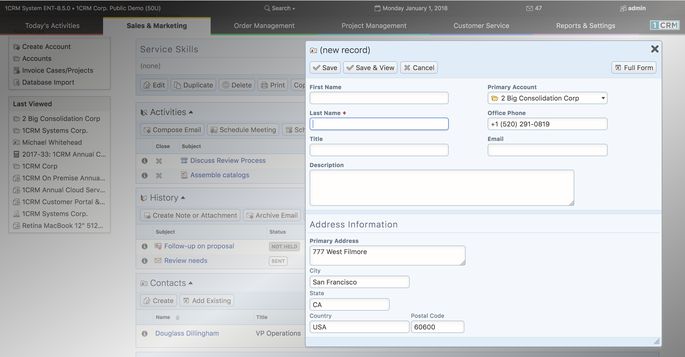
- Figure 33: The Accounts Module - Contacts Sub-panel Popup
- For the purpose of this exercise, however, click on the Full Form button (top right) to see the full form for entering details of a new Contact. Enter his data as shown below. Note as you do that even though you started off in the Accounts module, you are in the Contacts module as you enter the details of the new Contact at 2 Big.
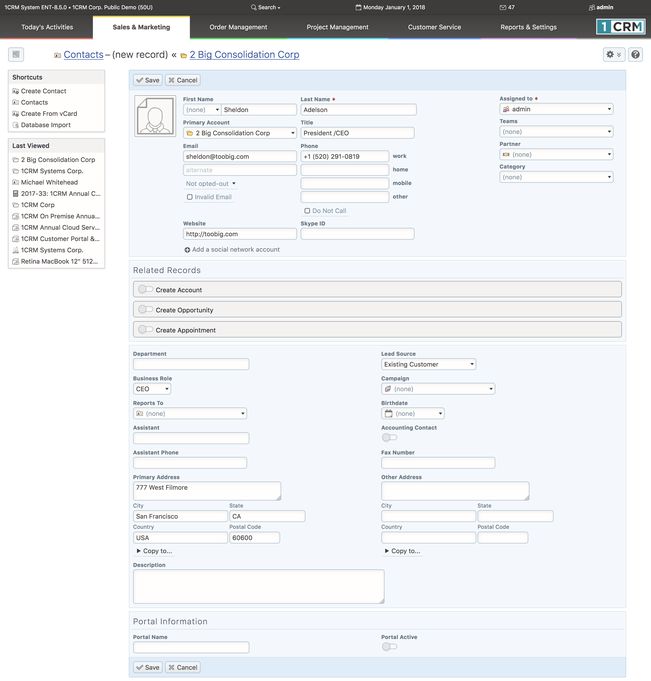
- Figure 34: The Contacts Module - Edit View Full Form
- Now click on the Save button to save the Contact record. Notice that in the Last Viewed area of the screen you are beginning to accumulate a list of the items of information you have been working with within the system. These are available as links, to quickly take you back to any item of information you have been working with recently. 1CRM is not a system where you will want to kick yourself (or the system) saying – darn it, I was just there, why is it so hard to get back to it!
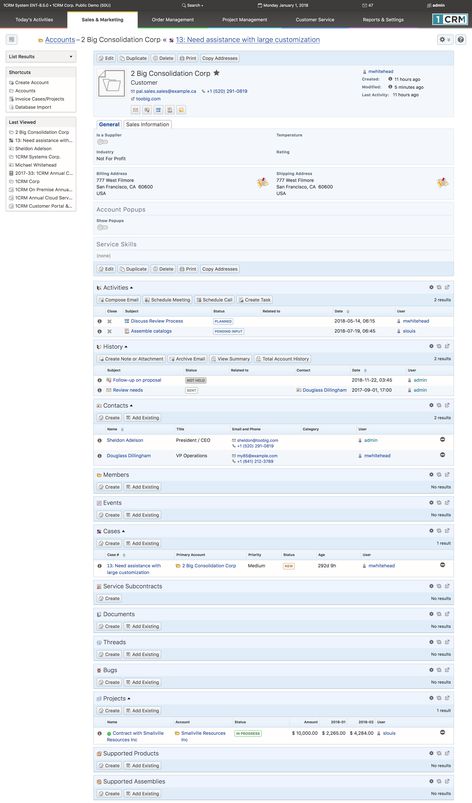
- Figure 35: Contact Linked to Account
- You should now see a screen like the one above – showing the account detail view for the 2 Big account, with Sheldon Adelson as a contact at that account. To reinforce the ability to link back and forth, up and down and sideways within 1CRM (and any good CRM) – click on Sheldon’s contact name to link to his contact detail view screen. From that screen, click on the account name link, to come right back to the account detail view screen for 2 Big.
- Now – add yourself as another contact at 2 Big, repeating the process described above. You should now see another contact listed in the contacts sub-panel of the 2 Big account detail view screen. This is another important point. We have re-used all the basic account information in the main panel of the 2 Big account for another contact. We did not have to type it in again. And if any of the 2 Big account information changes, we will only have to edit the 2 Big account record, not the information we have about our contacts there. This is one of the key advantages of a CRM over a contact manager like Microsoft Outlook – it understands that accounts and contacts are two separate types of information that are linked together, not crammed together into one unsatisfactory amalgam.
- 3.5.4 Linking and Searching/Filtering
- Again – to reinforce the speed and power of navigation in 1CRM – link to your own contact information. Then back to the account detail view. Then on to Sheldon’s contact record. A contact can lead to an account, which can lead to other contacts at that account – all extremely quickly. And very relevant to your everyday workday needs.
- Go ahead now and explore by yourself the contacts list view. Notice that you can search for a specific contact in the Browse All tab above the list of contacts. Click on the Quick Filter tab to get a more comprehensive search capability.
- Figure 36: Contact List View with Browse All Tab (10 Items/Page, Mass Update Expanded)
- After their install has been completed, and they have been using the system for a few months, we usually ask clients what they like most about using their 1CRM system, and their reply often resembles this:
- “I can search contacts for the name of someone I’ve only met once or twice over a snack. I only know his first name, but that’s OK – it can show me every Ted in the system right away. I pick the one I want from the list of Teds, and link to his detail view, from which I can call him. If he’s out, I link to his account detail view, and it shows me who else we know at that company, and I link to one of them and call them. I do this maybe fifty times a day, and so it makes a huge difference to me that I can do it so quickly and so naturally. I swear this system thinks the same way I do!”
- 3.6 CRM Workflow Basics II: Leads and Opportunities
- Now that you have practiced putting Accounts and Contacts into the system, and linking Contacts to Accounts, let’s go on to learn about some more types of information your CRM can organize for you.
- Within just about all CRM systems, there exist the dual concepts of Leads and Opportunities. They are kept as very different items of information, even though they may sound very similar to each other. The generally accepted distinction between them is this:
- A Lead is a person’s name and contact information, plus their company name. Although contact information has been verified, as well as some interest in purchasing, no specific sales Opportunity has been identified for this Lead.
- An Opportunity is just a record of the chance that you might make a sale to an Account, the size of the sale involved, the time frame in which the sale might happen, and details of where you are in the sales process, and the likelihood of closing the sale.
- Note: When you have been in touch with the Lead and confirmed that they do have a genuine and qualified interest (they have a real business problem, and the money to fix it, and you’re talking to someone who has the power to do so) in making a specific purchase, you convert the Lead into a Contact and an Account, plus an Opportunity. You also convert the Lead when they ask for a Quote, as both Quotes and Opportunities require an Account to reference.
- Note: There is actually a stage before Leads, known as Targets (also often known as Prospects). These are usually names you have purchased on a list, or other low-quality source. Once the contact information and some interest has been established, they are usually converted to Leads. The main sales force generally becomes involved with them only once they become Leads.
- In CRM terms, the process of selling goods and services to your customers comes down to a series of steps that look something like this:
- Acquiring and tracking Leads;
- Identifying specific sales opportunities with those Leads;
- Quantifying those sales opportunities, and creating Accounts, Contacts and Opportunities within the system;
- Aggregating all Opportunities together into a sales pipeline to see the big picture; and
- Closing the Opportunities as sales.
- By having an automated system that remembers all your Leads, can convert them into Opportunities once qualified, can add them all up to show a sales pipeline, and can accumulate a history of Account activities, your business gains three big improvements.
- You can now see how business is shaping up over the next couple of months in a more tangible and quantifiable way than ever before. The sales pipeline is your distant early warning system – it shows you when business levels are falling off, or growing faster than anticipated. In a smaller business it is your best friend when it comes to business planning, giving you a more detailed and distant view into the future, helping you to make appropriate staffing and expenditure decisions.
- All your Leads, Opportunities, and Account history are now formally recorded in a central system that the business owns. Your vulnerability to threats from sales personnel, or to the sudden defection of sales personnel, is much reduced. If a sales person leaves the organization, you still have all the Leads and Opportunities the business paid to develop, and the Account history needed to help a new sales person take over the Account quickly and effectively.
- The sales person on an Account is not the only person in the organization with access to details of activity history. Accounting and service personnel who have direct customer contact can now base their decisions about grey-area judgment calls in the Account on hard information from the Account history.
- When a CRM system is first adopted, there may be many Leads sitting in the inboxes of various sales people. All these Leads need to be harvested and input to the CRM so they can be tracked. Then on an ongoing basis, all new Leads need to be entered into the system, and then assigned to a sales person, ensuring they will be tracked.
- Let’s type one in for ourselves now to get familiar with the process. Click on the Leads tab, and then on the Create New Lead shortcut on the left hand side of the screen. Notice, by the way, that there are shortcuts for importing Leads in bulk, and for creating a Lead from a vCard (an electronic business card, such as you may save from Outlook or Apple Contacts).
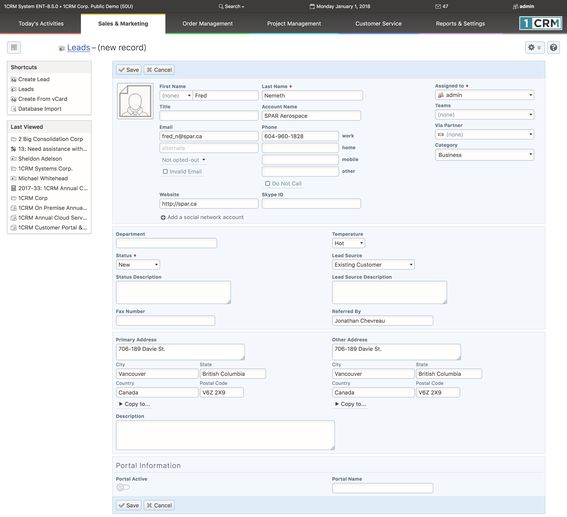
- Figure 37: Lead Edit View: Data Entry Screen
- Using the screen pictured above, enter the data for our new Lead, and click on the Save button. You now see the Lead detail view, with its main panel, and sub-panels for open activities and history. These sub-panels will let you track what your sales people are doing with the Leads you pass them.
- One key field on each Lead is the Status field. It is set to New when a lead is first entered, and then to Assigned when the Lead is assigned to a particular sales person. It becomes Converted if the Lead is converted into a Contact (and generally an Account and an Opportunity). Another key field is the Lead Source. Between these two fields you can track what proportion of Leads that you get are converted into Opportunities (and/or sales) - and how that proportion varies according to the source of the Lead. Gaining empirical knowledge that identifies your most effective and successful Lead sources is a key business enabler.
- To continue our worked example of the life cycle of a Lead, let’s imagine that you call up the Lead above, and after talking with him for a bit, decide that SPAR Aerospace is a genuine potential new Account for you, and that the Lead with Fred Nemeth should be converted to an Account because there is a real Opportunity you need to document. At the top of the Lead detail view screen is a Convert button, with a Convert to Contact option. Click on it now, and you will see a screen like this:
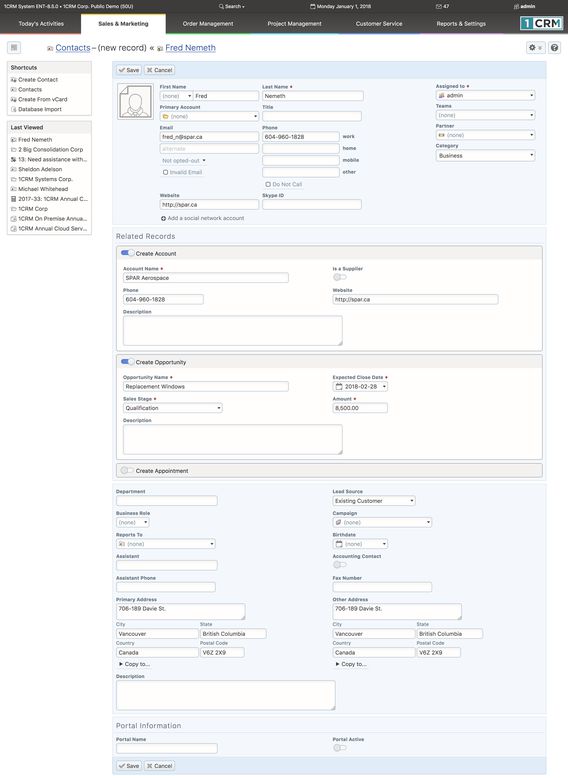
- Figure 38: Lead Conversion Screen
- As you can see, converting the Lead basically turns the Lead into a Contact, and optionally will also create an Account, an Opportunity, and even an Appointment. In the Related Records sub-panel, check Create Account (it is checked by default if the lead had an Account name), Create Opportunity, and Create Appointment if you want to generate those items of information as well. You can even create a Note or Attachment (uploaded file, such as a Microsoft Word or Excel file) to be linked to the Account record.
- Based on your imaginary conversation with Fred, we have chosen to click on the Create Opportunity box, and enter data for an Opportunity to sell some replacement windows. Note that you must put in an amount for the Opportunity, and an expected close date. When you are done, click on the Save button to save all the new information records at once. You see the Lead detail view for the converted Lead, and near the top of that screen are links to the resulting Contact, Account and Opportunity. Click on the link for the newly created Account, Spar Aerospace.
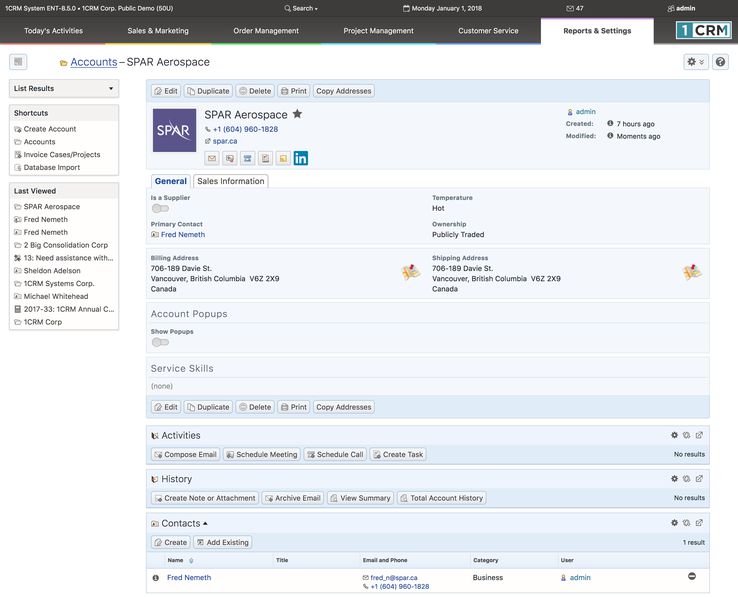
- Figure 39: New Account, with Linked Contact
- Notice that in addition to the Account (with company logo and LinkedIn profile we also added) and linked Contact that you see in the figure above, if you click on the Sales Information tab at the top, you will see the original Lead, plus an Opportunity linked to that Account. Again, just practice navigation a little. Click on the Opportunity. The resulting screen also shows the Contact. Click on the Contact. That screen also shows the Account. Click on the Account. We’re back where we started. This is the joy of CRM – everything is related, and from one small item of information, you can link to volumes of Account history, Contact history, related Contacts, and related Opportunities or Leads.
- 3.7 CRM Workflow Basics III: The Sales Pipeline
- Now that we have looked at creating Accounts, Contacts and Leads, plus converting Leads into Contacts and Opportunities and Accounts, we have all of the capabilities we need to start assembling a sales pipeline. Now – click on the Opportunities tab to see a list of all the Opportunities in our demonstration set of data. You should see a screen like this:
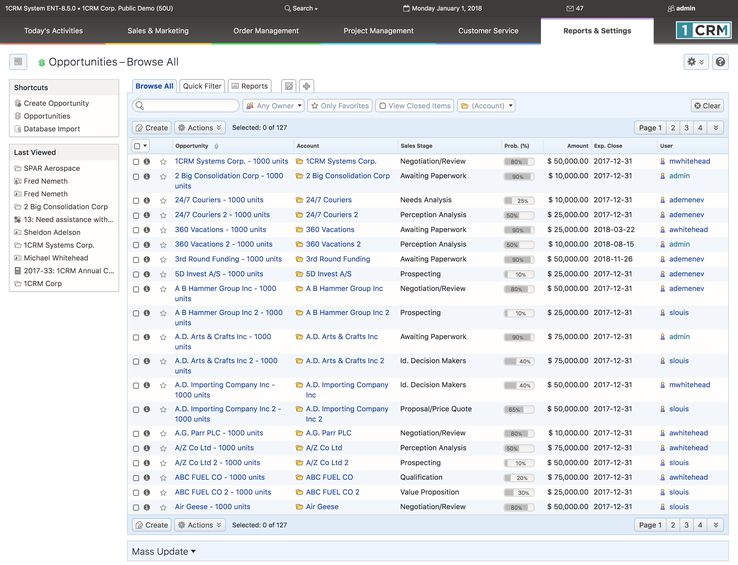
- Figure 40: Opportunities List View
- Clearly being able to see all the Opportunities we have identified for future business is very useful. But there are drawbacks. We can’t see all of the Opportunities on this screen – only 20 of the 127 in the system. We have to page back and forth to see them all. As well, we see an estimated value for each Opportunity, an estimated close date for the business, the Sales Stage to indicate where we are in the sales process for each Opportunity, and the percentage probability of closing the sale, but we see no automatic totalling of the Opportunities. As well, we might like to see a total of the Opportunities weighted by the percentage probability of closing them – to gain a more realistic expectation of future sales.
- First – let’s have a more detailed look at an Opportunity, to understand what information is kept for an Opportunity. We generated an Opportunity in the last section, but without actually using the Opportunity edit view screen. Click on the first Opportunity listed to see an Opportunity detail view screen, and then click on the Edit button to go to the edit view. You should see a screen like this:
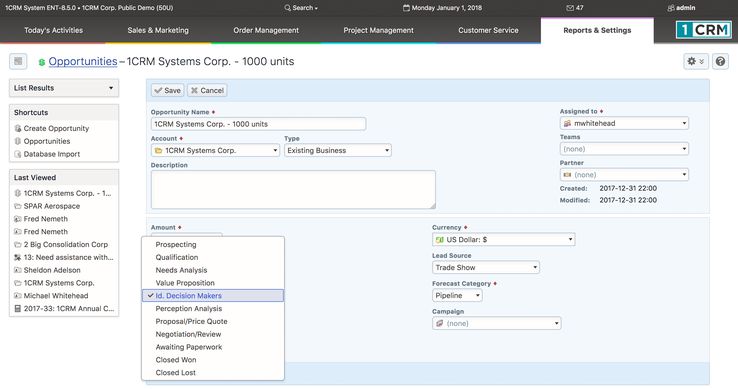
- Figure 41: Opportunity Edit View
- One key attribute of an Opportunity is the Sales Stage. In the screen above you can see the dropdown box for Sales Stage with all the options visible. (These options can be customized if they don’t match how you do business, of course.)
- Other important information contained in an Opportunity is the Expected Close Date for the business, the Next Step to close the business, the percentage Probability of closing the business, the Lead Source for this Opportunity, and the Type of business (new or existing business).
- OK – we’re done with this Opportunity edit view. Click on the Cancel button to exit the screen.
- As useful as the Opportunities list view is, there are clearly a number of views and what-if questions we would love to apply to our Opportunity data that are not really addressed by the list view:
- What is our best lead source?
- What is our total sales pipeline?
- How does it break down by month for estimated close dates?
- Are most of our opportunities in early, or more advanced stages of the sales process?
- Which sales people are being most successful at the moment?
- 3.7.1 The Sales Charts Dashboard
- To address the need to answer questions like this, higher quality CRMs have graphical charts which show visual breakdowns of Opportunity data, totalling them overall, and sub-totalling by key indicators such as Sales Stage, Lead Source, and account representative.
- Within 1CRM any chart may be added onto any dashboard page. The complete set of Opportunity related charts is shown by default on the Sales Charts Dashboard. Click on it now, and you should see a screen like this:
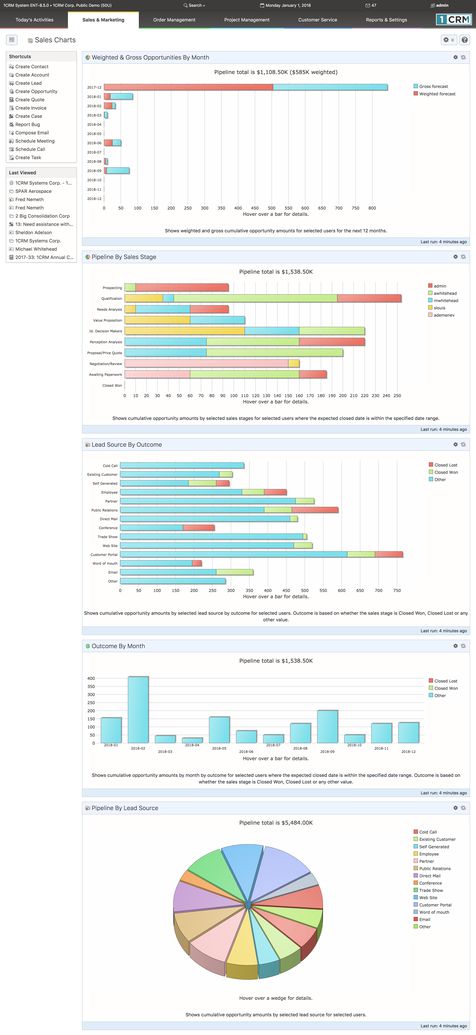
- Figure 42: Sales Charts Dashboard
- The six charts related to sales and Opportunities are:
- Fiscal Year Booked Sales; (not shown above)
- Weighted & Gross Opportunities by Month;
- Pipeline by Sales Stage;
- Opportunities by Lead Source by Outcome;
- Pipeline by Month by Outcome; and
- All Opportunities by Lead Source.
- The Fiscal Year Booked Sales chart is pretty easy to understand.
- The Weighted and Gross Opportunities by Month chart is a handy one, showing you visually the total value of all Opportunities expected to close in each month, and then the total of those same Opportunities after they have been weighted by their Probability percentage.
- The Pipeline by Sales Stage chart is also available as a variant - My Opportunities - except that this variant shows only your own Opportunity data, not those for the entire organization. This chart is usually used by the owner of a small business, or the sales manager, to gain an overall sense of the maturity of the sales pipeline. He can answer the question – “Is there enough future business far enough along to close in the near future to meet sales targets?” As well, the stacked bar chart presentation gives a visual indication of which sales people have the greatest dollar value of Opportunities, and if some of them have an undue proportion of their Opportunities in the early stages. Many sales managers use this chart to watch out for any sales person who may be bluffing about how much business he has coming in – as this normally shows up by a lot of Opportunities, most of which are in the early sales stages.
- The Opportunities by Lead Source by Outcome chart is handy for giving you a quick visual indicator of which Lead Sources are producing the greatest value of Opportunities, and the colour-coded stacked bars show you if some Lead Sources are especially good or bad at being converted into sales. It can show you the most effective advertising medium for your business - TV, Radio or Internet (Adwords for example).
- The Pipeline by Month by Outcome chart shows how your next few months of sales are shaping up, and the stacked bars break down the Opportunities according to if their Sales Stage is Closed Won, Closed Lost, or anything else (meaning the Opportunity has its expected close date in the month shown, but it has still yet to close in favour of our business, or a competitor).
- The All Opportunities by Lead Source chart provides a useful pie chart visualization of all Opportunities, breaking them down by Lead Source.
- Each of these charts has an Edit control at the top right which allows you to set a few filters on the data driving the chart. Opportunities shown on the charts can be limited to those from specific sales people, to Opportunities due to close in specific time frames, or to those Opportunities with specific Sales Stages, or from specific Lead Sources.
- Each chart also provides you with the ability to mouse over areas of interest, to see more information. If on the Pipeline by Sales Stage chart you mouse over those Leads in the Prospecting stage, the area under the chart will show amplifying information about how many Opportunities there are in this stage, and their total value.
- Lastly, and most usefully, each chart offers a facility known as drilldown. If you mouse over the opportunities at the Prospecting stage again, and this time click on the bar in the chart that represents those Opportunities, the system will bring up the Opportunities list view screen, automatically filtered to show exactly those Opportunities that are behind the chart’s graphical representation of the data. While some people understand information more easily from a graphic, and some from numbers and text, this drilldown system offers the best of both worlds.
- Taken together, these capabilities of the Sales Charts dashboard should significantly improve your ability to know what to expect to happen in sales for the next few months, to understand what lead generation strategies are working most effectively for you, and to root out problems with sales people who may habitually overstate the value or probability of their sales pipeline or repeatedly fail to close business by forecast dates.
- For the sales people themselves, this tool can act as a motivator to generate new Opportunities, or to close business which is visibly lagging against its forecast dates, as well as a handy way to organize the information on their Opportunities.
- 3.8 CRM Workflow Basics IV: Calendaring
- Being in business is a large series of small events. Meetings, telephone calls, notes, emails, or reminders to revisit an issue in a few months. A very important aspect of any CRM is the ability to schedule these activities, and to associate them with the accounts and contacts they involve.
- In 1CRM, there is a full group calendaring system, capable of scheduling all these activities, and helping staff schedule meetings or telephone calls at times when people are free to attend them. It will also book these meetings and calls into the calendars of all those invited to take part in them.
- Click on the Calendar tab now (or simply on today’s date: see Calendar Information (7) on Figures 15-18), and you should see a screen like this:
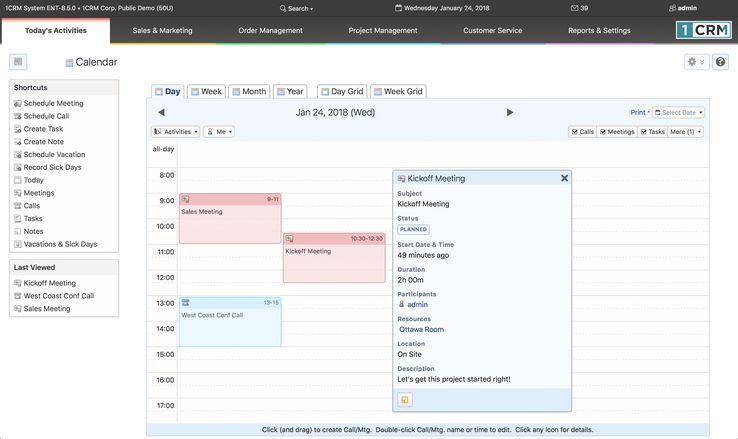
- Figure 43: Calendar – Day View
- This is the default view for the calendar tab – the day view for today’s date. As you can see, there are tabs to see views for the current week, month, or even year. And within each of those views, there are nudge controls to go to the previous or next day, week, month or year.
- Take a moment right now to click on the week, month and year buttons, to get familiar with the display layouts and the navigation buttons offered by the application. On each of those views, notice that you can click on the Today or Select Date links to see the day view of calendar info for that date.
- To see how the calendar works, let’s make ourselves an appointment for tomorrow at 11AM, to meet with Fred Nemeth of SPAR Aerospace, to discuss their plans for renovations. From the current screen, click on the arrow button to move to tomorrow. When you see the activities for that date, click in the area of the calendar display where you might naturally write appointments. Click at the 11:00 time, and drag downwards to 12:30, then release the mouse button. You will see a little box pop up that let’s you quickly schedule a Call or Meeting - with Start Date & Time and Duration already set for you. In this popup the default is to create a Meeting - to create a Call just click on Switch to Call button. Now enter a Subject for the meeting, click on Add Participants and lookup Mr. Nemeth to add him to the meeting, add him as a related Contact (which sets the related Account), then click Save.
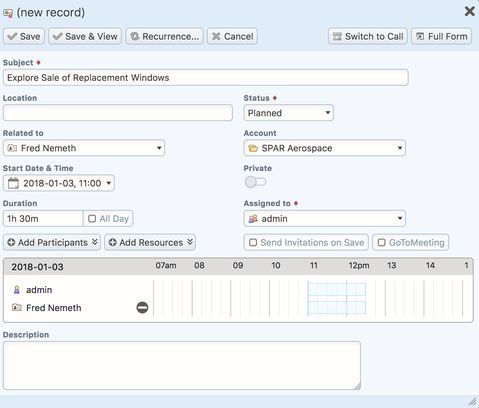
- Figure 44: Scheduling a Meeting
- Once you have done that, you will now see the calendar again, but with the meeting shown on it - something like this:
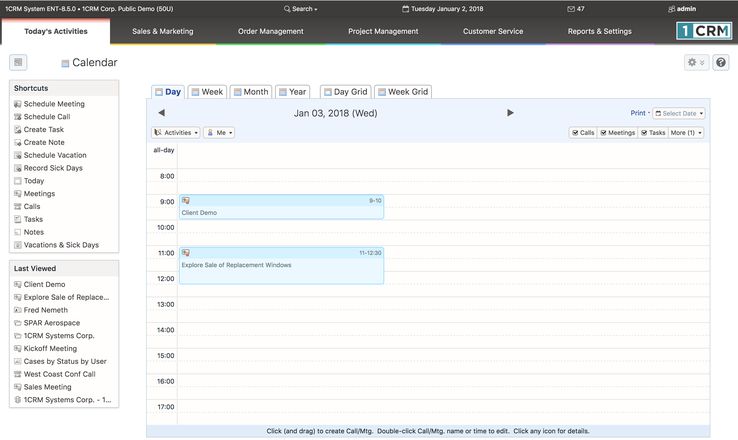
- Figure 45: New Meeting Displayed on Calendar
- From the screen shown in the Figure above, you may hover your cursor above any Call or Meeting such as Explore Sale of Replacement Windows. This will show the meeting details we see below.
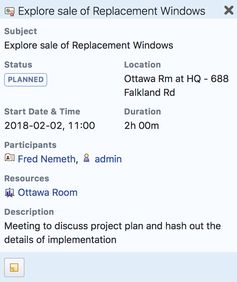
- Figure 46: Meeting Details
- To invite more attendees, either employees from your company (defined as users within the CRM system) or customers (from contact data within the CRM), you just double click on the meeting time or subject within the appointment as shown on the calendar, and the same edit call/meeting box comes up that is shown in Figure 44.
- Again, the power of the CRM to connect all your customer information together comes into play here. Click on the link on Fred Nemeth’s name in the Meeting Details box when you have it displayed. You see the detail screen for his Contact record, with the linked Account, Meeting, Lead and Opportunity. Now click on the Subject of that Meeting, and you go to the detail view for the Meeting.
- This gives you an initial overview of the calendaring capabilities within 1CRM. In the next section we will learn more about the various activities that users of the system can create and track – and we will learn more about the calendar then as well.
- 3.9 CRM Workflow Basics V: Sales Activities
- While we learned about the calendar in the previous section, we also learned something about the activities that may be defined and tracked within 1CRM. Let’s now look at those activities in more detail.
- Within 1CRM there are five different types of activities:
- Meetings
- Calls
- Tasks
- Notes
- Emails
- Within the Today’s Activities tab group all five of these activities are available as modules. Activities are important within a CRM for two different reasons. First, they are important to help everyone schedule their activities, and remind them of when they are coming up. Dashboard pages can include dashlets to display My Meetings, My Calls, My Open Tasks and My Inbox: Unread Emails to remind users of approaching appointments and deadlines. By default these are all included on the Action Items dashboard within the Today’s Activities tab group. There is also a Calendar dashlet that offers day, week, month and year layouts.
- Secondly, it is very important that each user’s activities are scheduled within the CRM (as opposed to Outlook or another system) as when the activities have been completed, they still perform an extremely valuable function by adding to the activity history for Contacts and Accounts. This activity history is vital to assist sales managers and general managers, as well as any sales personnel who inherit Accounts from a previous sales person, in gaining a quick and comprehensive understanding of the current status of their Accounts.
- Let’s look at the activities for SPAR Aerospace in a little more detail. Click on the last viewed entry for this account to get you there quickly – or click on the Account tab and then look them up. The top part of the screen should resemble this (we have added a bit more data we’ll explain soon):
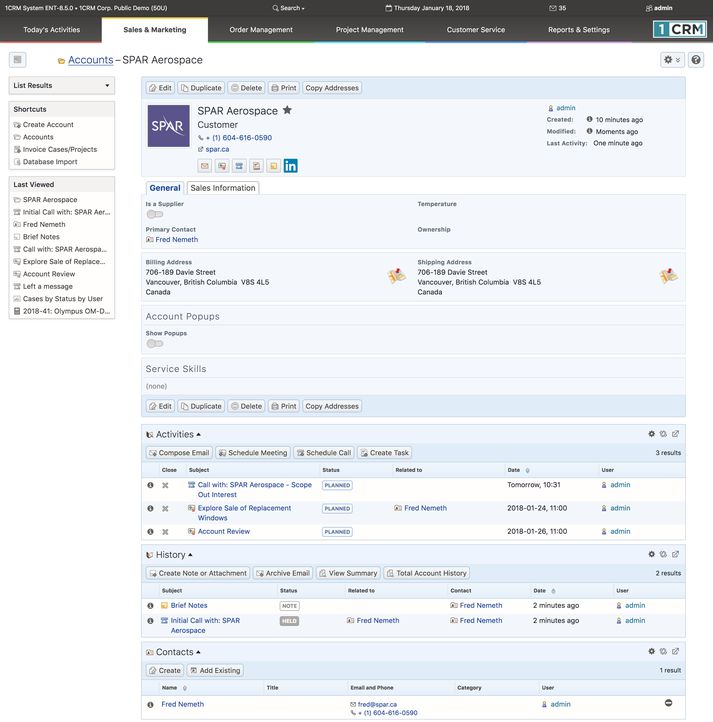
- Figure 47: Account Activity History
- Each activity has a small icon to the left showing if it is a Meeting, Call, Note, Email, or Task. In the Open Activities sub-panel, you will only ever see Meetings, Calls, and Tasks. Emails and Notes, as well as closed Meetings, Calls and Tasks, are all listed under the History sub-panel.
- We see our upcoming Meeting listed in Activities, with Fred Nemeth linked to it, and a status showing of Planned. To illustrate how Account history works, let’s pretend we have held that Meeting, and click on the close icon for that Meeting – shown as an
 . You get a chance to add any notes you might like to the record of the Meeting, and then click on Save. Now the Meeting is shown under the history sub-panel, with a status of Held.
- After a few months of operation for your CRM, with everyone in the company scheduling their activities in the system, and gradually accumulating activity history for all Accounts, your business will have acquired a remarkably valuable resource it has never had – a history for every Account and Contact, that is searchable at any time of day from any device in the world with a browser, and won’t go away when a sales person leaves the firm.
- 3.9.1 Creating a Note
- Let’s explore some more types of activities, starting with Notes.
- Imagine that when we met with SPAR Aerospace they discussed a more significant renovation of their premises – including new doors, windows and carpets. Fred Nemeth actually stepped through a PowerPoint slide show of the renovations that had artist’s drawings of the resulting building, and a breakdown of the numbers and sizes of new doors and windows, and square footage of the new carpets needed.
- To make sure that anyone who has contact with this Account has access to this detailed information, let’s make a Note on the detail view of this Account, and attach the PowerPoint slide show. In the history sub-panel, click on the Create Note or Attachment button. The Account name is pre-filled. Select the Contact, enter a Subject for the Note, and some documentation in the Note field for people reading the Note, and then click on the Browse button to select a file to upload as an attachment to the note. Once you have selected a file, click on the Save button. The file will be uploaded, and the Note will be saved, producing a screen which resembles this:
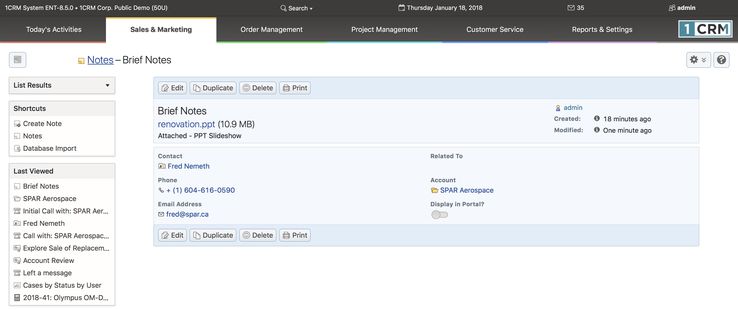
- Figure 48: Note with Attachment
- Click on the Account link go back to the history sub-panel of the SPAR Aerospace detail view, and you can see the new Note now included as part of the Account history.
- 3.9.2 Creating a Task
- Now that we have had a Meeting, and added Notes to the Account history, we really need to assign ourselves a Task to prepare a quotation for Fred at SPAR Aerospace. Let’s do that now. From the Account detail screen, go to the Open Activities sub-panel and click on the Create Task button. You will see the Task edit popup, which looks like this:
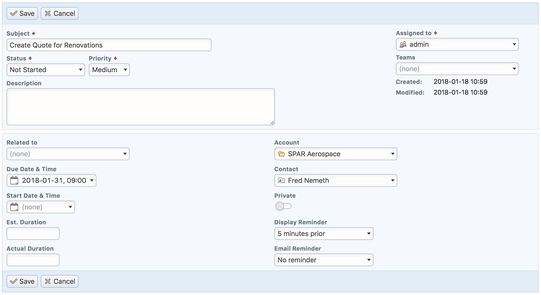
- Figure 49: Task Edit View
- As shown above, type in a subject, then select a Due Date and time using the little calendar pop-up to select a date. Within the calendar pop-up you can move forward or backward through the calendar by month or year with controls provided, and then click on the day you want in order to select it.
- You can also set the Priority of the Task, assign it a Status (Not Started, In Progress, Completed, Pending Input, or Deferred) and enter a Description for the Task.
- Press the Save button once you are done and you’re back on the Account detail view for SPAR Aerospace, with a new Task in the Open Activities sub-panel. Now click on the Today’s Activities tab, and you should see this Task listed in your My Open Tasks dashlet. As well, if you go to the Tasks list view you should see all your Tasks listed out, including this one.
- 3.9.3 Scheduling a Call or Meeting, Calling with Skype
- A few days pass, and you complete your proposal for Fred Nemeth before the Due Date you set yourself. You then mark the Task as Completed, and need to email the proposal to Fred, and then call him to talk about it. You email the proposal to Fred (see the section on Managing Emails coming up next), asking him when would be a good time for a call. He mails back with a time and date, and you need to book that Call into your calendar. You go to the Activities sub-panel of the Contact record detail view for Fred, and then click on the Schedule Call button - then click on Full Form to see the full Call edit view. You see a screen much like the Figure below.
- You start entering the call by typing in a Subject, and then setting a Start Date & Time (using the little calendar pop-up). By creating the Call via the Contact record for Fred, it is already related to him - and it is already related to the SPAR Account as well. Then you look lower down on the screen, and realize you have a problem. The start and stop time for your Call are marked on the time line of your day. Unfortunately there is a blocked out segment of your day marking a pre-existing commitment, and this Call is on top of it. In this case you could email back to Fred and ask him if a little later at noon the same day would work for him.
- Your CRM let’s you book Calls and Meetings that involve multiple employees and customer Contacts by adding their names as Participants at the bottom of the screen. Enter their first or last name, look them up, and add them to the call or meeting. All employees will have their free/busy status displayed in the same way yours was above so you can see to avoid scheduling conflicts.

- Figure 50: Schedule a Call
- What’s the point of adding customers as Invitees, if you can’t see their calendar of commitments? Because the Send Invitations on Save checkbox let’s you automatically email all attendees (employees or external Contacts) so they know about the Call or Meeting, and can accept it or reject it. As well, any employee invited to Calls or Meetings will see these activities scheduled on their Action Items screen, where they have controls to accept them, accept them tentatively, or decline them.
- The following information is included in the email an invitee receives when the Send Invitations on Save checkbox is used:
- Who has issued the invitation?
- Is it for a Meeting or a Call?
- What is the subject of the Meeting or Call? (In this case it would show as 1CRM Call – Discuss Proposal.)
- What is the status of the Meeting or Call?
- Is there an associated GoToMeeting session?
- When does it start, and what is the duration?
- Then three links are provided, to enable the recipient of the email to accept, tentatively accept, or decline the invitation.
- Note: All Contacts, Leads and Users in 1CRM can have a Skype ID. Hovering over a Skype ID offers the option to start a Skype Call, Skype Chat or Skype Video Chat.
- Calling With Skype & the Call Timer:
- When it comes time to make your call, if you like you can just click on the client’s phone number as it is displayed anywhere in 1CRM, and the system will pop up a window to log the call. Just click on Call using SkypeOut to place the Call.
- By default the system will use Skype to place the call right from your computer. Your system administrator has settings (Admin - System Settings - Locale Settings) that enable/disable call logging and SkypeOut calling, or select calling services other than Skype (e.g. RingCentral™ as discussed below).
- When you Save the record of the Call the system will record:
- the Call Subject
- time and date the Call was made
- duration of the Call
- any notes you want to take from the Call
- the phone number called
- the customer Account related to the Call
- any Call relationships to other information in 1CRM
- Call Status - such as Planned, or Held
- The moment you click on the Call using SkypeOut button to place your call, your Call Timer starts counting (it replaces the Call using SkypeOut button in the Call popup). Once your Call has been completed, or failed to connect, you can click on the Call Timer to stop the timer and automatically set the Call start time and duration.
- Note: If you go to an existing Call detail view and click on the Call using SkypeOut button on that record, the process is very similar. However, when you click on the Call Timer to stop the timer the system will ask you if you want the Call start time and duration to be updated. If you confirm, these are set and Call Status is also set to Held.
- 3.9.4 Calling with RingCentral
- In order to utilize the RIngCentral service in coordination with 1CRM, your administrator must first select RingCentral in Admin - System Settings - Locale Settings - Telephony Integration.
- Your administrator must also perform the administrative function Admin - Maintenance - Normalize Telephone Numbers. This will ensure that all phone numbers entered into the system (or via imported data) prior to RingCentral integration being turned on will be properly formatted so that RingCentral can call them, and also recognize who is calling for incoming calls.
- Next, each user planning to use RingCentral must go to the My Account - Integration tab - and edit the settings shown in the Figure below:
- Your Direct Phone Number (IMPORTANT NOTE: For North America numbers, enter this in the form 16046160590 - with the 1 in front, then the area code then the 7-digit number, with no spaces, or dashes or parentheses.)
- Expand RingCentral Window on Incoming Call (see section on Receiving RingCentral Calls)
- Press 1 to Start Call option (checkbox to Enable / Disable)
- Your administrator should be able to provide your direct phone number.
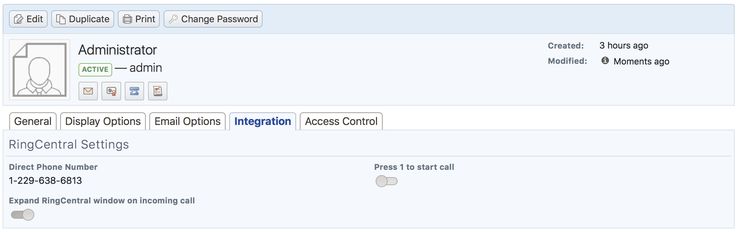
- Figure 51: RingCentral Integration Settings
- Once those settings are saved, you will see a small RingCentral icon at the bottom right corner of the 1CRM screen. You need to click on this icon to login and enable the 1CRM to RingCentral integration. When you first click on this icon it expands to display the RingCentral Popup window, and you will need to enter your RingCentral password, then click on Login. You will then see a list of recent calls, one per screen with pagination controls.

- Figure 52: RingCentral - Minimized Icon
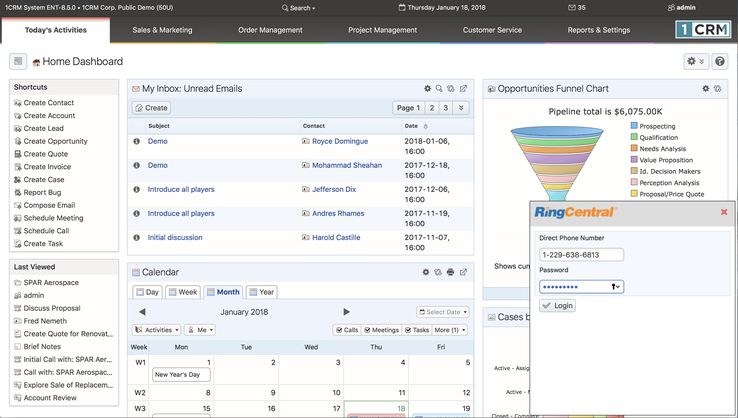
- Figure 53: RingCentral Popup Window - Ready to Login
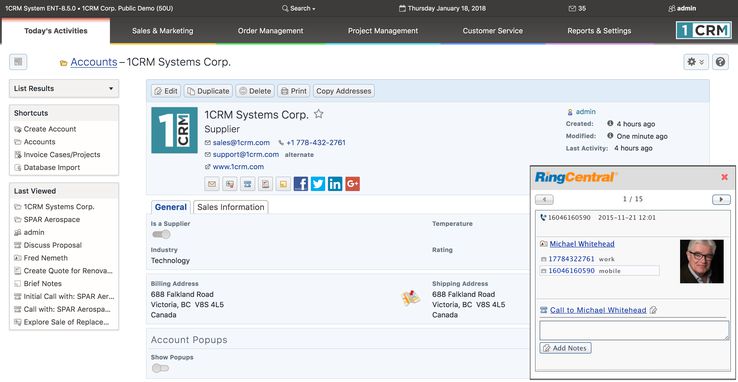
- Figure 54: Account Detail View, with RingCentral Popup Showing Call Log
- Now if you like, you can minimize the RingCentral Popup window by clicking in the grey area of the top bar (the red X will log you out). You now have 1CRM fully setup and working for use with RingCentral.
- Next, you need to install the RingCentral softphone on the computer you are using to access 1CRM, or use a physical VOIP phone from RingCentral. You can download the RingCentral Desktop Apps for Mac or Windows here, and the Mobile Apps for iOS or Android here. Once you have a VOIP phone or App installed and running using the instructions provided by RIngCentral, you are ready to go!
- Let’s take a moment to study the details of the RIngCentral Popup:
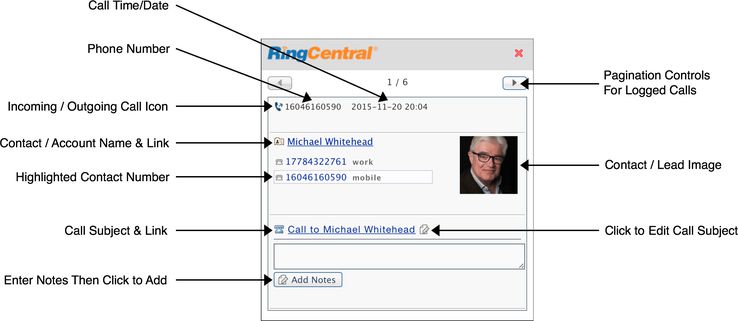
- Figure 55: RingCentral Popup
- Every time you receive or make a call using RingCentral it will be logged in the RingCentral Popup, and in your 1CRM system. As you can see above, as each call is logged in the RingCentral Popup a lot of handy information is displayed along with useful links to the related 1CRM data.
- Now let’s try it out. Just click on any phone number you see in 1CRM that has a hyperlink on it, such as the one shown for 1CRM Corp. in the Figure above. (Note: The 1CRM Call Logging window does not appear when logged in to RingCentral, as all RingCentral calls are logged automatically.)
- The first time you do this you may be a bit surprised to see a RingCentral window (Figure 56) that seems to indicate someone is calling you!
- This is due to the nature of how RingCentral makes calls - what is called a 2-leg process. When you tell RingCentral you want to call someone, what happens is that actually RingCentral calls you first. Once you answer (by clicking on the green Answer button as shown in the Figure below), it calls your desired contact (optionally after you press ‘1’ to start the call), and then joins those two calls (two legs of the call) together.
- One of the key advantages that this approach enables is that the person you are calling sees your company phone number as the incoming number, not your mobile number or the number wherever you may be.
- Once your call ends, you will notice that it has been added to the call log you see in the RingCentral Status window, together with all the information on the related Contact, Lead or Account.
- If you like, now you can enter some Notes in the RingCentral Popup, and click on Add Notes. The first line of text will be used as the subject for a new Note created and linked to the Call, and any other lines of text will be added into the Notes field of that new Note.
- Calls logged by RIngCentral are automatically given the Subject of Call to Contact, or Call From Contact (or just the phone number if the caller is unknown). You can use the icon provided to edit the Call Subject if desired. The logged Calls also automatically include information on the Call date, time and duration, as well as Incoming or Outgoing direction.
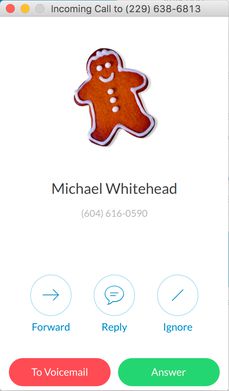
- Figure 56: RingCentral Softphone Call Window
- 3.9.5 Receiving Calls with RingCentral
- When receiving a call via RingCentral, if you have the RingCentral Popup window open it will show the details of the caller if the incoming phone number can be identified in the 1CRM system. 1CRM data for Contacts, Accounts and Leads will be searched for matches to the incoming phone number, in that order. (This ensures that if both Contact and Lead records exist in the system with the same phone number, that the Contact will be matched rather than the Lead.)
- Each incoming call will automatically be logged to 1CRM, and linked to any related Contact, Account or Lead if one can be identified. Similarly the Call record in 1CRM will automatically show the Call time, date and duration.
- Note: There is also a user configuration option to auto-expand the RingCentral Popup window on receipt of an incoming call.
- If the incoming call is from an unknown number you will see displayed in the RIngCentral Popup this type of information:
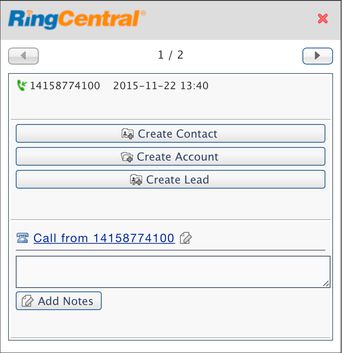
- Figure 57: RingCentral Popup - Unknown Number
- The buttons available here allow you to create a new Lead, Contact or Account in the 1CRM system using the caller’s phone number, as well as the RingCentral Popup displaying some of the other information and links described above.
- 3.9.6 Managing Emails
- In the last section, when you needed to email Fred Nemeth with the proposal, we mentioned you would be able to do the whole thing within 1CRM. This is because 1CRM includes its own ability to send outgoing emails, and then automatically link those emails to the Account and Contact records they involve.
- Let’s go over how you would send your email. If it is still visible, click on the Last Viewed link to the Fred Nemeth Contact detail view, or look up the Contact from within the Contacts tab.
- Within the Open Activities sub-panel for that contact, locate the Compose Email button, and click on it. Or just click on the Email icon in the Live Business Card header for Fred. You will see the Compose Email popup screen, which when completed would look much like this:
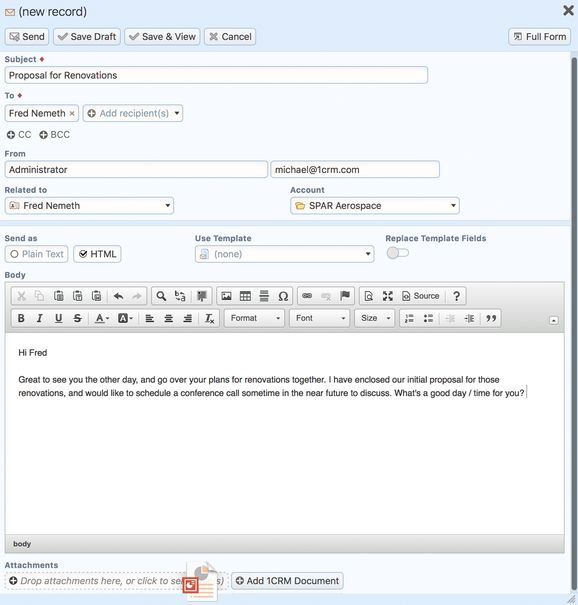
- Figure 58: Compose Email
- Notice that you can just Drag and Drop to attach the proposal to the email as shown above (you can add a single file or multiple files at once this way), or click in the attachments area to select a file. To choose who to send the email to, just click on
 and enter the first few letters of a Contact or Lead’s first or last name and a list of possible suggestions will appear, from which you can select the one you want. Or click on
  to do a full search. You can also enter an email address not known in your CRM, as a custom entry.
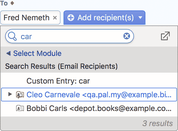
- Figure 59: Adding Email Recipients
- You can click to expand the CC and BCC addressee options, and you can drag and drop addressees between the TO, CC and BCC lists.
- When you click on the Send button to send this email to Fred, you see a little confirmation box to confirm that the message has been sent. You can then link back to Fred’s Contact record, and see that the email is now included in the history sub-panel for him, for the reference of any other employee who comes into contact with Fred.
- As ever, the email activity is listed in the history sub-panel along with its related Contact and Account – making it easy to quickly navigate between the email, the related Account and Contact, and any other items of information that are in turn related to that Contact or Account.
- Now – let’s learn a little more general information about the email capabilities of 1CRM. Click on the Emails tab and you will see the list view screen for emails, with lots of emails in it – like this:

- Figure 60: Emails List View
- Examine the shortcuts list – notice that you can Compose an Email, Create Email Template, or Create Archived Email. You can also click on Folders to see a list of your email folders. You always have at least Inbox, Drafts, Sent and Trash folders, plus any others you create using the Create Folder shortcut. Also notice in the Personal Email search panel a dropdown control for the folder. This is how you switch folders - the list view will show you a list of the emails in the folder selected.
- Within the Compose Email screen, as you can see in Figure 58, you can compose an email and just save it for now, without sending it. You use the Save Draft button at the top of the compose email screen to do that. Once you have saved a draft email, it can be displayed with all other draft emails by selecting the Drafts folder with the dropdown Folder control in the Personal Email search panel.
- To send a draft email, click on its subject from the list view screen, and when on the detail view screen, you can click on the Send button at the top of the screen to send it right away, or click on the Edit button at the top of the screen to edit it, then when it is in its final form, click on the Send button to send it. To move emails from one folder to another, just select them on the list view by clicking on the checkbox to the left of the subject (or almost anywhere on the row, other than on linked text), then in the Mass Update panel at the bottom of the screen, select the target folder, and click on the Update button.