- 4.0 Today’s Activities
- 4.1 The Home Dashboard
- Figure 61 shows the 1CRM screen with the Home Dashboard selected:
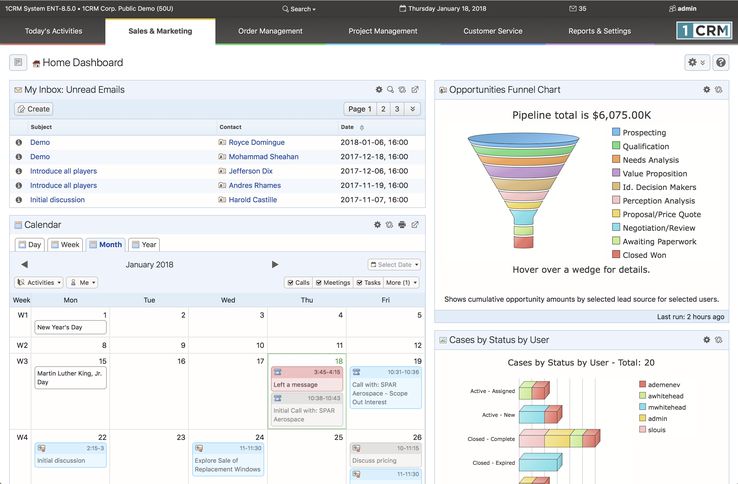
- Figure 61: The Home Dashboard (Sidebar Collapsed)
- Dashboard pages are in many ways the single most useful displays in the entire 1CRM System. Aside from the usual complement of navigation aids and shortcuts, the Home Dashboard page contains a series of information dashlets, which contain summary information from all the other modules in the system. Dashlets may also contain charts of 1CRM information, or information from external sources. These dashlets may be added to the screen layout, removed, and moved around, until you feel you have an information overview screen layout that is perfect for you.
- Dashboard pages are defined in the Dashboards module, in the Reports & Settings tab grouping. By default, each 1CRM installation has two dashboard pages in the Today’s Activities tab group - the Home Dashboard and Action Items. In most of the other tab groups (Sales & Marketing, Order Management, Project Management and Customer Service) there are also two dashboards by default. Sales & Marketing has a Sales Home dashboard and a Sales Charts dashboard, for example. Sales Home is at the start of the tab group, and Sales Charts is at the end, and the same sort of arrangement exists for the other tab groups mentioned.
- 4.1.1 Editing Dashboard Info
- Each dashboard page has basic dashboard information defined for it, as well as a layout. The dashboard info may be set by using the Dashboards module, or by clicking on the
 button at the top of any dashboard page (see Figure above), and choosing the Edit Dashboard Info option from the four options presented. Once you do this, the following screen will be displayed:
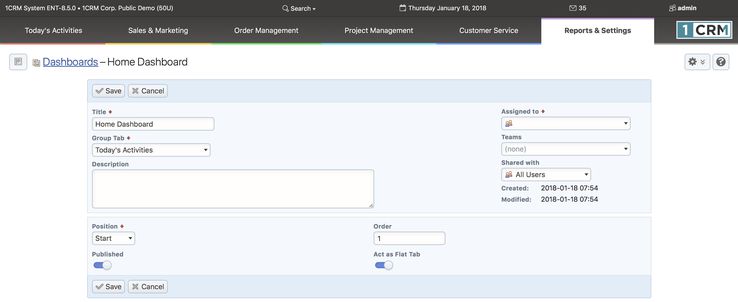
- Figure 62: Setting Dashboard Information
- On the Figure above, you can enter a new Name for the dashboard, choose the Group Tab in which it is to appear, and the position (Start or End) within that Group Tab. The Order value is used if for example 2 or 3 dashboards are defined as going at the Start of the same Tab Group. The Published toggle controls if the dashboard is displayed or not. And the Act as a Flat Tab toggle controls if the dashboard is to be displayed when a theme is in use that either does not offer tab groups, or has been set to simple Modules navigation, not Grouped Modules.
- 4.1.2 Editing the Dashboard Layout
- Each dashboard also has a layout, which defines how many columns it has and the width of those columns (in percentage terms) plus the specific dashlets on the dashboard and their position and order in the columns.
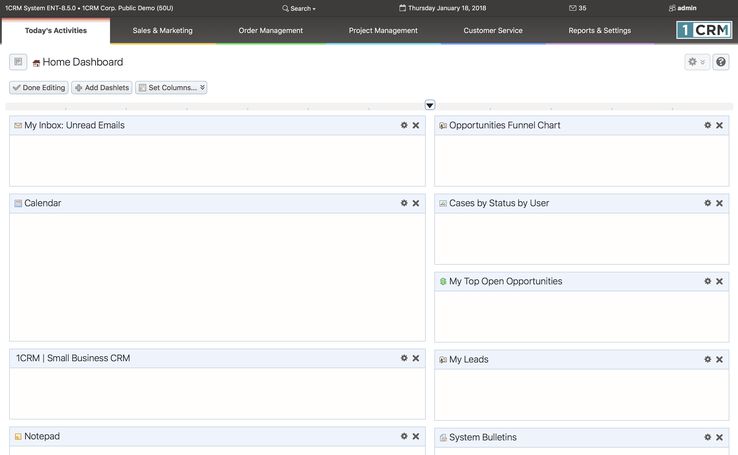
- Figure 63: Dashboard - Edit Layout Mode (Sidebar Collapsed)
- The dashboard layout information may be edited by clicking on the
 button at the top of any dashboard page (see Figure 61), and choosing the Edit Layout option from the four options presented. Once you do this, a screen similar to the Figure above will be displayed.
- While in Edit Layout mode, you may perform these operations:
- To adjust the proportional width of the existing columns in a dashboard, simply drag the slider at the top of the boundary between the columns horizontally in either direction. The division of the total screen width allocated to each column will be displayed as it is adjusted.
- To adjust the number of columns on a dashboard, simply click on the button labelled Set Columns, and choose from the dropdown options of one, two, three or four columns.
- To remove a dashlet from the dashboard, just click on the
 at the top right of the dashlet. You will be asked for confirmation.
- You may move dashlets around on the dashboard by clicking on the title bar of the dashlet and dragging it to a location you prefer.
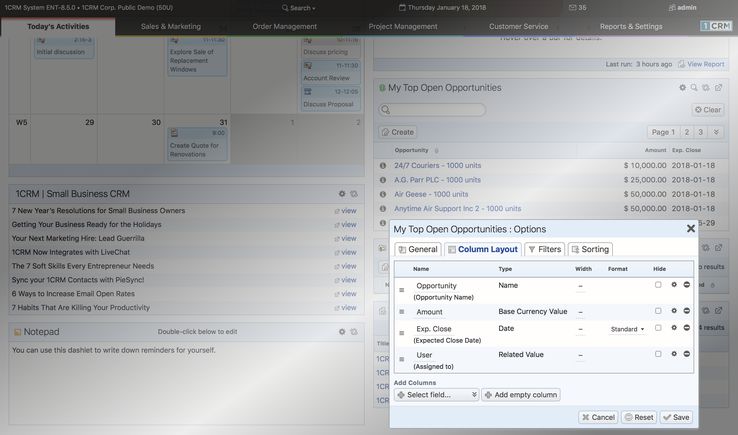
- You may edit the information a dashlet displays and how it is filtered by clicking on the gear icon
 at the top right of the dashlet (see Figure 65 for an example of setting the options for a dashlet).
- To add a dashlet, click on the Add Dashlets button. When you do so, you will see a screen like that in the Figure below:
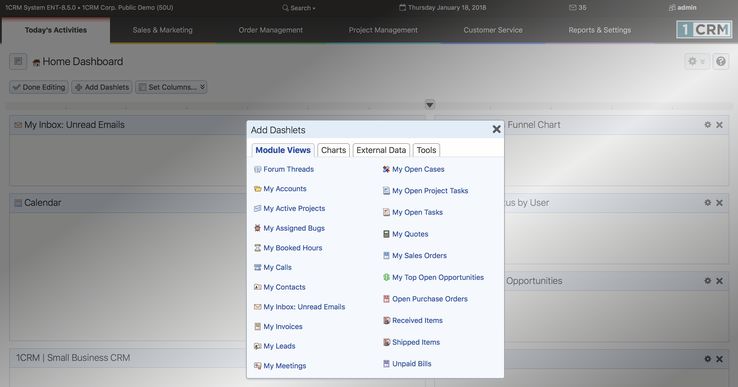
- Figure 64: Adding a Dashlet
- An Add Dashlets dialog box comes up - with four tabs to choose from: Module Views, Charts, External Data and Tools. Just select a tab, and click on a dashlet you want to add, or click on
 to close the dialog box. As you can see, Module View dashlets are a bit like miniature list views for the modules involved. Charts lets you select from a range of charts of 1CRM data. Tools currently contains the Activity Log, System Bulletins, Calendar and Notepad dashlets. And External Data contains the World Weather, Stock Quotes and News Feed dashlets.
- When you have added all the dashlets you want, and have arranged them, you can finish editing your dashboard by just clicking on the Done Editing button to save the current state of the dashboard and return to the normal dashboard display.
- 4.1.3 Dashlet Controls
- In the normal dashboard display mode, each dashlet may offer as many as five small icons in the top right of the dashlet, to perform various functions:
- You may edit the information a dashlet displays by clicking on the gear icon
 at the top right of the dashlet (see Figure 65 for an example of setting dashlet options).
- You may search the records from a module that is displayed in a dashlet by clicking on the search icon
 . (See Figure 66 for an example.) Note that the search text will be matched anywhere in the fields searched. For each module, the fields searched are the same ones used by the system search feature.
- To refresh the information displayed by a dashlet (such as out of date World Weather or Stock Quotes) simply click on the refresh icon
 that somewhat resembles a recycling symbol, at the top right of the dashlet.
- You may go to the list view for the module to which a dashlet is related - if it is a Module View dashlet - by clicking on the goto-module icon
 .
.
- On the Calendar dashlet you may use the
 icon to print out your agenda for the day.
- Figure 65: Setting Dashlet Options
- Figure 66: Searching Dashlet Information
- For a video look at how to manage dashboard pages, set dashlet options and apply search filters, see this video.
- 4.1.4 Module View Dashlets
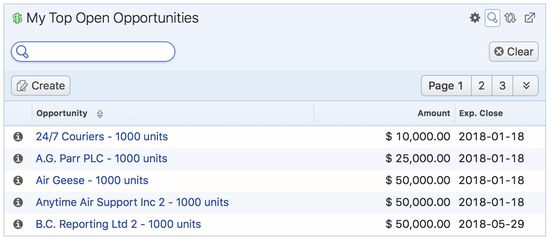
- Module View dashlets present information from 1CRM modules in a format that somewhat resembles a miniature list view format, as you can see in Figure 61, or in Figure 66 with the search filter active.
- There is no filter panel above the list, although there are the dashlet options and search/filter capabilities to assist in this regard. There is also no Mass Update panel below the list. The list itself is shorter, and controlled by the Display Rows value in the dashlet options which may be set to 1, 3, 5 or 10. You can page forwards and backwards through the list, or move to the first or last records in the module, and you can click on
 under the dashlet name to add a new record.
- These dashlets also typically offer all four control icons - to edit the dashlet’s options, apply a search filter, refresh the dashlet info, or go to the related module’s list view.
- Module View dashlets are extremely useful - typically in two main ways.
- To make data from that module accessible and searchable on your dashboard. Examples of this would be adding a Contacts or Accounts dashlet. Unless you plan to page forwards and backwards through the small pages of its short list view, the main utility of these dashlets is the search filter, so you can look up a specific account or contact quickly, without going away from your dashboard to do it.
- As reminders of a small number of important items in a module. You might add the My Open Cases dashlet to your dashboard, and set the options values so that it displays the oldest open Cases assigned to you at the top of the list as a reminder to work on them. Or you might add the My Top Open Opportunities to your dashboard so you can see the business you should be following up on.
- 4.1.5 Chart Dashlets
- Chart dashlets show information from 1CRM modules in graphical chart form. They tend to be wider than most other dashlets, and so frequently you may wish to dedicate a whole dashboard to charts, or a specific column on a dashboard, so that dashlet widths align more successfully.
- These dashlets typically offer two control icons - to edit the dashlet’s options, and to refresh the dashlet info.
- Note: If you have trouble seeing a chart, check in Admin if your 1CRM system is using Flash or SVG to generate charts. Flash is not supported on iPad or iPhone.
- 4.1.6 External Data Dashlets
- There are currently three dashlets of this type:
- World Weather
- News Feed
- Stock Quotes
- All three of these dashlets offer two control icons: to edit the dashlet’s options, and to refresh the dashlet info.
- World Weather Dashlet
- The World Weather dashlet displays weather and local time information for up to ten selected cities around the world. Figure 67 below shows a typical World Weather display, and Figure 68 shows the option settings for that dashlet used to obtain that display. Note that the temperature has been selected to be shown in ℃, and that the Display TImes option has also been set (which add the Time column to the display). You can also see how the Add City field is used to look up a new city to add to the display.
- When using this dashlet you can click on any city name to see the expanded details for that city, or click on that city again to restore the dashlet to its more brief format. (You can also click on the Yahoo! Weather link for even more complete information.) The time of the last data update is shown, and the dashlet caches data for two hours unless an explicit refresh is performed.
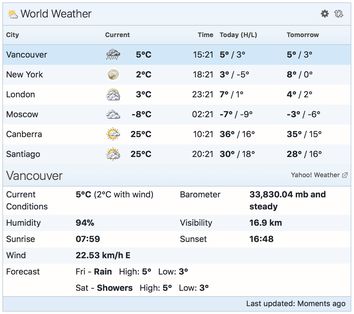
- Figure 67: World Weather Dashlet Display
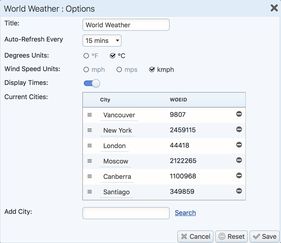
- Figure 68: World Weather Dashlet Options
- News Feed Dashlet
- The News Feed dashlet allows you to choose a news feed from the list maintained by your 1CRM system’s administrator, or to directly enter the URL for a feed.
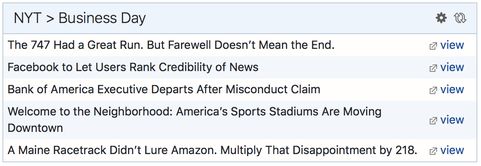
- Figure 69: News Feed Dashlet Display
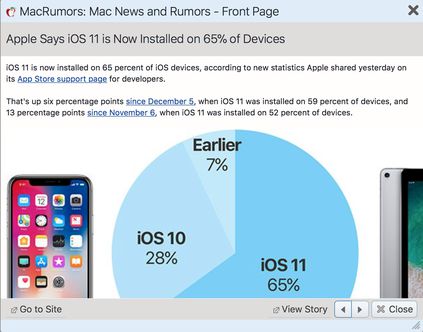
- On this dashlet’s display, you can click on the text of any news item to bring up the news reader display as shown in the Figure below. From the news reader you can click forward and backward arrows to review the text of all items in the feed. You can click on Close to return to the dashboard page, on View Story to bring up a new browser window with the full news item, or on Go to Site to see all the news stories at that site.
- In the dashlet display you can also click on the View link to the right of the text of each news item to immediately bring up the story in a new browser window without having to go via the news reader.
- Figure 70: News Feed Reader
- The News Feed dashlet options, as shown below, allow the user to search for a feed using any text string. If any matches are found for that text in the list of feeds maintained by the administrator, they will be displayed as shown below, and one may be selected for use in this instance of the dashlet. (You can add this dashlet to a dashboard several times over, and select a different feed for each instance, to get all your favourite news displayed on one dashboard).
- The dashlet options also allow the user to set a custom title for the dashlet, to set the number of rows (news items) to be displayed, and to enter a feed URL manually that has been found on one of the many feed aggregation sites, such as the site for Google Reader.
- Just click on Save to save these settings and return to the normal dashboard display.

- Figure 71: News Feed Dashlet Options
- Stock Quotes Dashlet
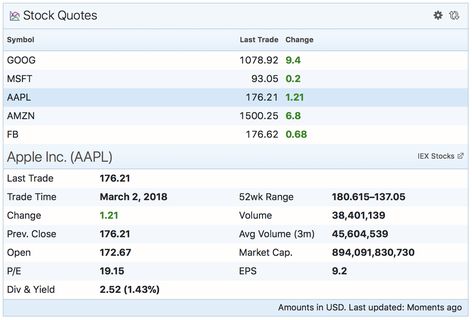
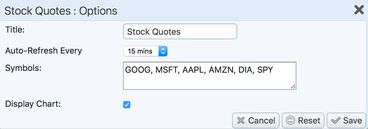
- The Stock Quotes dashlet displays recent stock quotes, using data from The Investors Exchange. Use the dashlet options (Figure 73 below) to enter the stock symbols you want displayed, separated by commas. A custom title may be set for the dashlet.
- When using this dashlet you can click on any stock to see the expanded details for that stock, or click on that stock again to restore the dashlet to its more brief format. (You can also click on the link to IEX Stocks to see further information.) The time of the last data update is shown, and the dashlet caches data for two hours unless an explicit refresh is performed.
- Note: Previous versions of this dashlet included chart options which were discontinued when Yahoo! Finance terminated their data feeds when acquired by Verizon. We hope to restore them when possible.
- Figure 72: Stock Quotes Dashlet Display
- Figure 73: Stock Quotes Dashlet Options
- 4.1.7 Tools Dashlets
- There are just two Tools dashlets - the Calendar and the NotePad. The Calendar dashet is very much the same as the Calendar module, so you should read about it in that section of this guide. The only difference is that the Calendar Week view does not show Saturday and Sunday, to keep the dashlet a little narrower. And the Day and Week Grid views are not available. The Calendar dashlet also has a configuration control to select the default display mode - Day, Week, Month or Year.
- The Notepad is a simple little note-taking dashlet. Double click in the text area of the dashlet to be able to edit the text. When you click outside the dashlet again, your edits are saved. You can also set the height and name of the NotePad, and use multiple instances of the dashlet, as seen in the Figure below.
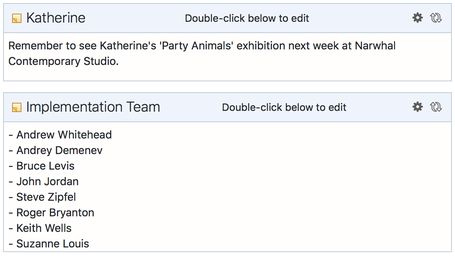
- Figure 74: NotePad Dashlets
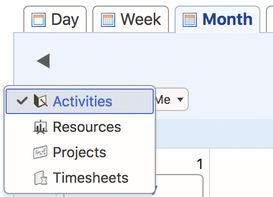
- 4.2 The Action Items Dashboard
- Figure 75 shows the 1CRM screen with the Action Items dashboard selected:
- Figure 75: Action Items Dashboard
- The Action Items dashboard contains a series of information dashlets, which contain summary information from other modules in the system.
- Dashboard pages are defined in the Dashboards module, in the Reports & Settings tab grouping. By default, each 1CRM installation has two dashboard pages in the Today’s Activities tab group - the Home Dashboard and Action Items. In most of the other tab groups (Sales & Marketing, Order Management, Project Management and Customer Service) there are also two dashboards by default. Sales & Marketing has a Sales Home dashboard and a Sales Charts dashboard, for example. Sales Home is at the start of the tab group, and Sales Charts is at the end, and the same sort of arrangement exists for the other tab groups mentioned.
- For more information on editing a dashboard layout, adding and removing dashlets, adjusting the number and width of columns, or setting dashlet options, please see the preceding section on the Home Dashboard.
- The information on the default Action Items dashboard layout has been selected to allow you to see at a glance all the calls, meetings and tasks you have coming up, as well as your email inbox (showing 10 rows so you get a good look). The My Contacts and My Accounts dashlets have been included with just 3 rows each, so you can use their search functions to look up any information you may need to progress your action items.
- 4.3 The Calendar Module
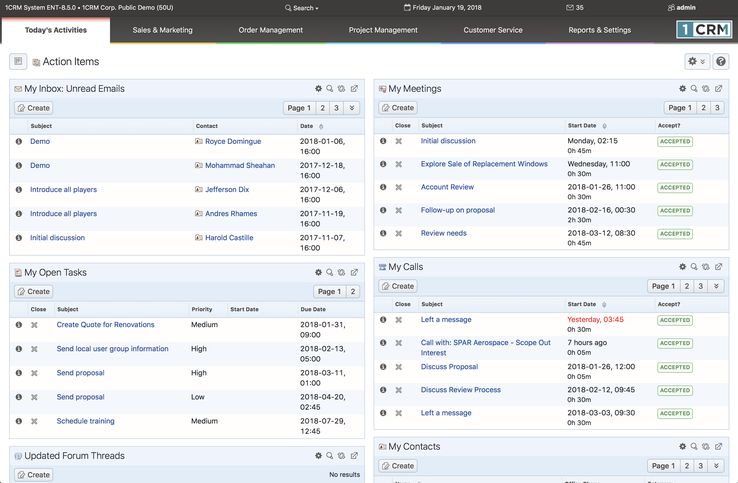
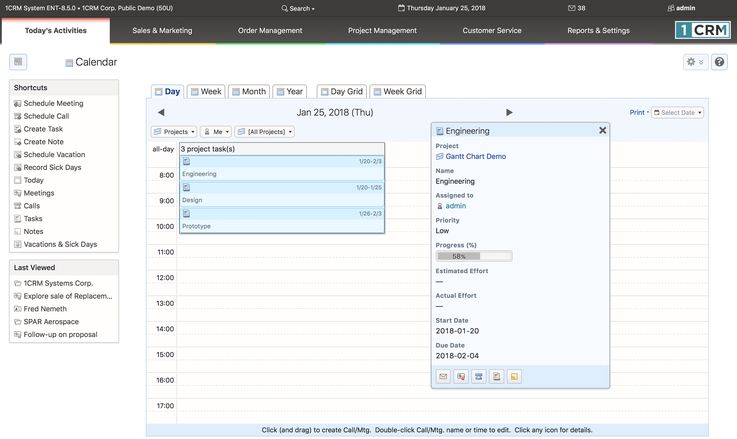
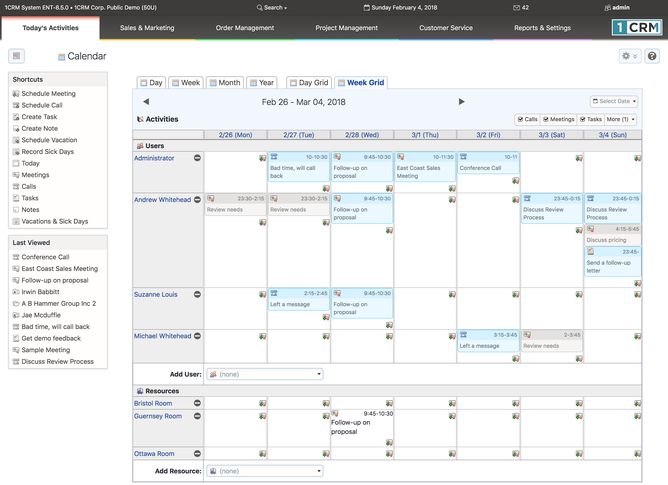
- Figure 76 shows the 1CRM screen with the Calendar Module selected and the sidebar collapsed, with the cursor hovering over a meeting to show additional details.
- Figure 76: The Calendar Module (Month Layout)
- 4.3.1 The Calendar Display and Main Controls
- The calendar module has six optional display layouts - Day, Week, Month, Year, Day Grid and Week Grid. Three of these layouts (Day, Week, Month) display calendar information for the current User, or for another selected User. The Year display layout just shows the calendar for the year with holiday information, and the ability to link to any date in the year. The other two layouts display a daily or weekly grid of information for scheduling meetings, with the ability to display schedule information for multiple selected Users as well as multiple selected Meeting Resources (such as meetings rooms, laptops, projectors and similar resources).
- You may access the three User-oriented display layouts by clicking on the Day, Week and Month tabs at the top of the main body of the calendar display. The Month layout is shown in Figure 76 above, while Figures 81 and 85 below show the Calendar Day and Week layouts.
- At the top of all the Calendar display layouts except Year, just under the tabs used to select the various layouts, you will see a number of controls:
- Arrow buttons to nudge to the previous or next Day, Week or Month.
- Links to go to Today’s date, or to select a date for display.
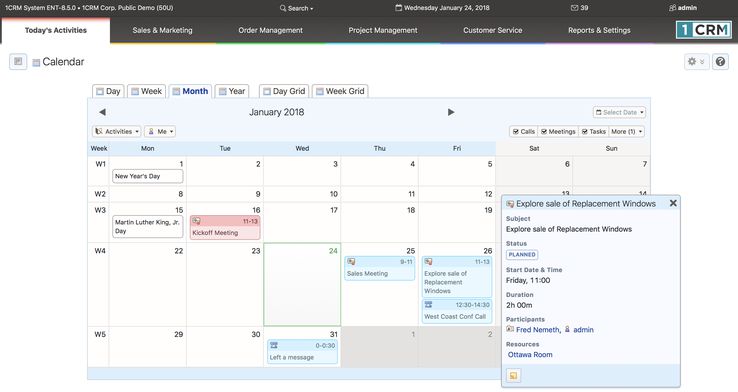
- Calendar Mode Selector: A dropdown list which allows you to select the Calendar Mode from one of Activities (the default), Resources, Projects or Timesheets.
- Note: Only the Activities mode is available on the Day/Week Grid displays.
- Figure 77: Calendar Mode Selector
- User Selection Filter: The Day, Week and Month layouts (for all modes except Resources) also offer a control to select a User for whom Calendar information is to be displayed, and a button to quickly return to showing information for the Current User.
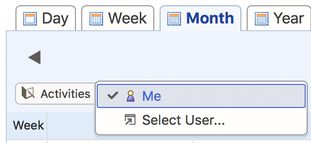
- Figure 78: Calendar User Selection Filter
- 4.3.2 Calendar Modes
- The Calendar Mode Selector allows you to select the calendar mode from one of Activities (the default), Resources, Projects or Timesheets.
- Select the appropriate calendar mode for the work you intend to do. The Activities mode is used for conventional calendar information. Resources and Projects modes are used for Project Management tasks. And Timesheets mode is used to record your time as Booked Hours entries.
- Calendar: Activities Mode
- Icons are used to indicate each type of Calendar activity:
 for a Call,
  for a Task,
  for a Meeting,
  for a Project Task,
  for a Vacation and
  for an Event.
- Meetings and Calls are shown at their scheduled times. On the Day and Week Calendars they are shown with boxes sized to a height that approximates the duration of the Call or Meeting. Meetings with the All Day check box set are shown in the All Day section of the Day and Week Calendars.
- Tasks are shown on their Due Date (and are not shown if there is no Due Date) at the Due Time (which defaults to noon) with a box height on Day/Week Calendars of an hour meeting.
- Vacations and Public Holidays are shown in the All Day section of the Day and Week Calendars, and on the Month Calendar with no associated time.
- Marketing Events are shown for all users, in the All Day section of the Day and Week Calendars, and on the Month Calendar with no associated time. Note: The default filter setting for Marketing Events is Off, so you must check it to see this information.
- Project Tasks are displayed for any users assigned as a resource for that Project Task, and are also shown in the All Day section of the Day and Week Calendars. Note: The default filter setting for Project Tasks is Off, so you must check it to see this information.
- A series of check boxes is used to select which types of calendar Activities to display. Calls, Meetings and Tasks check boxes are always visible, with check boxes for Marketing Events, Project Tasks and Vacations hidden behind a More dropdown link.
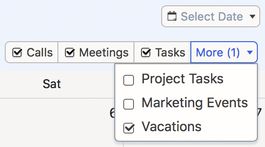
- Figure 79: Calendar Activities Filters
- Calendar: Resources Mode
- Select this mode to show the free/busy status of a selected meeting resource (or all meeting resources) on the normal Day, Week or Month calendar layouts. In this mode you can select a meeting resource (or all of them) using the control under the Calendar Mode Selector.
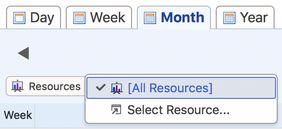
- Figure 80: Calendar Resource Filter
- Note: There are also dedicated Day Grid and Week Grid layouts available for the calendar which are even more useful for viewing the status of meeting resources.
- Calendar: Projects Mode
- Select this mode to show project tasks assignment information within the calendar context. A slightly different User Selection filter may be used to select any one user, or all users. And the Project filter control may be used to select a single project, or all projects. Once these filters are set, the main body of the calendar (in Day, Week or Month layout) will show project task assignments for all selected users on any selected projects.
- As illustrated in Figure 81, assignments are shown in the All Day section of the calendar, and the user may hover there to see multiple assignments displayed as a dropdown list. Then the user may hover on any selected project task to see a pop-up of more information.
- Figure 81: Calendar - Projects Mode
- Calendar: Timesheets Mode
- Select this mode to display or enter Booked Hours information within the calendar context. The normal User Selection filter may be used to select the current user, or any subordinate user. Once this filter is set, the main body of the calendar (in Day, Week or Month layout) will show Booked Hours for the selected user. An additional Create Timesheet control is provided to create a Timesheet if one does not exist for the period selected. When a Timesheet does exist its name is displayed, the control changes to a dropdown selector for available timesheets, and a Submit button can submit the Timesheet for Approval. Any hours entered are related to the currently selected user and Timesheet.
- New Booked Hours are created in this mode by clicking and dragging, much like defining a new Call or Meeting.
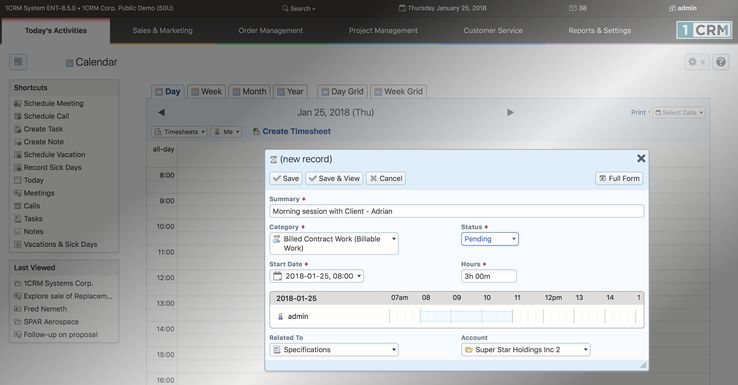
- Figure 82: Calendar - Entering Booked Hours in Timesheets Mode
- Simply click-and-drag on the calendar display (Day or Week layouts - the Month layout simply displays Booked Hours entries) to create a new Booked Hours entry - with the start time and number of hours indicated by your click-and-drag action. As shown in Figure 82, a popup form is displayed to enter the information. Once the new Booked Hours entry is saved, it will be displayed on the calendar as shown below:
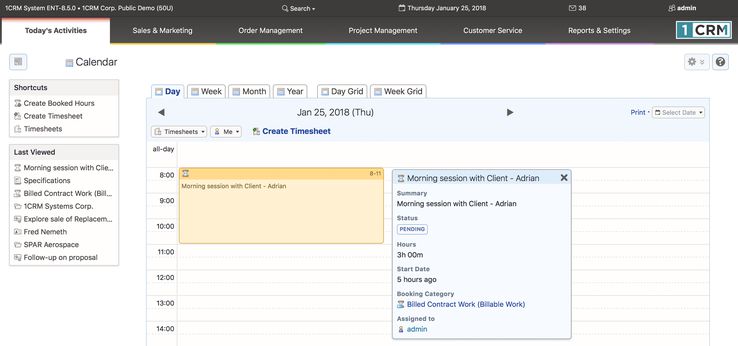
- Figure 83: Calendar - Timesheets Mode
- 4.3.3 Calendar Day Layout, and Printing Today’s Calendar
- As you can see in Figure 83 above, you may click on the Print link (towards the top right) on the Calendar Day tab to print out your appointments and tasks for the day (see Figure 84 below).
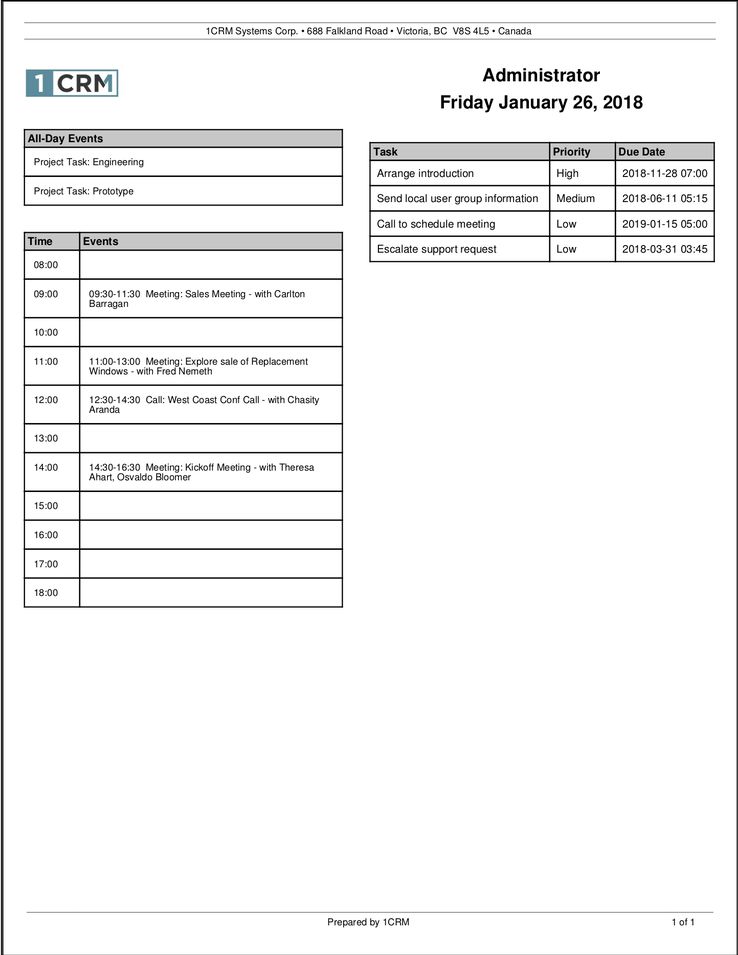
- Figure 84: Today’s Calendar Printed Format
- 4.3.4 Working With Calendar Items
- For each item displayed on the calendar, you have several controls available to you to manage it:
- You may single click on the item’s icon (
 for a Call,
  for a Task,
  for a Meeting,
  for a Project Task,
  for a Vacation and
  for an Event) to leave the calendar module and display the detail view for that item.
- On the Calendar Day and Week layouts you may click on any Call or Meeting to pop up a display box to edit the details of that Call or Meeting without leaving the calendar module.
- You may hover over the coloured rectangle of information displayed for any item, which will cause more details about the item to be displayed while remaining on the calendar display. (See Timesheet entry details in Figure 83 above, or Project Task info in Figure 81.)
- On the Calendar Day and Week layouts you may click and drag the Activity to a new time to reschedule it.
- Each different calendar layout allows you to nudge backwards and forwards in time - by a day, week, month or year as appropriate. In the Week, Month or Year display layouts, clicking on a particular date within the display will navigate to the Calendar Day layout for that date.
- 4.3.5 All Day Calendar Items
- On the Calendar Day and Week layouts, at the beginning of each day is an All Day area, which shows calendar items that last all day, or have no specific time during the day. These items are:
- Meetings scheduled for that day which have the All Day flag set
- Events that are active on that day
- Vacations that extend through that day
- Public Holidays that fall on that day
- Project Tasks for which you are a resource on that day
- If there is just one All Day item on any given day, it is displayed on the Day or Week Calendar layouts in the All Day area, in a similar fashion to any other calendar item.
- In Figure 85 below you can see how multiple All Day events are shown with summary text such as 2 Project Task(s), or 3 Project Task(s), 1 Holiday(s), if a day has multiple All Day entries. As also shown there, you can see details of them all by cursoring over the summary All Day information for that day. A dropdown list of those multiple items is then displayed, each with support for the normal actions you can take on a calendar item:
- You may single click on the item’s icon (
 for a Call,
  for a Task,
  for a Meeting,
  for a Project Task,
  for a Vacation and
  for an Event) to leave the calendar module and display the detail view for that item.
- You may click on any Call or Meeting to pop up a display box to edit the details of that Call or Meeting without leaving the calendar module.
- You may hover over the coloured rectangle of information displayed for the item, which will cause more details about the item to be displayed while remaining on the calendar display.
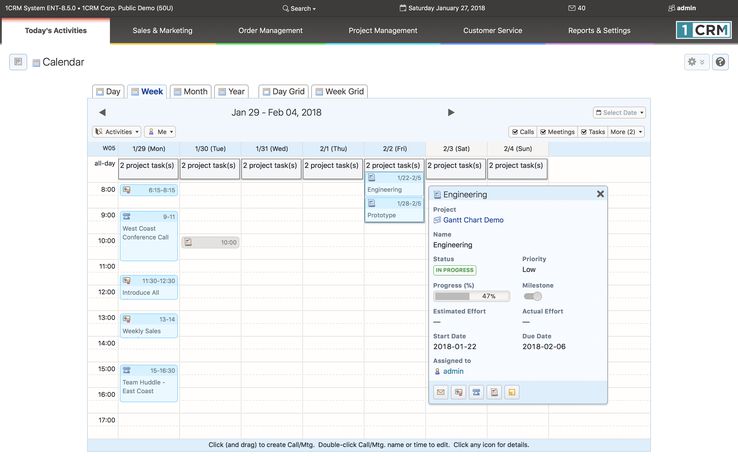
- Figure 85: The Calendar Module (Week Layout)
- 4.3.6 Public or Private Calendar Information
- Tasks, Meetings and Calls each have a check box that can be used to mark them as Public, or unchecked to mark them as Private. If you are viewing your own calendar information, then your Private information will look the same to you as if it were not private. But if someone else is viewing your calendar information, then Private Calls, Tasks and Meetings will be displayed at the correct time, and with the correct duration, but with no further information. The existence of a Private Call, Private Meeting, or Private Task is all that another user will see, but with the right time and duration so that a scheduling conflict may be avoided.
- 4.3.7 Scheduling New Calls and Meetings
- You can create new Calls and Meetings two ways:
- On the Calendar Day or Week layouts (either in the Calendar module or in the Calendar Dashlet on a dashboard page).
- By using the Schedule Call and Schedule Meeting shortcuts available in the Calendar module and on the Home dashboard and Action Items dashboard.
- The Calendar Day and Week layouts have the hours of the day listed vertically, and clicking on a specific time brings up a dialog box for scheduling a Call or Meeting, as shown in Figure 86 below.
- Clicking and dragging will set both the time and duration of a planned Meeting or Call. Figure 86 illustrates a new meeting created by clicking and dragging from 10:00 AM to noon on the Calendar Week layout. The Add Resources button has been used to assign a meeting room and the Add Participants button to relate a Contact. The meeting can also be marked as a recurring meeting, Public or not (Private), or related to other information in the system. The time/resource grid is used to check for meeting conflicts.

- Figure 86: Scheduling a Meeting on the Calendar Week Layout
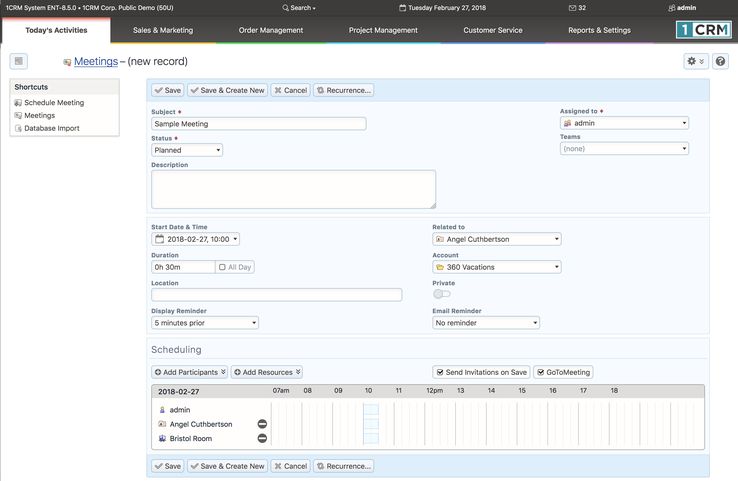
- You may also schedule new Calls and Meetings using the appropriate shortcuts in the Calendar module. For example, when scheduling a new meeting using the Schedule Meeting shortcut in the Calendar module, you see a screen like that shown in Figure 87 below.
- Using this screen, both Users and Contacts may be added to the meeting (via the Add Participants button), as well as meeting Resources such as meeting rooms, projectors etc.. Schedule conflicts may be seen on this screen once you set the time and duration of the meeting, and invitations will be sent out to both users and contacts at other organizations if the Send Invitations on Save checkbox is checked as the new meeting is saved.
- You add Contacts or Users by clicking on the Add Participants button, and then searching for and selecting the Contact or User desired in the popup window presented. They will be added to the time/resource grid above once selected.
- Display and Email reminders may be set for the meeting by using the appropriate dropdown box to both enable the reminder and set the amount of time prior to the meeting when you would like the reminder. (Note: Only visible on the Full Form, not on the form overlaid on the Calendar display.)
- Recurring Meetings
- A meeting may also be defined as a recurring meeting. To do so click on the Recurrence button on the Meeting edit view. A recurrence dialog box pops up to allow you to define the parameters of the recurrence. The recurrences of the initial meeting are created by a scheduler task that runs once a day. Recurring instances are created for the next month, but no more than 50 instances may exist at one time. When you edit a recurring meeting, a control at the top of the screen offers you three options:
- Update all instances - A simple change for all instances of the meeting.
- Update this instance only - Breaks the original sequence of meetings, ending it before the item being edited, and starting a new sequence with the item after the one being edited. Instance edited becomes a standard meeting with no recurrence.
- Update this instance and all future instances - Breaks the original sequence of meetings, ending it before the item being edited, and starting a new sequence with the item being edited.
- Time & Date Entry Abbreviations
- Rather than always having to enter a full date in the proper format (or select it using the small Calendar icon), and then enter the time in its correct format as well, a number of abbreviations are available if you prefer to use them: (Assume today’s date is August 4th, 2018, and the current date format is 2018/08/04)
- Enter a number < 1000. It is taken as the day of the month, and the current month & year are assumed. (Example: enter 10 and press the Enter or Return key, and see 2018/08/10)
- Enter a number > 1000. It's taken as the year. Current day and month are assumed.
- Enter + or - and a number, and it's taken as a day offset (-5 ⇒ 5 days previous, +0 ⇒ today)
- Enter + or - a number plus m, and it's taken as a month offset (+5m ⇒ 5 months from today)
- Enter + or - a number plus y, and it's taken as a year offset (+1y ⇒ 1 year from today)
- Enter two numbers, they are taken as the month and day (10 5 ⇒ 2018/10/5)
- Paste a timestamp in the date part of a date/time field, and it splits the time off and moves it into the second part of the field.
- In the time field, a single number is taken as the hour. Numbers < 8 are assumed to be PM, although AM or PM (or just a or p) can be added
- Decimals are supported in the time field, consistent with duration input fields (1.5 ⇒ 1:30)
- In combination: +5d 8p ⇒ date: 5 days in the future, at 8:00pm
- Figure 87: Using the Schedule Meeting Shortcut
- 4.3.8 Holidays, and Holiday Packs For Other Regions
- The calendar shows holidays in its various views (all of the Day, Week, Month and Year views show holiday information). 1CRM comes standard with holiday information loaded for the United States, Canada (Ontario), Australia, France, Italy, Spain, Germany, Switzerland and the Philippines. To load a holiday pack for another region, simply load it with Upgrades & Customization in Admin. Then in Admin - System Settings the default holiday pack for your entire 1CRM installation may be selected. And on your My Account screen you may choose if your calendar displays use the system default holidays, or those from another holiday pack available on the system. Sample calendar packs are available upon request for those that wish to develop their own holiday packs.
- Note: The information in a holiday pack typically contains holiday data for the next 20 years.
- 4.3.9 Google Calendar Synchronization
- On the Integration tab of your My Account screen, there is a panel called Google Account Settings. First you will need to authorize 1CRM to access your Google data, so that 1CRM may exchange calendar information with your Google account. Click the Authorize button in the Google Account Settings sub-panel to go to the Google web site. When a popup window opens, click Accept to generate an access token. Copy the generated token, and paste it into the box on the left, then Save. You will need to login to your Google account first.
- In the Google Calendar Settings panel, use the Sync Setting dropdown to choose the flow of calendar data: one way from 1CRM to Google, or the reverse, or two-way. You may also disable the sync by choosing the - Sync Disabled - option. Dropdown boxes are available so you may choose which calendar items (Calls, Meetings, Tasks) are synchronized between Google and 1CRM.
- Note: New activities created in Google are synchronized into 1CRM as Meetings.
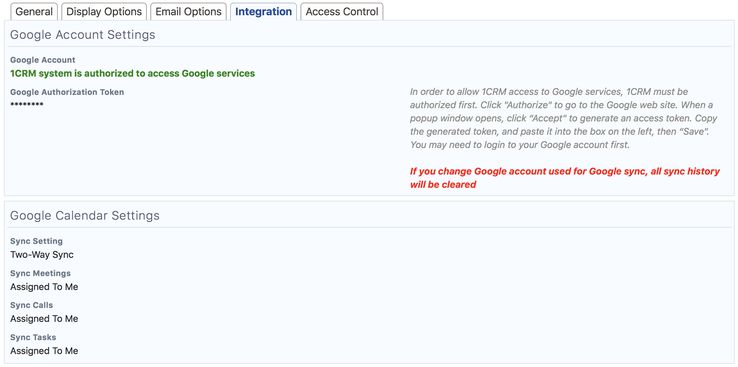
- Figure 88: Google Account & Calendar Settings on My Account Detail View
- If you create a recurring meeting in 1CRM, when you are synchronizing with a Google calendar, a recurring event will be created in the Google calendar. Editing the recurrence rules for a Google event drops all instances of the recurring meeting in 1CRM, and a new sequence will be created on the next run of the scheduler. Although 1CRM allows multiple recurrence rules per meeting, only one is taken into consideration when synchronizing - since Google calendar does not support multiple rules. So, if Google calendar synchronization is active, only single-rule recurrences should be defined in 1CRM.
- Note: To sync with your Google Calendar the Sync Google Calendar Events scheduler entry must be enabled, and your scheduler must be running. A run interval of 15 minutes is the recommended value. A maximum of 50 items are transferred for each sync, to manage load on the server.
- 4.3.10 CRMSync CalDAV Calendar Synchronization
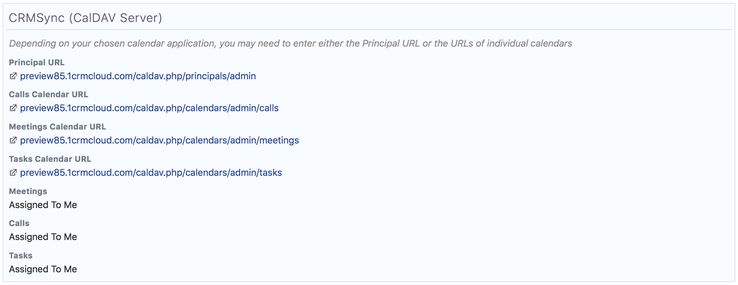
- On the Integration tab of your My Account screen, there is a panel called CRMSync (CalDAV Server). The CRMSync feature in 1CRM offers a CalDAV server to provide data sync capabilities for 1CRM Calls, Meetings and Tasks. To use the CRMSync feature for Calls and for Meetings, simply set the dropdown options here to choose what Calls and Meetings to sync: Assigned To Me, All I Am Invited To or All I Can See. For Tasks your options are just Assigned To Me and All I Can See.
- Then in any other system that supports CalDAV, such as Calendar and Reminders on macOS (for Apple Mac computers), or iOS (for iPhone and iPad), Android phones and tablets, or Microsoft Outlook (via a number of Outlook add-on options), simply subscribe to the CalDAV service by using the login credentials of your 1CRM server plus one or more of the CalDAV URLs as shown in Figure 89 below.
- Note: Be sure to use the actual URLs shown on your own My Account - Integration tab, not those shown in our example here.
- Different applications use different URLs. For example, the macOS Calendar app requires the Principal URL, and adds all 3 calendars. In Mozilla Sunbird, you add all 3 calendars separately, using the corresponding URLs for Calls, Meetings and Tasks.
- Figure 89: CRMSync (CalDAV Server)
- For more information, see the section in Chapter 10 entitled CRMSync for Calls, Meetings, Tasks (CalDAV Server).
- 4.3.11 Calendar Grid Layouts for Scheduling Multi-Person Meetings
- Of the six layout tabs at the top of the calendar, two of them are used specifically to display information about multiple Users as well as Meeting Resources, so that a convenient meeting time can be established.
- The Day Grid layout shows a table of selected users and meeting resources (meetings rooms, projectors, etc..) and any meetings in which they are involved for the hours of the business day. The display begins with the current user and no meeting resources, and you may add the users and meeting resources desired.
- You can double click on any Call or Meeting to edit it.
- You can single click on the icon for an existing Call or Meeting to leave the calendar module and display the detail view for that item.
- You can click on any 15-minute segment of a day to create a new meeting (default 15 minute duration) that automatically schedules the currently selected users and meeting resources.
- You can also hover over the box for any meeting to see the Additional Info box for it.
- The Week Grid layout shows a table of selected users and meeting resources (meetings rooms, projectors, etc..) and any meetings in which they are involved for the seven days of a selected week. The display begins with the current user and no meeting resources, and you may add the users and meeting resources desired.
- You can double click on any Call or Meeting to edit it.
- You can single click on the
 icon for an existing meeting to leave the calendar module and display the detail view for that item.
- You can single click on any Add New Call/Meeting
 icon to create a new meeting on that day and automatically schedule the currently selected users and meeting resources.
- You can also hover over the box for any meeting to see the Additional Info box for it.
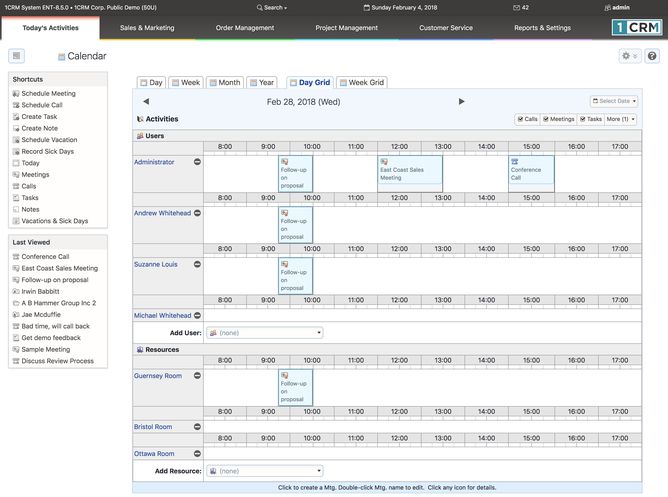
- Figure 90: The Calendar Module (Day Grid Layout)
- Figure 91: The Calendar Module (Week Grid Layout)
- 4.3.12 GoToMeeting Integration
- When scheduling a new meeting, you have the option of checking a GoToMeeting box. If you check this box for a new meeting, and then Save the meeting, 1CRM will automatically schedule a GoToMeeting meeting at the same time, by communicating with the GoToMeeting service via their web API. If you later on re-edit a meeting with an associated GoToMeeting, and uncheck the Schedule GoToMeeting Meeting box, and Save, 1CRM will automatically remove the meeting from the GoToMeeting service.
- Note: In order to use this feature, you must first enter your GoToMeeting Login and Password credentials on the My Account page, in the Integration tab. (Or inherit credentials from the Admin - Company Information GoToMeeting Integration settings if your My Account settings are blank.)
- Note: When system reminder emails are sent for meetings, and when meeting invitation emails are sent, they will include the link to join the GoToMeeting session if any.
- 4.3.13 Vacations & Sick Days
- From within the Calendar module, there are three shortcuts available specific to planning and recording Vacations and Sick Days.
- The Vacations & Sick Days shortcut leads to a screen like that shown in Figure 92 - a list of all Vacations and Sick Days taken. You can see what the status is (Planned, Approved, Not Approved, Cancelled, Days Taken), see how many days are planned (or were taken), the start and end dates of any leave, and what employee was involved.
- The Schedule Vacation shortcut is used as shown in Figure 93 to create a new Vacation record. Users should create new Vacation records with a status of Planned - and wait for it to become Approved or Not Approved. You will note that the Days field need not bear any strict relationship to the Start and End Dates fields. This is because there may be statutory holidays on some of the days taken, or the employee may have only taken a half day on one of the days, etc.. The Days value may be a decimal amount, such as 4.5, or 9.25, for instance.
- The Record Sick Days shortcut is used in a similar fashion to create a record of some Sick Days taken. These entries must be made with the status of Days Taken. Again, partial days may be taken, such as .5, 1.25, etc..
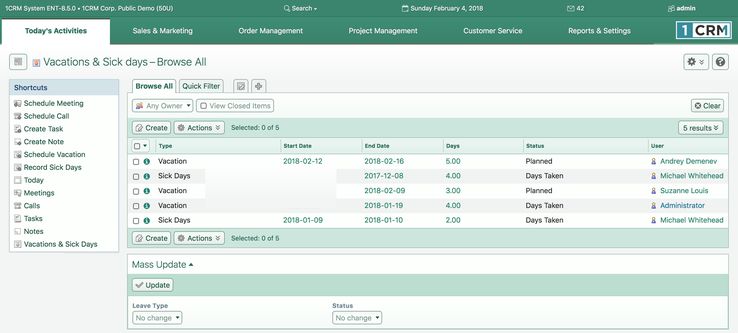
- Figure 92: Vacations & Sick Days (List View)

- Figure 93: Schedule Vacation
- A scheduler task changes all Vacations in the past from a status of Approved to a status of Days Taken. Both Sick Days and Vacations are marked on the employee’s record in HR as having been taken when they have a status of Days Taken, as shown in Figure 94 below.

- Figure 94: Employee Leave Record in HR Screen
- 4.3.14 Calendar Dashlet
- The Calendar dashet is very much the same as the Calendar module. The only differences are that the Calendar Week view does not show Saturday and Sunday, to keep the dashlet a little narrower. And the Day and Week Grid views are not available.
- 4.4 The Meetings Module
- Figure 95 shows the 1CRM screen with the Meetings module selected:
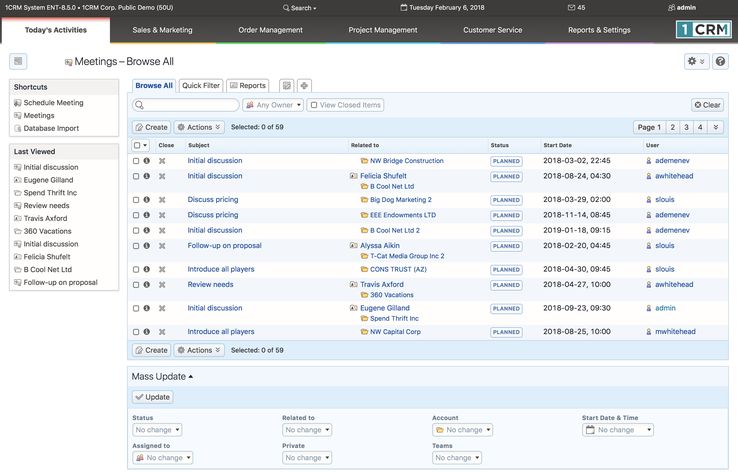
- Figure 95: The Meetings Module
- The Meetings module lists all the Meetings contained within your 1CRM system, and shows what Contacts and other items in the system they are related to. Meetings are extremely useful for creating reminders of Meetings you need to attend, or records of what was discussed at a Meeting, and linking these Meeting records to a wide variety of other types of information throughout 1CRM. Figure 95 illustrates the initial view for the Meetings module, the Meetings List view.
- The Meetings module has a
 Help icon on the title bar at the top right of the main screen body, followed by a choice of layout tabs, and a list of all or selected Meetings. The Meetings list may be sorted by clicking on any column title that has the
  icon beside it. Clicking on a column title when it is already the highlighted sort column reverses the sort order.
- The Meetings list is paginated if it contains more items than may be listed on the display, and controls are provided to go to the start or end of the list, or step to the next or previous page. Clicking on any Meeting in the list displays the detail information for that Meeting.
- Navigation shortcuts are provided to create a new Meeting, or to switch back to the Meetings list view.
- Each item in the list has a check box at the left, and at the bottom of the screen is a Mass Update facility which may be expanded to update one or more field values for all checked items.
- The Meetings list view provides powerful linking capabilities to related information. Clicking on a Meeting’s subject takes you to a detailed view of the specific Meeting. Clicking on the Contact zooms to a detailed view of that Contact, and so on.
- Calls, Meetings, Tasks and Notes (all considered Activities) are often created by adding them at the History or Activities sub-panel on an Account, Contact or other record in the system.
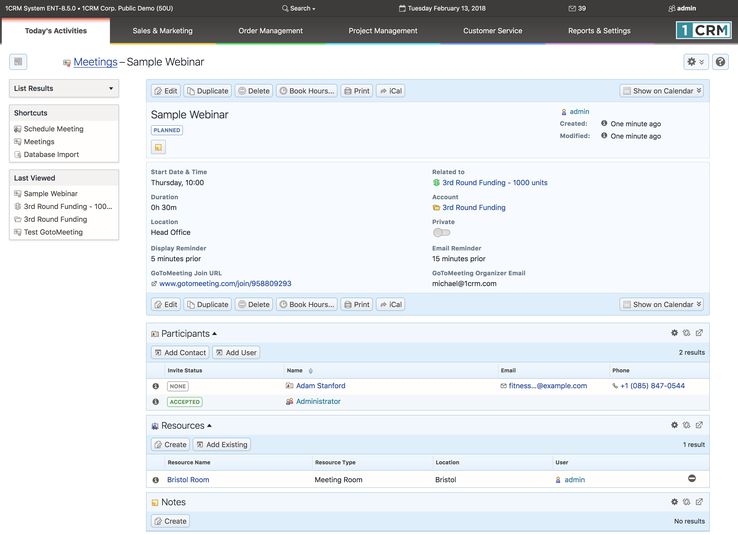
- Figure 96: Meeting Detail View
- 4.4.1 Joining a GoToMeeting Session
- The Figure above shows the Meeting detail view. As described in the section about the Calendar module, when scheduling a new meeting you can check the GoToMeeting box, and automatically schedule a GoToMeeting as you create the meeting in your 1CRM system.
- Once you Save the Meeting in 1CRM, you can at any time join that GoToMeeting session by simply clicking on the GoToMeeting Join URL, as shown in the Figure above.
- 4.5 The Calls Module
- Figure 97 shows the 1CRM screen with the Calls module selected:
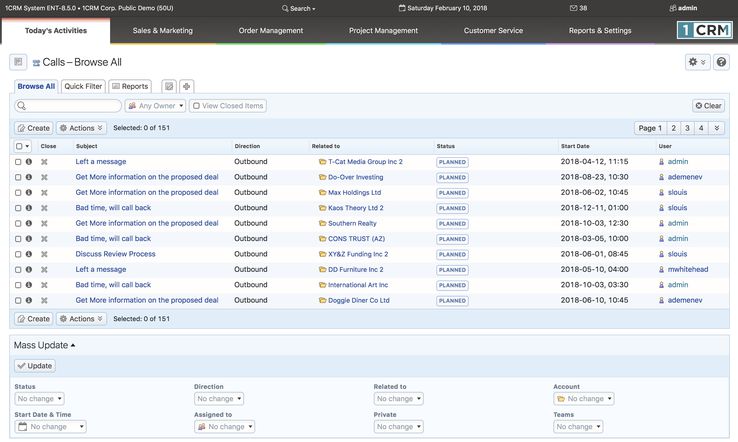
- Figure 97: The Calls Module
- The Calls module lists all the Calls contained within your 1CRM system, and shows what Contacts and other items in the system they are related to. Calls are extremely useful for creating reminders of Calls you need to make, or records of what was discussed on a Call, and linking these Call records to a wide variety of other types of information throughout 1CRM. Figure 97 illustrates the initial view for the Calls module, the Calls List view.
- The Calls module has a
 Help icon on the title bar at the top right of the main screen body, followed by a choice of layout tabs, and a list of all or selected Calls. The Calls list may be sorted by clicking on any column title that has the
  icon beside it. Clicking on a column title when it is already the highlighted sort column reverses the sort order.
- The Calls list is paginated if it contains more items than may be listed on the display, and controls are provided to go to the start or end of the list, or step to the next or previous page. Clicking on any Call in the list displays the detail information for that Call.
- Navigation shortcuts are provided to create a new Call, or to switch back to the Calls list view. Each item in the list has a check box at the left, and at the bottom of the screen is a Mass Update facility which may be expanded to update one or more field values for all checked items.
- The Calls list view provides powerful linking capabilities to related information. Clicking on a call’s subject takes you to a detailed view of the specific Call. Clicking on the Contact zooms to a detailed view of that Contact, and so on.
- Calls, Meetings, Tasks and Notes (all considered Activities) are often created by adding them at the History or Activities sub-panel on an Account, Contact or other record in the system.
- 4.6 The Tasks Module
- Figure 98 shows the 1CRM screen with the Tasks module selected:
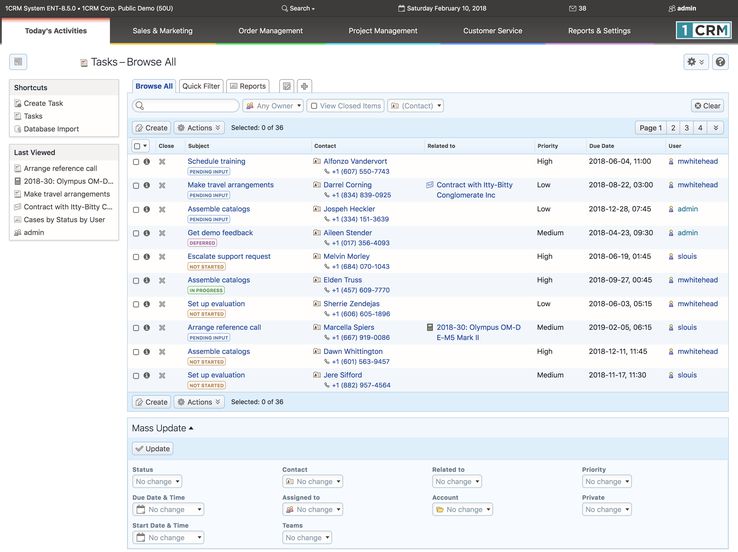
- Figure 98: The Tasks Module
- The Tasks module lists all the Tasks contained within your 1CRM system, and shows what Contacts and other items in the system they are related to. Tasks are a key capability within 1CRM, used to record all manner of to-do items, and relating them to a wide variety of records throughout the system. Figure 98 illustrates the initial view for the Tasks module, the Tasks List view.
- The Tasks module has a
 Help icon on the title bar at the top right of the main screen body, followed by a choice of layout tabs, and a list of all or selected Tasks. The Tasks list may be sorted by clicking on any column title that has the
  icon beside it. Clicking on a column title when it is already the highlighted sort column reverses the sort order.
- The Tasks list is paginated if it contains more items than may be listed on the display, and controls are provided to go to the start or end of the list, or step to the next or previous page. Clicking on any Task in the list displays the detail information for that Task. Navigation shortcuts are provided to create a new Task, or to switch back to the Tasks list view. Each item in the list has a check box at the left, and at the bottom of the screen is a Mass Update facility which may be expanded to update one or more field values for all checked items.
- The Tasks list view provides powerful linking capabilities to related information. Clicking on a task’s subject takes you to a detailed view of the specific Task. Clicking on the Contact zooms to a detailed view of that Contact, and so on. Calls, Meetings, Tasks and Notes (all considered Activities) are often created by adding them at the History or Activities sub-panel on an Account, Contact or other record in the system.
- 4.7 The Notes Module
- Figure 99 shows the 1CRM screen with the Notes module selected:
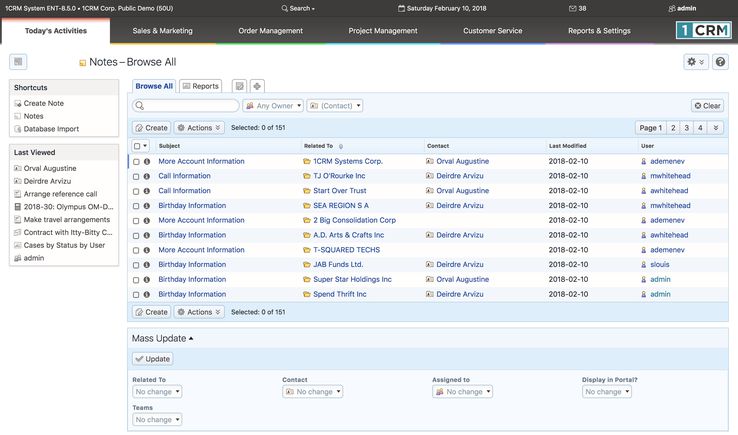
- Figure 99: The Notes Module
- The Notes module lists all the Notes contained within your 1CRM system, and shows what Contacts and other items in the system they are related to. Notes are extremely useful for creating brief notes, or attaching substantial documents, spreadsheets, proposals or images to a wide variety of records throughout 1CRM. Figure 99 illustrates the initial view for the Notes module, the Notes List view.
- The Notes module has a
 Help icon on the title bar at the top right of the main screen body, followed by a choice of layout tabs, and a list of all or selected Notes. The Notes list may be sorted by clicking on any column title that has the
  icon beside it. Clicking on a column title when it is already the highlighted sort column reverses the sort order.
- The Notes list is paginated if it contains more items than may be listed on the display, and controls are provided to go to the start or end of the list, or step to the next or previous page. Clicking on any Note in the list displays the detail information for that Note. Navigation shortcuts are provided to create a new Note, or to switch back to the Notes list view. Each item in the list has a check box at the left, and at the bottom of the screen is a Mass Update facility which may be expanded to update one or more field values for all checked items.
- The Notes list view provides powerful linking capabilities to related information. Clicking on a note’s subject takes you to a detailed view of the specific Note. Clicking on the Contact zooms to a detailed view of that Contact, and so on.
- Calls, Meetings, Tasks and Notes (all considered Activities) are often created by adding them at the History or Activities sub-panel on an Account, Contact or other record in the system.
- 4.8 The Email Module
- Figure 100 shows the 1CRM screen with the Email Module selected using the Email tab:

- Figure 100: The Email Module – Email List View Screen
- The Email module helps you compose draft emails and save them to be sent at a later date, or send them right away. You may also create email templates which reference variable fields from Account or Contact records, so that when you send a new Email using an email template, variable data from the related Account or Contact will automatically be inserted in the email. Emails may be associated with Contacts, Accounts, Opportunities, Cases, Leads, Supported Products, Projects, or Bugs.
- The Email module also lets you receive incoming email (including attachments) from one or more POP3 or IMAP email accounts – which you may specify in your My Account settings – and reply to or forward these emails. As well, users may create personal mail folders, and move email between folders. Deleted email goes to the Trash folder – and email deleted from the Trash folder is completely deleted, including attachments. Settings on your My Account page control the automated removal from the system of email, based on configurable conditions.
- The Email module has a
 Help icon on the title bar at the top right of the main screen body, followed by a choice of layout tabs, and a list of all or selected Email messages. A filter is provided (see dropdown in figure above) to display the mail within any standard or user-defined folder. The
  button lets you Trash or Delete selected emails, and also Print them in a useful PDF format.
- The Email list may be sorted by clicking on any column title that has the
 icon beside it. Clicking on a column title when it is already the highlighted sort column reverses the sort order. The Email list is paginated if it contains more items than may be listed on the display. Controls are provided to go to the start or end of the list, or step to the next or previous page.
- Clicking on the subject of any Email in the list displays the detailed text of that message. Clicking on the Contact link displays the Contact to whom the mail was addressed, and clicking on the Related to link displays the related Account, Opportunity, Case, Lead, Product, Project, or Bug information.
- Navigation shortcuts are also provided to Compose and send a new email, to Create or View Email Templates, to Create a new email folder or view the current list of folders.
- Note: Before you use the Email module, go to the Email Options tab of your My Account page and setup the information below. Notice the
 button on a Monitored Mailboxes sub-panel at the bottom of the My Account screen (once the Email Options tab is selected - and before you click on Edit), which you need to use to receive email. See Section 10.1.10 for setup details.
- Email address – Your main email address. Note: This must be set properly in order to receive email notifications.
- Reply-to name – your name as you wish email recipients to see it.
- Reply-to address – the email address you want people to use when emailing back to you.
- Email Signature – your name and/or contact information, for automatic inclusion at the end of each email you send.
- Email client – typically leave this set to System Default Mail Client. This controls what happens when you click on a hyperlinked email address within 1CRM – does it take you to the Create Email screen within 1CRM – or does it fire up an external email client.
- Default display format – choose HTML (richer display capabilities) or Plain Text.
- Default send format – choose HTML (richer email composition capabilities) or Plain Text.
- Inline images – choose Hide or Display (usually display, unless you have low bandwidth).
- Messages in Trash Cleanup – Options are to Never Delete (default), or to keep email in trash for a period of from 5 days to 1 year. This option, and the next four options, are there to help keep the volume of email in 1CRM to manageable proportions, to keep system email performance optimized. Email messages that are cleaned up are deleted, along with their attachments.
- Received messages without associations cleanup: Specifies retention period for received messages that are not related to any other data object in the system. This would be an email message received from someone that is not a Contact, and therefore less likely to be of value as business history.
- Received messages with associations cleanup: Specifies retention period for received messages that are related to at least one other data object in the system – such as an Account, Contact, Project, etc... Usually this would be at least 3 months, and often 6 or more.
- Sent messages without associations cleanup: Specifies retention period for sent messages that are not related to any other data object in the system. This would be an email message sent to someone other than a Lead or Contact, and therefore not likely to be of value as business history.
- Sent messages with associations cleanup: Specifies retention period for sent messages that are related to at least one other data object in the system – such as an Account, Contact, Project, etc... Usually this would be at least 3 months, and often 6 or more.
- Mail transfer agent – your administrator will tell you if this needs to be set for Sendmail or SMTP. On a Linux server, Sendmail can be easier to configure, but SMTP causes fewer issues with your emails being seen as SPAM. See section 10.1.9 for setup details.
- When an email is opened, the user sees the Email Detail View, which allows the user to Reply to an email, Reply All, Forward it, Delete it, Edit it or Duplicate it. From the Email List View screen, multiple emails may be selected using check boxes to their left, and trashed or moved to another email folder for the current user using the Mass Update panel.
- Emails which are composed and sent from within 1CRM may take advantage of the email signature feature, which may be set in the user’s My Account area. When composing an email, an attachment may be uploaded from the user’s client computer. As well, Documents may be attached from the 1CRM Document repository.
- To choose who to send the email to, just click on
 and enter the first few letters of a Contact or Lead’s first or last name and a list of possible suggestions will appear, from which you can select the one you want. Or click on
  to do a full search. You can also enter an email address not known in your CRM, as a custom entry.
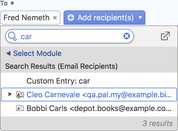
- Figure 101: Selecting Email Recipients
- You can click to expand the CC and BCC addressee options, and you can drag and drop addressees between the TO, CC and BCC lists.
- To retrieve email from one or more Monitored Mailboxes, add them on the Email Options tab of your My Account page, by clicking the
 button on the Monitored Mailboxes sub-panel of the Detail View.
- You can retrieve your incoming mail two ways:
- If your 1CRM system is set up to use the Scheduler to regularly poll for incoming email, and if when you add a new monitored mailbox you select the Scheduled Retrieval check box, your email will be read into your Inbox automatically at the time of each poll.
- You may click on the Check Email button (towards the top of every screen) at any time, whether or not your mailboxes are being polled regularly.
- In addition to the fairly conventional user email features described above, 1CRM also offers Group email. Multiple email accounts (such as support@company.com, or info@company.com) may be designated by the administrator to be monitored (see Admin - Email - Group Inboxes), and any email received will automatically be placed in the Group email folder specified. Users may:
- View the entire contents of all Group email (by selecting the Group Email tab as shown on Figure 100), or of any specific Group email folder
- Take email from any Group email folder and place it in one of their personal email folders
- Return emails from their personal email folders to any selected Group email folder
- 4.8.1 HTML Editor
- When composing an HTML email (or editing HTML in many other parts of the system, such as product descriptions, custom login message or email signatures), you may take advantage of an advanced HTML editor within 1CRM. This editor includes a spell checker, rich text formatting features, and image management capabilities. To use this feature if it is minimized, simply click on the down arrow icon
 shown as item 1 in Figure 102. This will expand the top bar on the compose window, as shown in Figure 103.
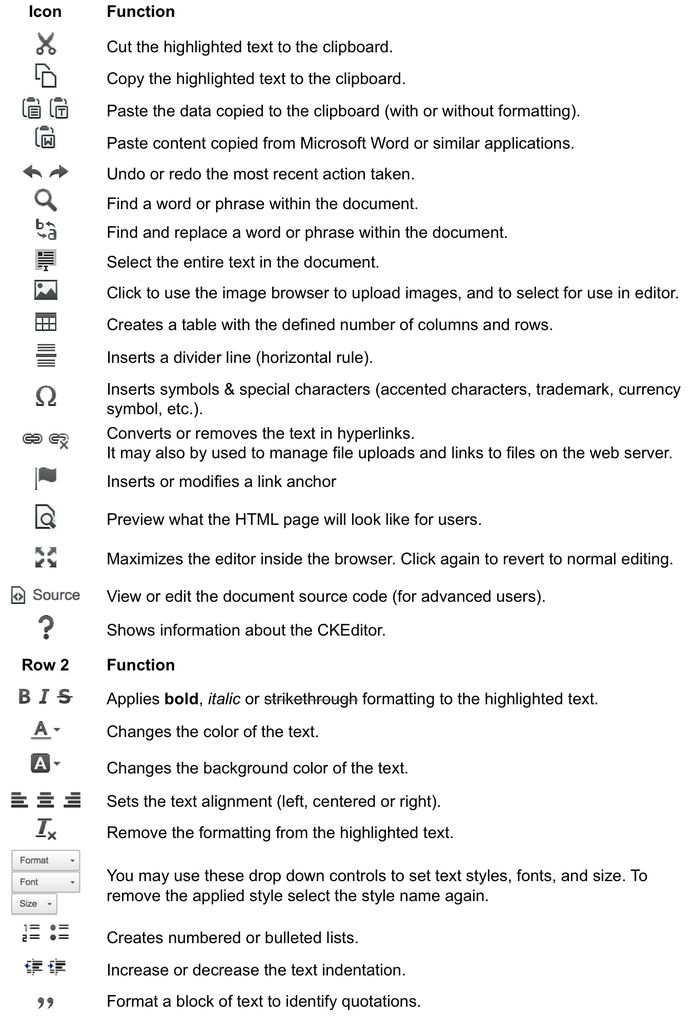
- The HTML editor functions are summarized in a table below:
- HTML Editor Functions
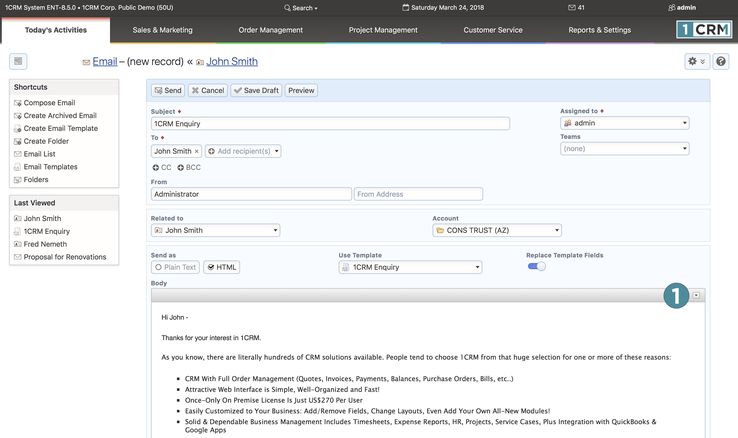
- Figure 102: Composing an Email
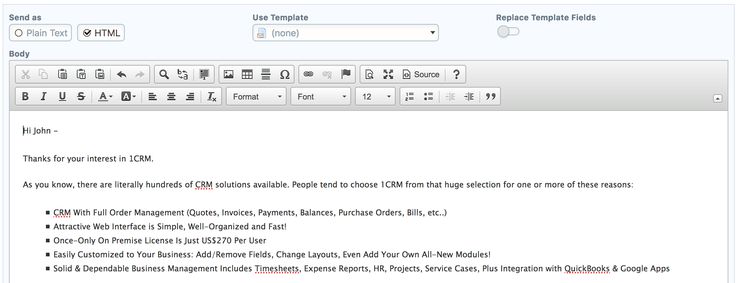
- Figure 103: HTML Editor Control Panel
- 4.8.2 Uploading and Using Images in HTML
- You can use the Image Browser to select existing images for use in your HTML document.
- Click on the icon
 to open the editor, then click on the Image Browser icon
  to bring up the Image Properties dialog box (see Figure 104).
- You can manually enter the URL of an external image, and just click on OK.
- Note: Make sure the images you use may be accessed by anyone on the Internet.
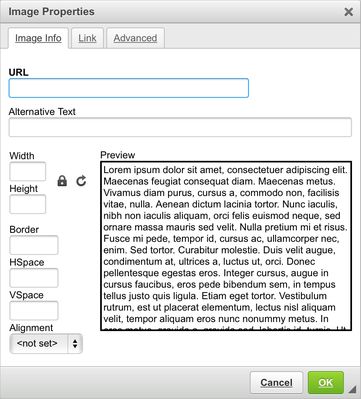
Figure 104: Image Properties Dialog Box
- 4.8.3 Advanced Editing
- A very handy technique for advanced editing is to edit an HTML document just as you like it in a dedicated editor such as DreamWeaver, and copy the HTML source of that document to your clipboard. Then go to the HTML editor in 1CRM and click on
 , and paste all the HTML source into that window. Click on
  again to turn it off, and then Save.

Figure 105: Advanced Editing by Pasting in View Source Mode
- 4.9 The Forums Module
- Figure 106 shows the 1CRM screen with the Forums Module selected:
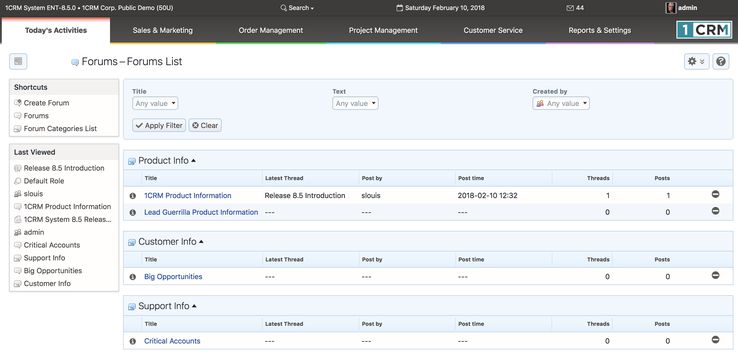
- Figure 106: The Forums Module
- The Forums module is designed to permit ongoing discussions within the CRBM system. In order to use this module, one or more Forum Categories must first be defined by an Administrator, using the Forum Categories List shortcut shown in the figure above.
- Then, new forum threads must be created, and each thread must be within an established category. Forum threads are listed as above, organized by Category.
- Once you have created a thread, any user may reply to it, as shown in Figure 107. That is the basic manner in which Forums and Threads are used. But there are several more powerful aspects to this module:
- There is a Forum dashlet which can show the latest Forum Threads that have been updated
- Users can subscribe/unsubscribe to a Thread, and subscribers receive a notification email whenever new replies are added to the Thread
- Threads may be related to Accounts, Opportunities, Cases and Software Bugs
- To view the Forums dashlet, simply go to any dashboard page, and use the Add Dashlets button to add the Forums dashlet to the dashboard, as shown in Figure 108.
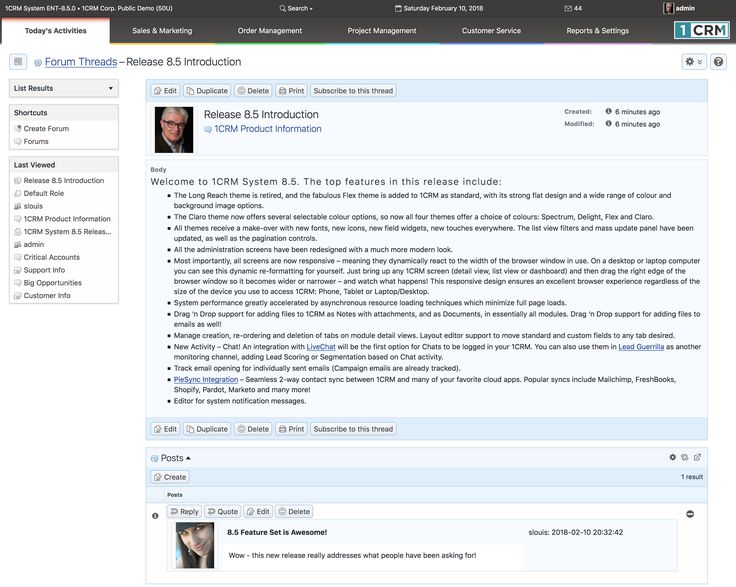
- Figure 107: A Forum Thread
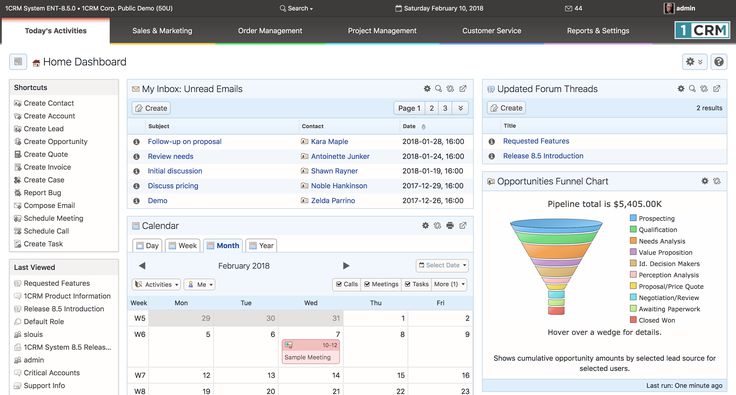
- Figure 108: Forums Dashlet
- To subscribe to a Forum Thread, simply click on the Subscribe to this thread link (see Figure 107). You will see this message:
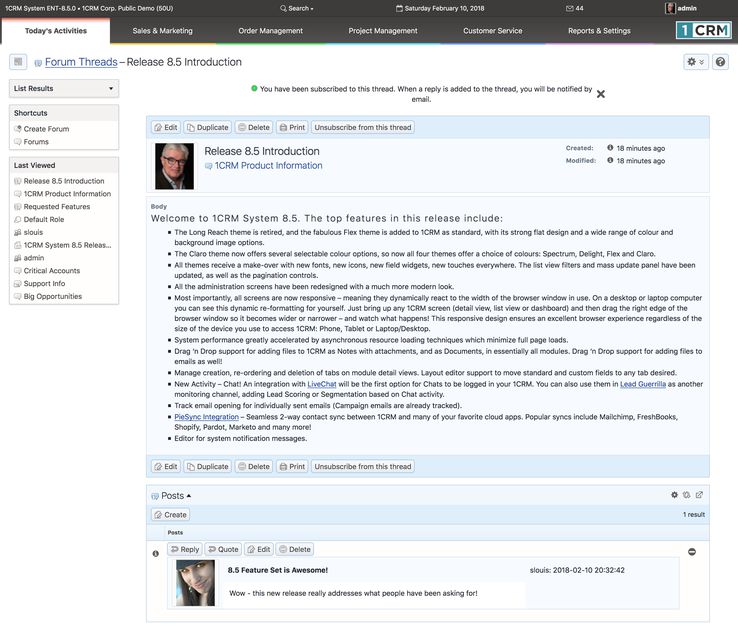
- Figure 109: Subscribing to a Thread
- 4.10 The Chats Module
- Figure 110 shows the 1CRM screen with the Chats Module selected:
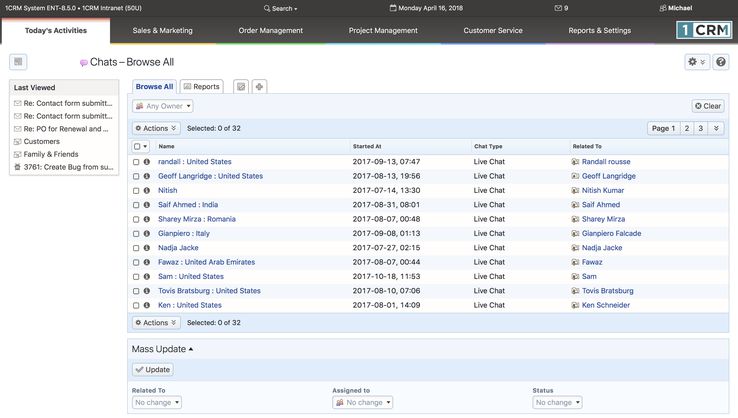
- Figure 110: The Chats Module
- The Chats module holds Chats passed into the CRM from an integrated website chat system such as LiveChat. Completed Chats are displayed as part of the History sub-panel on Leads and Contacts, offering another useful source of information about a form of customer contact (often known as a customer Touch).
- See this webpage for details of how this integration is setup by your system administrator. Each user must also add a configuration setting on the Integrations tab of their My Account page.
- The Chats module has a
 Help icon on the title bar at the top right of the main screen body, followed by a choice of layout tabs, and a list of all or selected Chats. The Chats list may be sorted by clicking on any column title that has the
  icon beside it. Clicking on a column title when it is already the highlighted sort column reverses the sort order.
- The Chats list is paginated if it contains more items than may be listed on the display, and controls are provided to go to the start or end of the list, or step to the next or previous page. Clicking on the Name of any Chat in the list displays the detail information for that Chat. Navigation shortcuts are provided to create a new Chat, or to switch back to the Chats list view. Each item in the list has a check box at the left, and at the bottom of the screen is a Mass Update facility which may be expanded to update one or more field values for all checked items.
- The Chats list view provides the ability to link the Lead or Contact related to each Chat. Clicking on a Chat’s Related To value takes you to a detailed view of the specific Lead or Contact.