- 5.0 Sales & Marketing
- 5.1 The Accounts Module
- Figure 111 shows the 1CRM screen with the Accounts Module selected using the Accounts navigation tab:
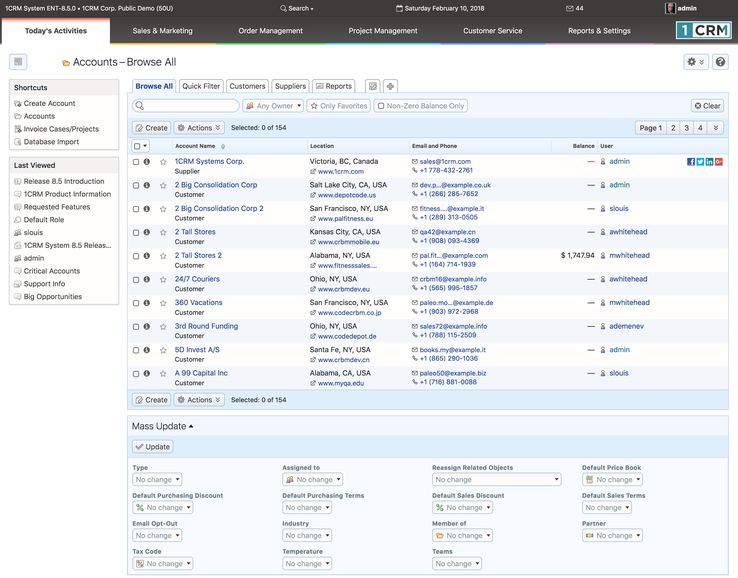
- Figure 111: The Accounts Module List View
- The Accounts module is the heart of any CRM system. All other data in the system is typically linked either directly to an Account, or to other information that is linked directly to an Account. An Account is any organization that has some relationship with yours.
- The Accounts module has a
 Help icon on the title bar at the top of the main screen body, followed by a choice of layout tabs, and a list of all or selected Accounts. The Account list may be sorted by clicking on any column title that has the
  icon beside it. Clicking on a column title when it is already the highlighted sort column reverses the sort order.
- Navigation shortcuts are provided to create a new Account, or to import bulk Account data from Salesforce.com, ACT!, etc…
- The Account list is paginated if it contains more items than may be listed on the display. Controls are provided to go to the start or end of the list, or step to the next or previous page. Clicking on any Account in the list displays the detail information for that Account.
- Each Account listed shows the Account Receivable balance (and Payable Balance if they are a Supplier), based on a calculation of all open Purchase Orders for that account, less any payments applied to those Purchase Orders. Credit limit, default terms, default discounts, etc.. may be all defined for both the Customer and Supplier relationship.
- Also notice the links to social network accounts available on the far right for each Account.
- 5.1.1 Printing Monthly Statements
- A unique control in the filter panel lets you filter out all accounts with a zero account balance, to concentrate on those Accounts that do have a receivable balance. As well, note if you click on the
 button, you see an option to Print Statements as PDF. By combining the filter with the use of the Check All feature, and this button, you can quickly and easily print statements at month end for all Accounts with a non-zero balance. Once you have a number of Accounts selected using the check box to the left of them, select the Print Statements as PDF function, and you will receive a downloaded PDF at the browser interface. This PDF will contain a statement for each Account selected, with all of the statements joined together into one long PDF.
- 5.1.2 Emailing Monthly Statements
- The Email Statements as PDF option is similarly accessed via the
 button. Simply select one or more Accounts from the list view use this function to email them each an Account statement (optionally including all unpaid invoices) in PDF form using a defined email template. To use this feature, you should first ensure that each Account has at least one Contact with the Accounting Contact check box enabled, that your own email settings have been configured, and that you have created a suitable email template.
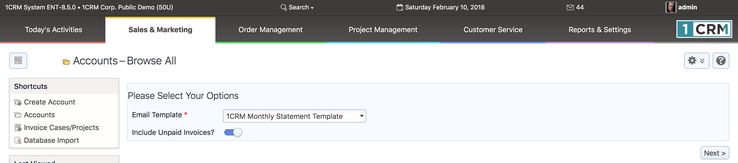
- Figure 112: Emailing Monthly Statements - Step One
- Select the Accounts you wish to receive an emailed statement, then click on the Email Statements as PDF button. You will see the Step One screen as shown in Figure 112. Select the Email Template you wish to use, and whether or not unpaid Invoices should also be attached. Then click on Next to proceed to Step Two, as shown in Figure 113.
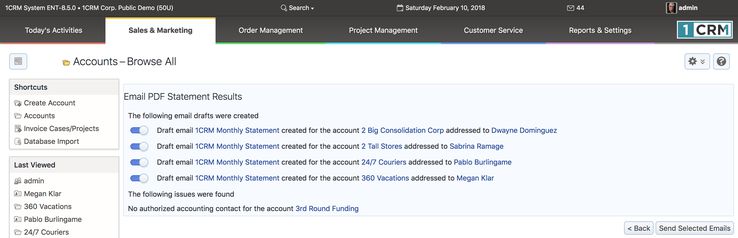
- Step Two confirms the emails that are about to be sent, and lets you check every detail of them. Step Three (see Figure 114) confirms the emails that have been sent, or shows any errors that arise while sending the emails. Then just click on the Finish button to return to the Accounts list view.
- Figure 113: Emailing Monthly Statements - Step Two

- Figure 114: Emailing Monthly Statements - Step Three
- 5.1.3 Invoicing for Time Booked to Projects and Cases
- Within the Accounts module, you may use the shortcut Invoice Cases/Projects to generate and email invoices for time that has been booked to Cases and Projects. For more details please see the section describing the Invoices module.
- 5.1.4 Re-Assigning Accounts
- In the Mass Update panel for the Accounts Module (see Figure 115), there is a field to Mass Update the Assigned To value for Accounts. This is extremely handy for reassigning Accounts from one user to another. Next to that field is another field to Reassign Related Objects. Using this field together with the Assigned To field, you can reassign not just Accounts, but all data related to those Accounts. When re-organizing sales territories, or replacing a departed salesperson, you will find this capability invaluable.
- You use these fields as follows:
- Select Accounts to be reassigned from one user to another
- Set the Assigned To user (to whom all selected Accounts are to be reassigned) in the appropriate field
- Select all the related types of data which should also be reassigned to the new user on the Reassign Related Objects multi-select field
- Click on the Update button of the Mass Update panel to complete the process
- All the selected Accounts, plus all the information items of the types selected that are related to those Accounts, will now be reassigned to the new user.
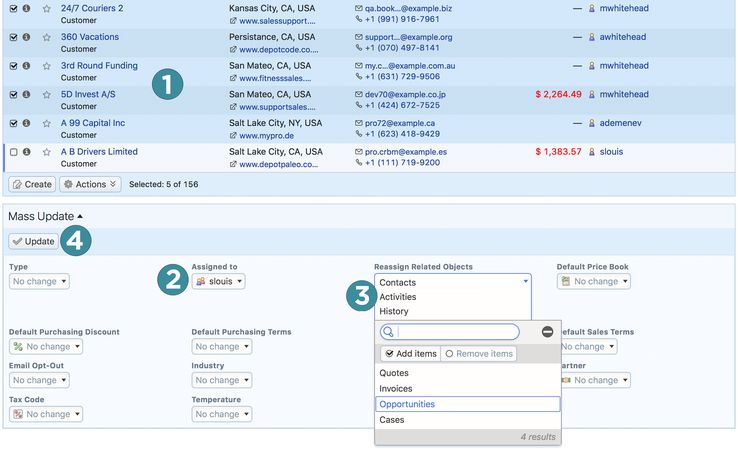
- Figure 115: Re-Assigning Accounts
- 5.1.5 Copying Account Addresses to Related Contacts
- One of the nice features of a CRM is that Contacts and Accounts are different things - one is the business you sell to, and the other is a person that works there. But sometimes this can be a bit inconvenient, and one of the most inconvenient times is when the Account has a change of address. If you have half a dozen Contacts at that Account, you might have to enter the new address information for the Account, and then for each Contact as well.
- To save you from having to do that, 1CRM has a special feature for copying the Account address across to the Account’s Contacts. In Figure 116 towards the bottom you can see the Copy to... links just under the Billing and Shipping addresses in the Account edit view. If you click on one of them, you’ll see a dropdown list with the options --None--, Shipping Address, Primary Address of Contacts, Other Address of Contacts, and Both Addresses of Contacts. Choose one of the last three options to update the Primary and/or Other addresses for all of the Contacts related to this Account. Then Save the Account record (see message at top of screen in Figure 116) to copy the address information from the Account to the Contacts. If you change your mind, you can revert to the --None-- option before you Save the Account. The Shipping Address option is used to copy the Account Billing Address to the Account Shipping Address. A similar option is available to copy the Shipping Address to the Billing Address.
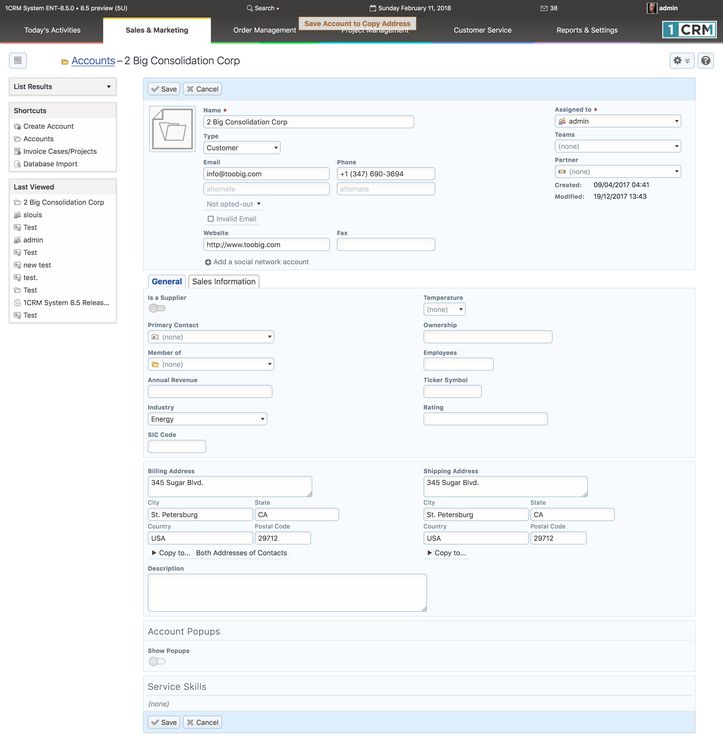
- Figure 116: Copying Account Address to Related Contacts
- 5.1.6 Creating a New Account
- To Create a new Account record, first click on the Create Account shortcut. You will see the Account Detail screen, similar to the one shown in Figure 20. You enter the Account name, normal contact information such as phone and fax numbers plus Website URL, and corporate information such as Ticker Symbol, Annual Revenue, number of Employees, SIC code, and Ownership. Your new Account may be assigned a Type of Analyst, Competitor, Customer, Investor, Partner, Press, Prospect or Other. It may also be assigned an Industry classification from a broad range of choices.
- If an Account is a supplier, the Is a Supplier check-box should be checked. Enabling this check-box will cause an additional panel of Purchasing Information to be added to the Account detail view.
- If the Account was introduced to you via one of your sales Partners, then you need to select the Partner Name from a popup selection box.
- The Sales Information panel (and in some cases, the main panel for the Account) contains several values of special significance:
- Balance Receivable - This is a display-only field that is calculated by adding up the balance due on all invoices for this Account, less any Credit Notes.
- Sales Credit Limit - This value may be used to record an Account’s credit limit. A warning message may be displayed when creating a new Quote or Invoice for an Account whose Balance Receivable exceeds their Credit Limit.
- Default Sales Terms - Used to set the default Terms for any new Quote or Invoice created for this Account.
- Default Sales Discount - Used to set the default Discount for any new Quote or Invoice created for this Account.
- Tax Code - Used to set the default Tax Code for all line items added to a Quote or Invoice for this Account. If set, this value overrides the Tax Code set on each Product within the Catalog, unless the item is marked Tax Exempt in the Catalog.
- Sales Shipping Provider - Used to set the default Shipping Provider for any new Quote or Invoice created for this Account.
- Tax Information - This information will be added to any Quote or Invoice PDF generated for this Account. Typically it will contain a national tax number, or business number, depending on the country where the Account is based.
- Currency - Used to set the default Currency for any new Quote or Invoice for this Account.
- 5.1.7 Account Popup Messages
- Enabling the Account Popups checkbox on the Account will cause an additional panel to be added to the Account detail view. This panel enables the display and editing of three pop-up messages - for the Account in general, plus for Sales and Service. They may be used to set popup notes for an Account to alert employees in contact with the Account to special circumstances - such as Credit Hold, Large Sale Pending, etc..
- When the checkbox is set, and there is an Account popup message, then that message is displayed when the Account detail view is brought up.
- When the checkbox is set, and there is a Service popup message defined, the Service message is displayed when the Account is selected on a Case, or when a Case detail view is brought up that already has the Account selected.
- When the checkbox is set, and there is a Sales popup message defined, the Sales message is brought up when the Account is selected on a Quote or Invoice, or when an Invoice or Quote detail view is brought up that already has the Account selected.
- 5.1.8 Display Multiple Accounts on a Map
- On the Accounts list view if you click on the
 button, you see an option to Display on Map. If you select a number of Accounts, then perform the Display on Map function, you will see all selected accounts displayed on a shared map.
- You can:
- Hover over any map point to see the Account name;
- Click on any map point to see additional details;
- Click on the
 control to expand the map to full screen size;
- Click on the
 control to zoom out;
- Click on the
 control to zoom in;
- Click and drag to move the map in any direction within the window.
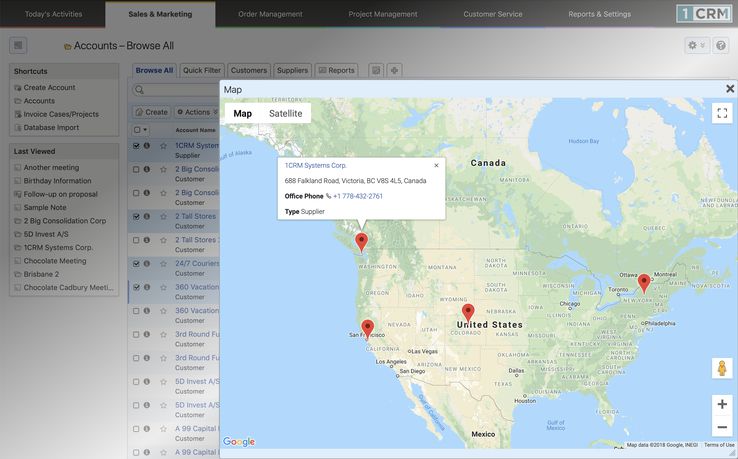
- Figure 117: Display Accounts on a Map
- Note: Your system administrator can control what information is shown when viewing additional details such as for 1CRM Systems Corp. above.
- This same Display on Map action is available on the Leads and Contacts list views as well. It can be very useful when used in conjunction with a smart list tab which selects a specific set of Accounts, Leads or Contacts, to then visualize them all on one common map view.
- 5.2 The Contacts Module
- Figure 118 shows the 1CRM screen with the Contacts Module selected:

- Figure 118: The Contacts Module (List View)
- A Contact is an individual with some relationship to your organization (usually a customer), and likely with one of your Accounts.
- The Contacts module has a
 Help icon on the title bar at the top of the main screen body, followed by a choice of layout tabs, and a list of all or selected Contacts. The Contact list may be sorted by clicking on any column title that has the
  icon beside it. Clicking on a column title when it is already the highlighted sort column reverses the sort order.
- The Contact list is paginated if it contains more items than may be listed on the display, and controls are provided to go to the start or end of the list, or step to the next or previous page. Clicking on any Contact in the list displays the detail information for that Contact.
- Navigation shortcuts are provided to create a new Contact by typing it in (Create Contact) or by importing the information from a vCard (Create from vCard). A special Enter Business Card option let’s you create a Contact plus an associated Account, Opportunity and Appointment.
- Administrators may also import bulk Contact data from Salesforce.com, Outlook, SugarCRM, ACT!, etc… using the Database Import shortcut.
- The Contact list view provides handy linking capabilities to related information. Clicking on the Contact Name takes you to a detailed view of that Contact, and the Account Name links to the detailed Account view.
- A particularly useful feature of the Contacts module is that each Contact may be set to belong to one or more Categories (it has a multi-select ability). So, once your Category options have been defined in the Studio, each Contact may be marked as to which Categories they belong to, and the list view may be filtered to show only Contacts that belong to one or more categories.
- 5.2.1 Live Business Cards
- The top section of the Contact detail view screen (and the same is true for Leads as well) is designed to resemble a traditional business card. See the image below. This section of the Contact or Lead detail view screen is known as the Live Business CardTM. The image below shows the many convenient actions grouped together in the compact area of the Live Business Card.
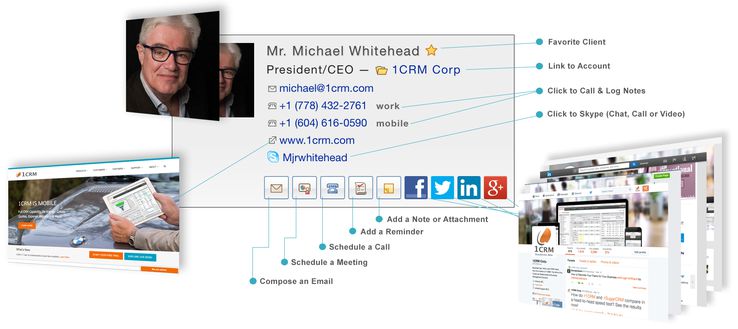
Figure 119: Live Business Card (Contacts Detail View)
- 5.2.2 Google Maps Integration
- You will see an icon (resembling a stick-pin in a folded map) to the right of every address displayed in the Contacts module detail views. If you click the icon
 a Google Maps display will come up on top of the 1CRM display. The Google Maps display is initially set to the address from 1CRM, and is fully navigable.
- 5.2.3 Category Mass Update
- In the Contacts and Leads modules you can Mass Update records with Category information. Since a Lead or Contact may belong to more than one of the set of Categories defined in your system, Mass Update allows you to assign multiple selections from the Category field. To perform this sort of Mass Update to a number of Contacts or Leads, simply:
- Select the Contact or Lead records you wish to update
- Choose the Category value(s) you wish to assign to the records selected, and click on Update.

- Figure 120: Category Mass-Update on Contacts List View
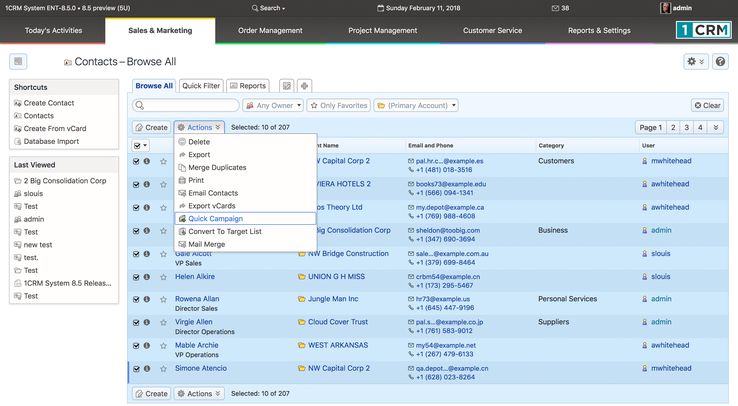
- 5.2.4 Email Contacts: Ad Hoc Bulk Email
- You may use the filtered list of Contacts (filtered by Categories as above, or whatever you like) in the list view to perform an ad hoc bulk emailing. If you have the Contacts displayed that you want to email (no more than 200 may be selected), just choose the Email Contacts option from the
 button and the Compose Email form will come up, with the email address of all these Contacts added into the BCC line. Now simply select an email template or compose the text of your email, add a TO name (likely yourself), and click on Send.
- Note: Only one email is sent, not one to each Contact – so do not use a template with personalization fields inserted into it, such as $contact_first_name, as they will not be personalised to each recipient.
- 5.2.5 Quick Email Campaigns
- The Quick Campaign feature in the Contacts and Leads Mass Update panels allows users to send personalized emails very quickly to many selected Contacts or Leads at once. Quick Campaigns use the standard 1CRM Campaigns functionality but without the need for the user to go manually through all the individual steps to establish a Campaign or Target List.
- Quick Campaigns queues all outbound email messages it creates for immediate sending in the 1CRM outbound mail queue, and relies on the scheduler task Send Campaign Emails to send those emails, just as standard Campaigns do. Quick Campaign responses, views, opt-outs and bounces are tracked and recorded in the same way as with standard Campaigns.
- Note: Quick Campaign messages (just like standard Campaign messages) are different from emails sent with the Email Leads and Email Contacts (see section above) buttons in that:
- Email Leads / Contacts does not record the sending of the message in each recipient’s message history
- Email Leads / Contacts does not support standard variables or user variables in templates
- Email Leads / Contacts email messages are not individually addressed to each recipient but to a bcc recipient group
- Before You Use a Quick Campaign
- First, prepare an email template. It may contain standard email template insertion variables, such as $contact_first_name, to personalize the message with the recipients’ specific details, for example:
- Dear $contact_first_name, ...
- It may also include variables to personalize the message with the name, title and signature of the 1CRM user sending the Quick Campaign:
- Thank you for your interest in our products. My name is [SENDER_FIRSTNAME] [SENDER_LASTNAME], and I am a [SENDER_TITLE] for our company.
- Best regards,
- [SIGNATURE]
- Note: Email templates may be prepared to reflect different stages of the Lead qualification process, such as Welcome to new web site visitor, Follow-up message, Recycled lead message etc.. and therefore can be easily re-used for other Leads or Contacts at a later date. Sales users can then simply filter Leads or Contacts by status in the List View, select all records, and send a Quick Campaign from the Mass Update panel, while updating the status field information at the same time.
- Next, make sure you have at least one group mailbox setup with Possible Actions set to Bounce Handling, and with the mailbox Active box checked. To setup an appropriate mailbox go to Admin – Group Inboxes.
- Note: You may wish to set the mailbox’s Deliver to Folder to Campaign responses to see campaign response emails separate from other inbound group email.
- Sending Quick Campaign Emails
- In the Leads or Contacts List View screen, select your desired recipients, to a maximum of 200.
- Choose the Quick Campaign option from the
 button, as shown below.
- Figure 121: Beginning a Quick Campaign
- This causes a popup to appear as shown in Figure 122. Now select the Campaign Email Template. Then select a Campaign Mailbox; the selection only shows group mailboxes that are properly setup for bounce handling (see above prerequisites). Finally, click the Run Campaign button to initiate the Campaign.

- Figure 122: Sending Quick Campaign Emails
- Upon successful completion, the newly created Campaign opens to show all the outbound messages it has created in the outbound email queue.
- Note: In preview, any variable used in the template will show with its placeholder text, not with actual Lead or Contact data substituted.
- Note: All Quick Campaign email messages will be populated with the From name of the current 1CRM user, however the From address will be inherited from the selected Campaign mailbox's From address. Therefore emails may appear to be from “Jane Doe” <sales@company.com>.
- Once the periodic scheduler task Send Campaign Emails has run, all messages will show on the campaign record in the Sent/Attempted panel, and all responses, opt-outs and bounces will be recorded subsequently. If you don’t want to wait for the scheduler task to run, you can force the Quick Campaign to be sent immediately by going to Admin – Scheduler and executing the task manually. Either way, the Quick Campaign messages will be added to each recipient’s email history, as well as to each recipient’s campaign log, and can easily be recognized by their subject / title prefix of ***.
- Note: To later review or re-use the list of recipients of any Quick Campaign go to Campaigns – Target lists to find the Target list that was automatically created from all selected recipients. These Target lists may be re-used for standard Campaigns or to manually add Targets to your newsletter subscriptions.
- 5.2.6 Mail Merge Using RTF Template
- Another handy use for a filtered list of Contacts is to perform a Mail Merge function with them. Simply filter the Contacts list view as desired, select the Contacts you want, and choose the Mail Merge option from the
 button. You can then browse for a Mail Merge template file (it must have the RTF file type, short for Rich Text Format), and once you have selected it just click on the Run Merge button. After 1CRM finishes the processing, you receive a new download file to your browser. Now just save this file, load it into your favourite RTF-capable word processor such as Microsoft Word, and print it. The merged document will contain x copies of the original document, where x is the number of Contacts originally selected.
- Mail merge templates may contain insertion markers for personalization fields, such as the name or address of each Contact you wish to mail (Note: this also works for Leads as well). These templates are best created in Microsoft Word, and saved as an RTF filetype. They may contain logos, left and right justified text, multiple fonts, bullets, italic and bold text, to enable the creation of very attractive printed documents. Each Mail Merge template also needs special tags to mark the Start and End of the insertion part of the document. You can see a sample of an RTF template by downloading this file: http://www.1crm.com/dl/Sample Mail Merge Document.rtf.
- For a presentation on the use of the Mail Merge function, see this video.
- 5.2.7 Export vCards
- You may use the Contacts list view to export a group of vCards for a set of selected Contacts.
- Select the Contact records you wish to export as vCards
- Choose the Export vCards option from the
 button
- A file called ExportVCards.zip will be downloaded from the browser, containing all the vCards
- 5.3 The Campaigns Module
- Figure 123 shows the 1CRM screen with the Campaigns Module selected:
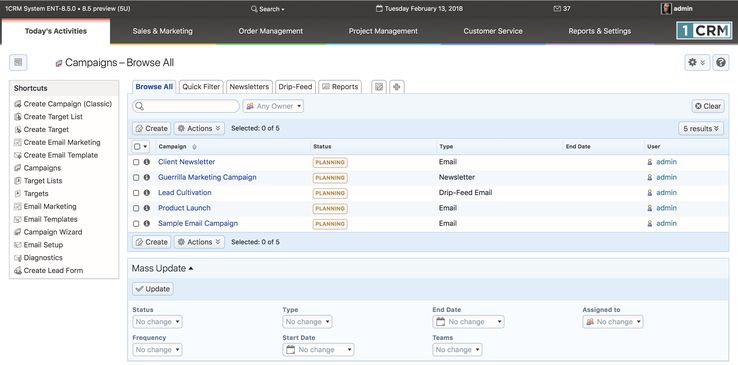
- Figure 123: The Campaigns Module
- You can create 1CRM Campaigns to track and manage your business’ marketing campaigns and targets. Within 1CRM, the individuals you deal with may be represented as one of three types of data: Targets, Leads, or Contacts.
- Targets may well be people you do not know much about – as they may simply be names on a list you have purchased.
- Leads information should be a bit more solid – you should know the contact data is valid if not comprehensive, and that the person has at least some interest in one or more of your products or services.
- Contacts are the most mature form of data – all the contact data should be verified to be accurate, and the person should be an actual customer, or about to become one.
- Note that when assembling a Target list for a Campaign, you may add together a mixture of Targets plus pre-existing Contacts and Leads – so (somewhat confusingly) a member of a Target list does not actually have to be a Target, but may be a Lead or a Contact, or even a User.
- Campaigns may be created by using either the Create Campaign (Classic) shortcut, or the Campaign Wizard shortcut. We will explain both options by creating an Email Campaign using the Create Campaign (Classic) shortcut, and a Newsletter Campaign using the Campaign Wizard shortcut.
- As well, there is a Quick Campaign feature available from the
 button of the Contacts and Leads modules - which you may find simpler and easier to use for smaller once-only Campaigns.
- 5.3.1 Create Campaign (Classic): An Email Campaign
- To create a marketing Campaign using the Create Campaign (Classic) option, click on that shortcut and fill in the basic details for the Campaign. The mandatory fields are: Name, Status, Start Date, End Date and Type. All the other fields are essentially documentation fields - fill them in if you feel they will be useful to you. The Campaign Type field is a very important one. The Campaign Type may be Email, Drip-Feed Email, Newsletter, Telesales, Mail, Print, Web, Radio or Television. Of these choices, Email, Drip-Feed Email and Newsletter Campaigns are actually performed by 1CRM. The others may be documented within 1CRM by entering them here as a Campaign, but the only value of entering them in 1CRM is as documentation. For now, choose Email, to create an Email marketing campaign. When you are done, click on the Save button. You should see the Campaign detail view screen, which will resemble the figure below.
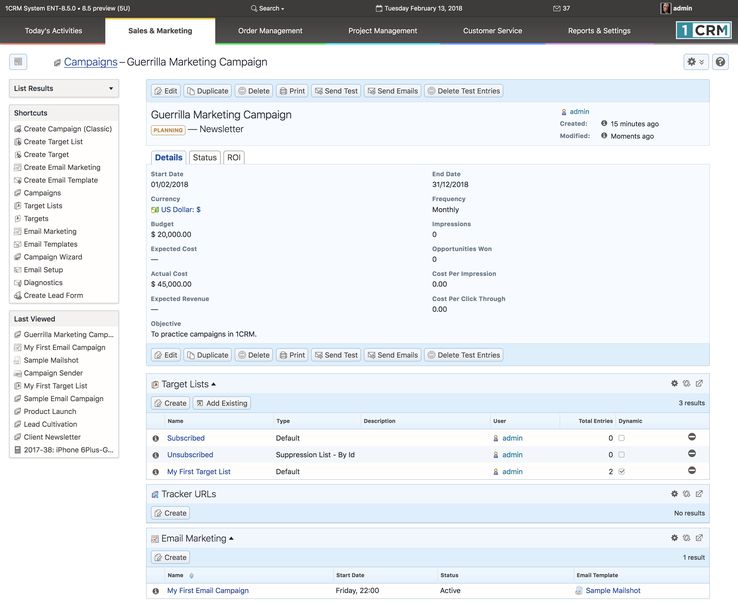
- Figure 124: Campaign Detail View
- As part of defining an email marketing Campaign, you will need to create an email marketing program within your campaign, and an Email Template.
- Create an Email Marketing Program
- Go back to the Campaign you just created. Click on the
 button in the Email Marketing sub-panel (see figure above), and fill in more details about your specific email marketing program within this overall Campaign, as per Figure 125 below.
- One of the required fields on an email marketing program is Use Mailbox. This needs a Group Inbox that you create in Admin – Email – Group Inboxes – and be sure to create it with Possible Actions set to Bounce Handling. So actually, you will need to go to Admin and create that Group Inbox first, before you define your email marketing program. See Figure 126 for an illustration of that screen.
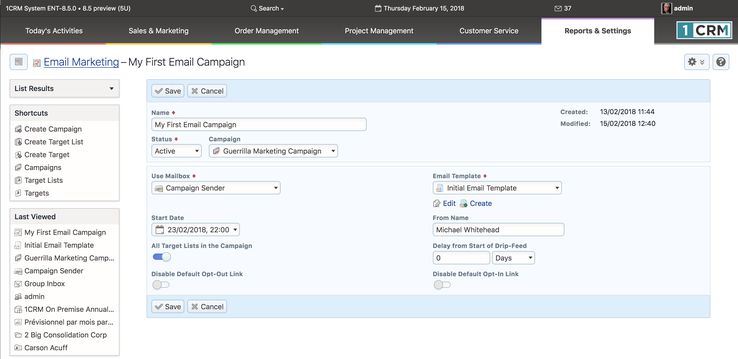
- Figure 125: Creating an Email Marketing Program
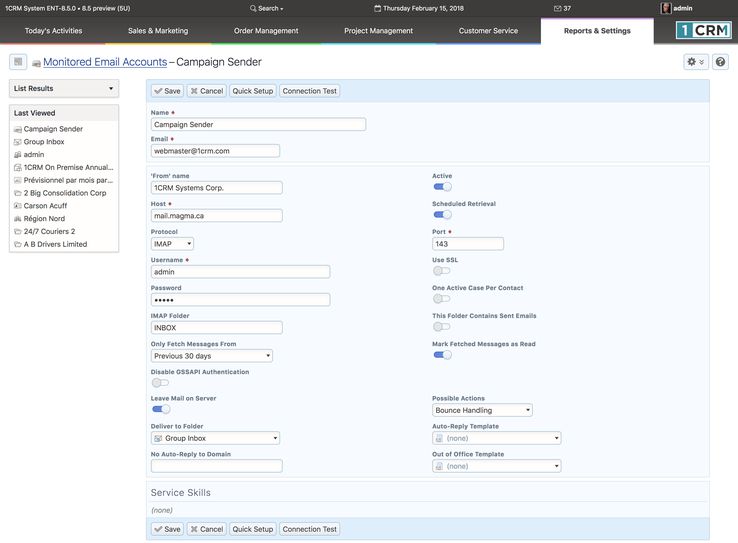
- Figure 126: Creating a Group Inbox for Bounce Handling
- Create an Email Template
- To create an Email Template, go to the Emails module, and click on the Create Email Template shortcut, or just create one when you are creating the email marketing Campaign (there is a special link available to do this).
- Once you are editing the Email Template (see Figure 127 below) set the Name, Description and Subject. Then edit the email body. To create a fancy marketing style Email Template as shown below, click on the little triangle (marked item 1 in Figure 127) to open up the toolbar shown in that figure. Then click on the Source link in the toolbar (item 2 in Figure 127) to view the email body window as HTML source code. Then you can paste HTML source from a program such as DreamWeaver into the email body, and then Save.
- Note that you can create variable data insertion points in your email using the Insert Variable dropdown controls, and the Insert button. These data insertion points allow you to personalise mail-shot emails with the name of the recipient, or their company name, etc.. Also note that binary attachments or 1CRM Documents may be attached to the email.
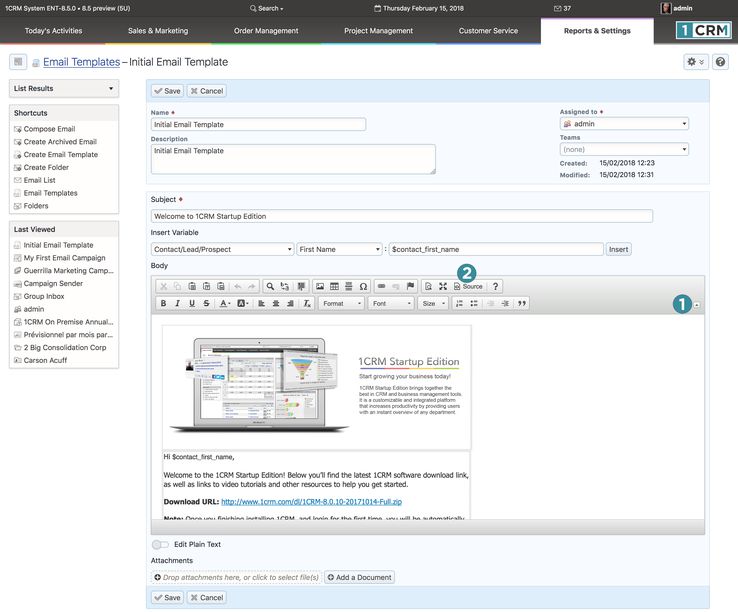
- Figure 127: Creating an Email Template
- Create a Target List and Link it to the Campaign
- Next, you need to create a Target list to hold all the Targets you identify for this Campaign. Click on the Create Target List shortcut, and fill in the Name, Type (leave this at Default for now) and Description for the list, and save it.
- Now you need to import (in either Comma Separated Values (CSV) or Tab Separated Values (TSV) formats), or type in, the data for some Targets – using the Database Import shortcut, or the Create Target shortcut. Once you have a number of Targets in the system, you need to select some of these Targets, as well as any Leads and Contacts (or Users) that you would like to include in the Campaign, and add all of these people to the Target list you created. You do that by opening the detail view of the Target list, and in turn, clicking on the Add Existing button for each of Targets, Contacts and Leads – and selecting whomever you wish from those lists.
- Lastly go back to the detail record for your marketing Campaign, and in the Targets List sub-panel, click on the Add Existing button to select the list we just prepared. Note that you can add more than one Target list here – so if you have them separated out by geography or some other criterion, you can include several lists here to make up the full Campaign. Your Campaign should now show its related Target list, and email marketing program, just like Figure 124 above.
- Note: You can also create or add to a Target list by using a report on Contacts or Leads. A button on the report detail view is used to perform this function. See section 9.1.3 for further details.
- Different Types of Target Lists
- When you create an email marketing Campaign, you should note that you may associate Target Lists of several different types with the Campaign:
- Default – these are the real live lists of people to whom you want to send your Campaign emails
- Test Lists – these are lists of people used to test the Campaign before it goes live
- Seed Lists – lists of people to be included in the Campaign, but not to be tracked as potential leads
- Test and Seed Lists are not included when the system calculates email tracking statistics
- Suppression Lists – At Campaign run time, suppress sending emails by User ID, by Email Address, or by Domain
- To summarize, the basic workflow process for creating a Campaign is:
- Create Campaign
- Create Email Marketing program within your Campaign
- Create an Email Template for the Campaign to use
- Create a Target List
- Create or Import Targets
- Add Targets (and potentially Leads, Contacts and Users) to the Target List
- Link Target List to the Campaign
- Dynamic Target Lists
- You may have noticed a Dynamic checkbox when defining a Target List. If you check this box on the Target List edit view, the secondary tab Target Filters becomes live, and you can define Filter rules for Targets, Leads, Contacts and Users to be automatically included into the target list.
- This is a fantastically useful feature - as it means you do not continually have to maintain target lists, adding new leads and contacts into them. As long as your fundamental data is maintained in good order - be it the Country field for Leads and Contacts as in Figure 128 below, or any other specific item of information on your Leads, Targets or Contacts - your target list will automatically stay up to date.
- Commonly, users will dedicate a field like Category, or a custom dropdown field, to tracking the stage of a Lead, in terms of what email campaigns it has received, or should be receiving. Combining that approach with Dynamic Target Lists, and Drip-Feed Email Campaigns, is the most powerful Marketing feature available in 1CRM. It also means that you can report on these Leads by their stage in the campaign process, and track conversion rates by the stage of the campaign process - extremely useful capabilities.
- Drip-Feed Email Campaigns
- Drip-Feed Email Campaigns are performed in a different manner to other email campaigns. Rather than explicitly clicking on the Send Emails button (see Section 5.3.4) you simply define the target list (almost always a Dynamic Target List) and the multiple entries on the Email Marketing sub-panel - each with its own different Drip-Feed Delay setting - and the emails themselves are sent by the action of a Scheduler Task called Schedule Drip-Feed Campaign Emails. The whole series of emails for each target is added to the Email Queue at the same time - simply with different dates on which they are to be sent. Hence it is the Email Queue which Drip-Feeds the emails to each intended target. Like all campaign emails, once sent they will be shown on the Campaigns sub-panel for each Contact, Lead and Target involved.
- Note: You should make sure the Drip-Feed Scheduler Task is active, and scheduled to run once each day.
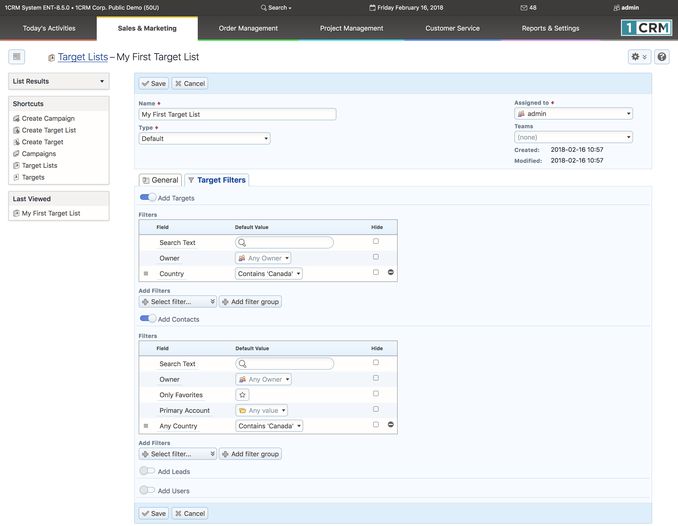
- Figure 128: Defining a Dynamic Target List
- 5.3.2 Campaign Wizard: A Newsletter Campaign
- Now we will go through the creation of a Newsletter type Campaign, using the Campaign Wizard shortcut to illustrate the use of that option. Click on that shortcut, and you will see this screen:
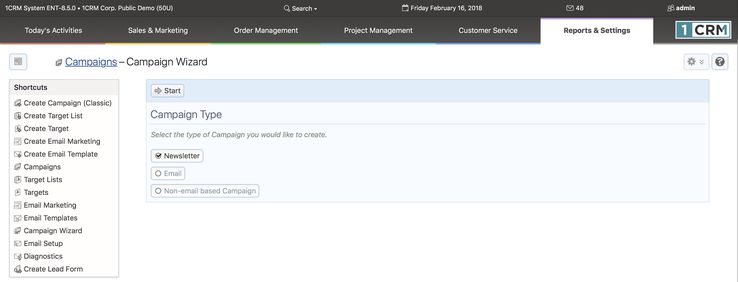
- Figure 129: The Campaign Wizard - Campaign Type
- Select the Newsletter option and then click on Start. You will see the screen shown in Figure 130 below. If you have yet to configure your email setup, you will also see a warning message reminding you to do so. (Do this in Administration - Email and Notification Settings.)
- Now enter a Name for your newsletter, and also enter at least the Status, End Date, and Frequency of the newsletter, as desired. Then click on Next to proceed to the screen shown in Figure 131.
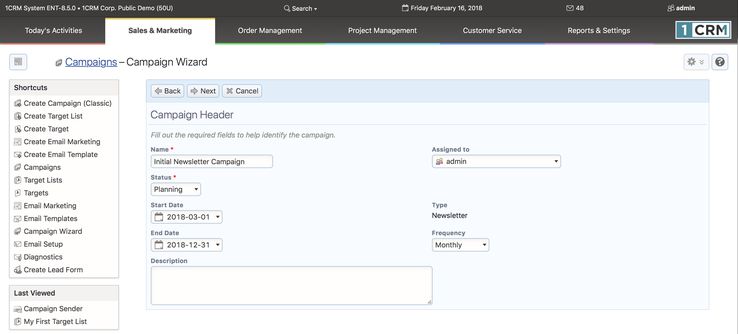
- Figure 130: The Campaign Wizard - Campaign Header
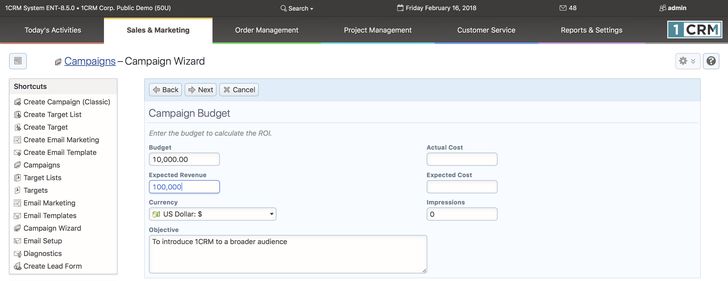
- Figure 131: The Campaign Wizard - Setting the Budget
- Set the budget details for your newsletter as appropriate (see the figure above) and click on Next.
- Tracker URLs
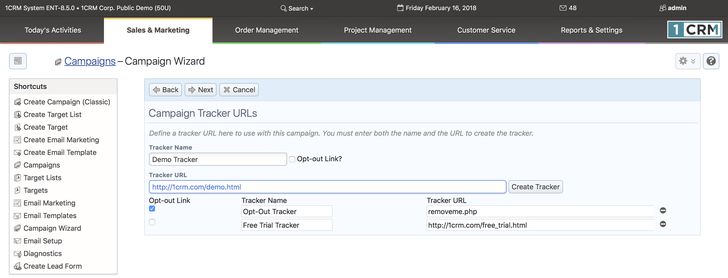
- The next screen (see Figure 132 below) allows you to set any Tracker URLs you may need for your Campaign. The idea of Tracker URLs is a little bit more complex than the rest of creating an email Campaign, so let’s look at it in some detail.
- If you look at the figure below, you can see that two Tracker URLs have been defined, and a third is about to be added by clicking on the Create Tracker button. A Tracker URL is a link - either a URL or a PHP program on your 1CRM server - to a place you want the recipient of the email to go when they click on a link in your email.
- For example, here at 1CRM Systems Corp., we might well send out an email that had a link to request a Free Trial of 1CRM, another link to try out our Public Demo Site, and lastly, a link to ask to Opt Out of the Newsletter Campaign. To do this, we would create an Email Template with all the fancy HTML we might want, plus the text that dealt with these three actions the recipient of the email might wish to take. Then we would create the Newsletter Campaign that used this Email Template, and in creating the Campaign, define three Tracker URLs - one for each of the three actions. And indeed, those are the three URLs defined in Figure 132. Then we would go back to the Email Template, and add Tracker URL references to the text dealing with each of the three actions, which would link them each to the appropriate Tracker URL.
- Figure 132: The Campaign Wizard - Tracker URLs
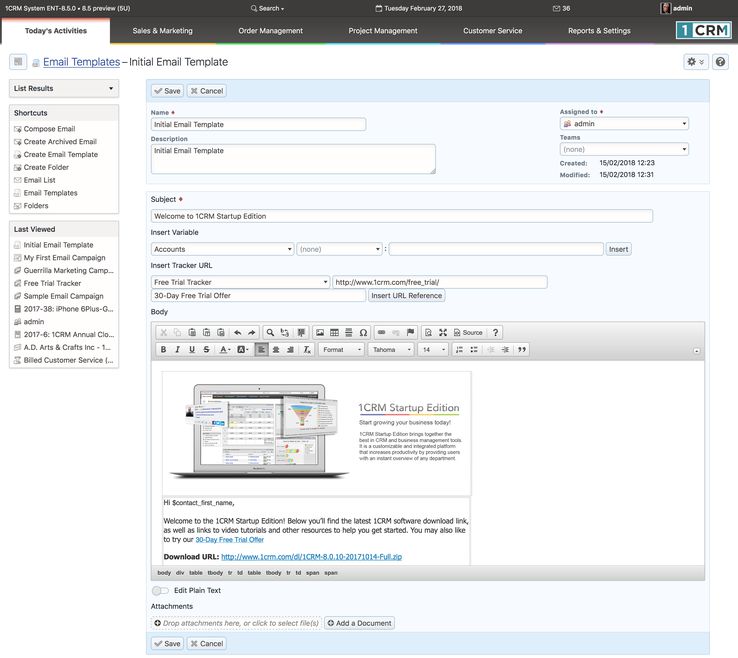
- Figure 133: Inserting Tracker URLs in Email Template
- In Figure 133 above you can see that a link has been added after text discussing the online demo. This link was added by selecting a Free Trial Tracker on the Tracker dropdown list, and then clicking on the Insert URL Reference button. The text to be added with the Tracker URL may be edited, and was set to 30-Day Free Trial Offer for that URL.
- When a client receives this email, and clicks on that link, they will be taken to the link associated with that Tracker URL - but most importantly, 1CRM will first collect statistical information about the fact that the client has clicked on that link.
- Note: The Insert URL Reference function is only shown on the Email Template edit view when you go there by linking from a Newsletter or Email marketing campaign screen.
- At this point we have set the Campaign header, the budget info, and created any Tracker URLs we may need. Now we proceed to the Subscriptions step of the Campaign Wizard, by clicking on the Next button, and we see the screen below:
-
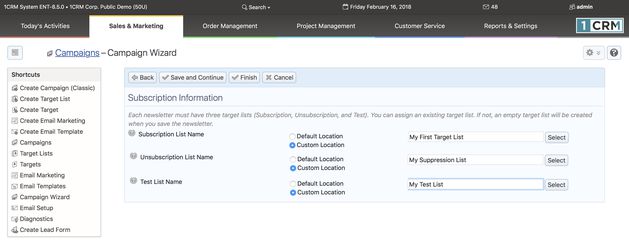
- Figure 134: The Campaign Wizard - Subscription Information
- On this screen we assign three existing Target Lists to the Newsletter Campaign - or create three new ones. For each new one, select the Auto-Create radio button. For each existing Target List, choose the Allow Select radio button, and then choose the Target List using the Select button. The Subscription list is for customers who are to receive the newsletter. The Unsubscription list is for those customers that have opted out of this newsletter Campaign. And the Test list is for Targets you will use for testing the newsletter Campaign.
- Now click on the Finish button to save your Campaign, and see a summary as in the figure below by clicking on your campaign in the list view:

- Figure 135: The Campaign Wizard - Newsletter Campaign Summary
- 5.3.3 Testing Your Campaign
- Once you have your Campaign and its related information created, you should run Campaign Diagnostics to check your setup. Click on the Diagnostics shortcut, and you will see a screen much like the one in Figure 136.
- This function lets you check that you have setup your Campaign properly, and also that your administrator has setup the various scheduler tasks needed at the system level to support the execution of a Marketing Campaign (Send Campaign Emails, Process Bounced Campaign Emails, Schedule Drip-Feed Campaign Emails).
- Next you need to test your Campaign by clicking on the Send Test button at the top of the Campaign Detail view. Make sure that you have created a testing Target list, and that you are sending the test Campaign to that list.
- Note: In test mode, a Campaign will ignore suppression lists, and also will not check for duplicated email addresses, allowing you to send multiple emails to the same recipient.
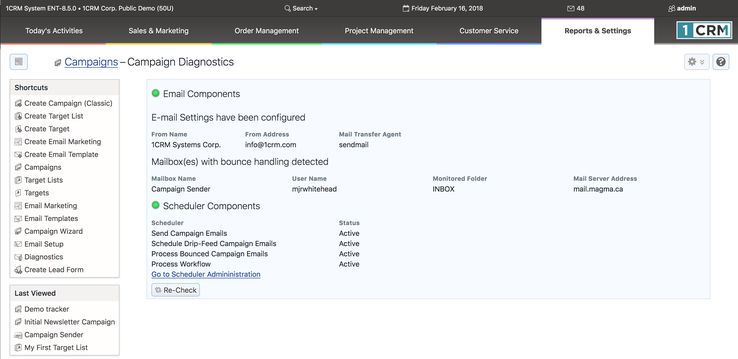
- Figure 136: Campaign Diagnostics
- 5.3.4 Running Your Campaign and Tracking Results
- Once you have created your Email or Newsletter Campaign (using the Classic or Wizard method), and its associated Email Marketing Programs, Email Templates, Target Lists and Tracker URLs, and tested that the Campaign seems to be working in test mode, it is time to run your first real Campaign.
- Running Your Campaign
- Once again, before you run your production Marketing Campaign, make very sure that your Email Template, and your Target Lists are all in good order - there is nothing worse than embarrassing your company by sending out an incorrect email, or sending it to people that have asked not to receive it.
- You also need to be careful about the Start Date & Time you set on an Email Campaign, to make sure it is set for when you want the Campaign to go out. The Start Date & Time on an Email Marketing program is the key time and date used by the system to initiate the Campaign. As well, you need to make sure that the Scheduler is set up properly if you are going to send out the Campaign automatically, rather than manually. (Diagnostics checks that for you.)
- To send out your production Campaign emails, click on the Send Emails button at the top of your Campaign detail view. You will see a screen like the Figure below:
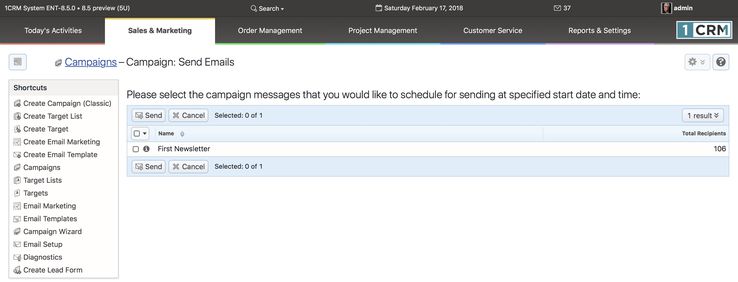
- Figure 137: Sending Your Campaign Emails
- On the screen shown above, individually select any Campaigns you wish to send out, or select all of them by clicking on the check-box beside the title of the Name column.
- Note: Check that the Total Recipients number seems correct.
- Then click on the Send button. All the appropriate emails will now be added to the Outbound Email Queue, as shown in Figure 138. Again, compare the Total Recipients number with the number of emails now in the Queue.
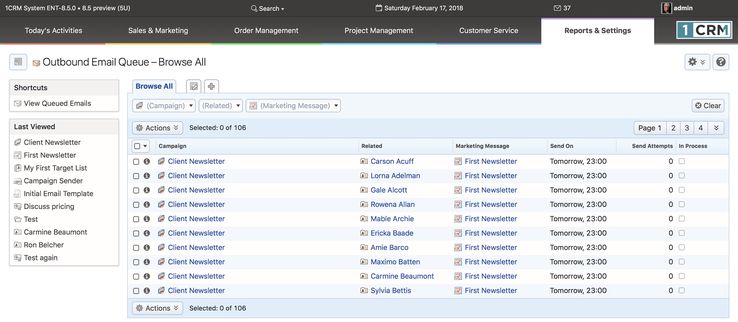
- Figure 138: The Outbound Email Queue
- Managing the Outbound Email Queue
- If you run an Email Marketing program with a Start Date & Time in the future, the system waits until that date and time passes, and then (using the Scheduler) sends the emails in the outbound queue.
- You may monitor and manage this Outbound Email Queue using the Manage Email Queue function within Admin (shown above).
- Note: Nothing you can do will send queued emails before their due date and time. Also remember that the Scheduler is what normally sends these emails, and you need to make sure the Scheduler is active using Diagnostics, and that the specific Scheduler task Send Campaign Emails is active as well.
- Note: The Use Mailbox Group Inbox on the Email Marketing program is where any email bounce-backs are sent. And the Scheduler task Process Bounced Campaign Emails needs to be active to process them.
- Tracking Campaign Results
- The Status tab on the Campaign Detail view provides a display of the status of any Email campaign.
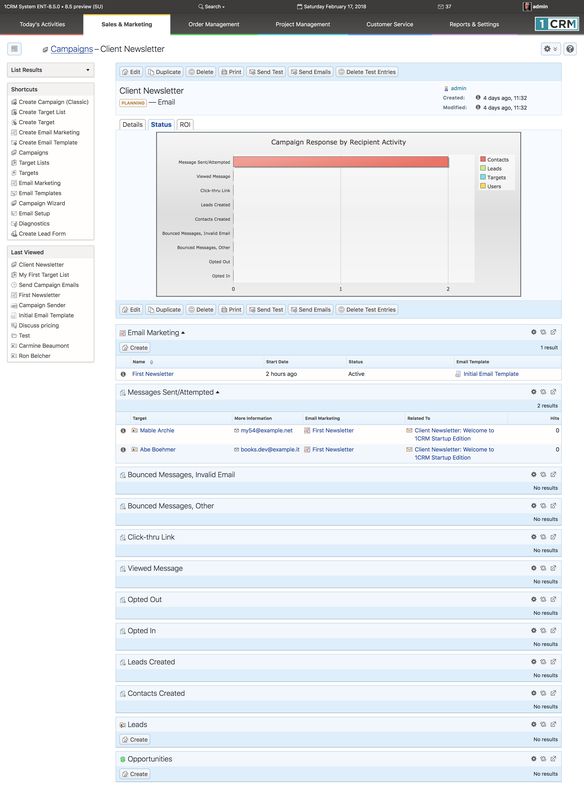
- Figure 139: Campaign Status View
- The ROI tab on the Campaign Detail view shows a Return on Investment chart for the Campaign, as shown in the figure below, using the data from Opportunities marked as Closed - Won that are related to the Campaign.
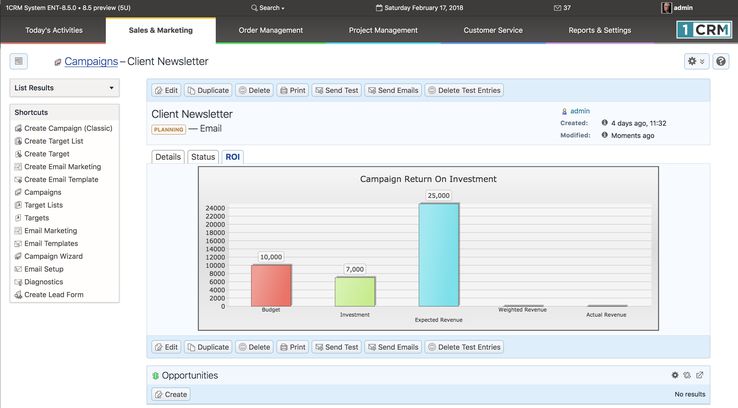
- Figure 140: Campaign ROI Chart
- 5.3.5 Creating Web-to-Lead Forms
- A really handy feature of 1CRM is its ability to create Web-to-Lead forms. Click on the Create Lead Form shortcut to start the process, and you will see a screen resembling the figure below. Using this screen, edit the field lists for either the first or second column of the Lead Form by clicking on them and selecting the fields desired. (Remember you can use the Shift key to select multiple items.) The Lead Form this feature creates may be integrated onto a public website, and then you may use the URL of that web page as the Target URL in one of your Campaigns. When a Target of the Campaign receives a Campaign email, and clicks on the Target URL, not only can you track this action, but when they go to the web page with the Lead Form and fill it out and submit it, it will insert a Lead in your 1CRM system.
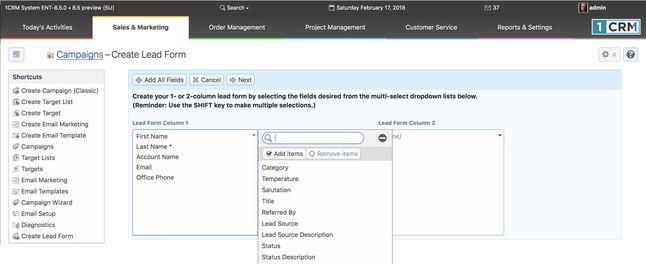
- Figure 141: Creating a Lead Form - Step One
- Once you have assembled the two column lists of fields you want captured, click on the Next button and you will see a screen resembling Figure 142.
- Note: To add new fields to the Lead Form that are not part of the standard 1CRM system, first they must be added to the Leads module using the Studio, so that they may be added to the Lead Form using the screen shown above.
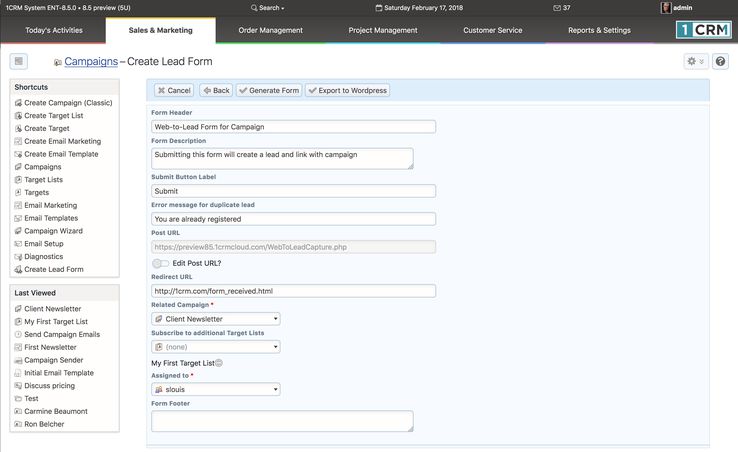
- Figure 142: Creating a Lead Form - Step Two
- On the screen shown above, you may edit the default Form Header text, as well as the Form Description, the Submit Button Label and the Post URL (you will need to check the Edit Post URL box first). You will also need to edit the Redirect URL, and select the Related Campaign and enter any Form Footer you may need. The Redirect URL is the URL where the user will be redirected after clicking on the Submit button on the Web-to-Lead Form.
- When you click on the Generate Form button, the Web-to-Lead Form is generated and is displayed in the HTML editor as shown below in Figure 143.
- Note: Use the Export to WordPress button when using your lead capture form with a WordPress website. See more information below.
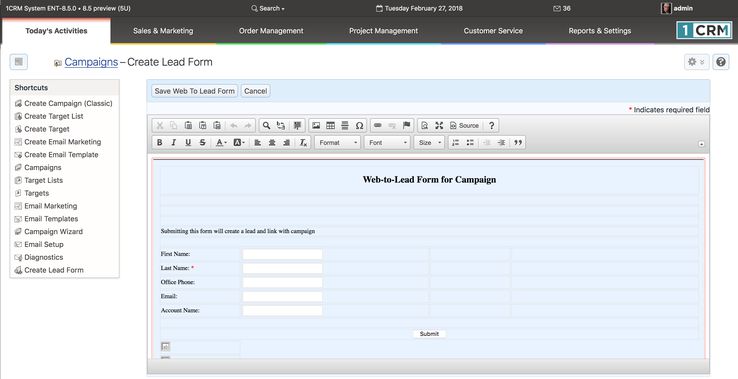
- Figure 143: Creating a Lead Form - Step Three
- The generated Web-to-Lead Form may be viewed and edited in the HTML editor, as shown in the figure above. When you click on the Save Web To Lead Form button, you’ll see a message like this:

- Figure 144: Creating a Lead Form - Step Four
- You can download your form from this screen, and copy it to wherever you wish to use it. You will typically use it as partial HTML text to incorporate into a web page that cosmetically matches the pages of an existing web site.
- 5.3.6 Creating Web Forms with 1CRM WordPress Plugin
- Back on Figure 142, if you click on the Export to WordPress button to generate your form, you will see a screen as shown below in Figure 145.
- The code displayed on that screen is designed to be copied from there, and pasted into the 1CRM Lead Forms plugin, once it has been installed on your WordPress site. You can get that plugin here.
- Once downloaded, installed and activated the plugin is displayed in the plugins list as shown in Figure 146. Figure 147 shows how to access the Lead Form plugin. Just click on Add New to add a new lead form to your WordPress site. Figure 148 shows the new lead form screen.
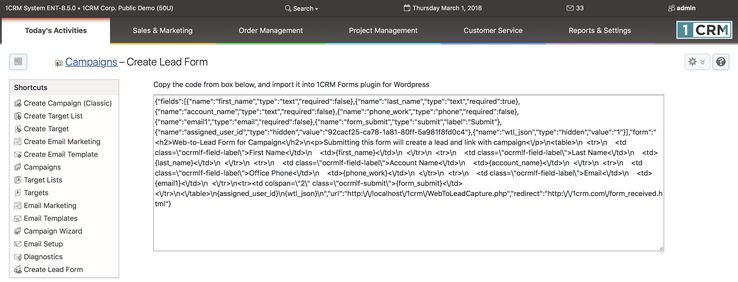
- Figure 145: Creating a Lead Form for WordPress Sites
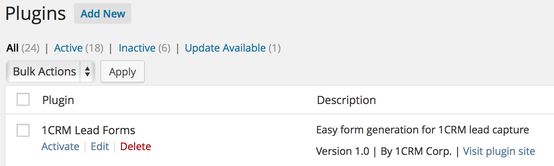
Figure 146: 1CRM Lead Forms Plugin Installed on WordPress Site
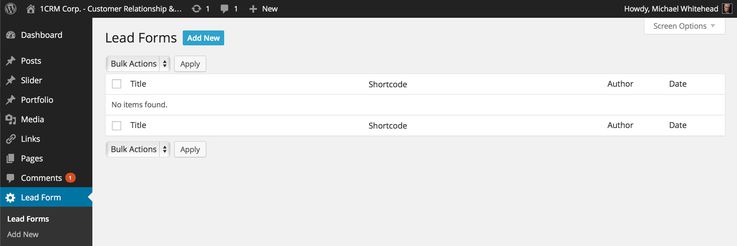
Figure 147: Using the Lead Forms Plugin in WordPress Site Administration
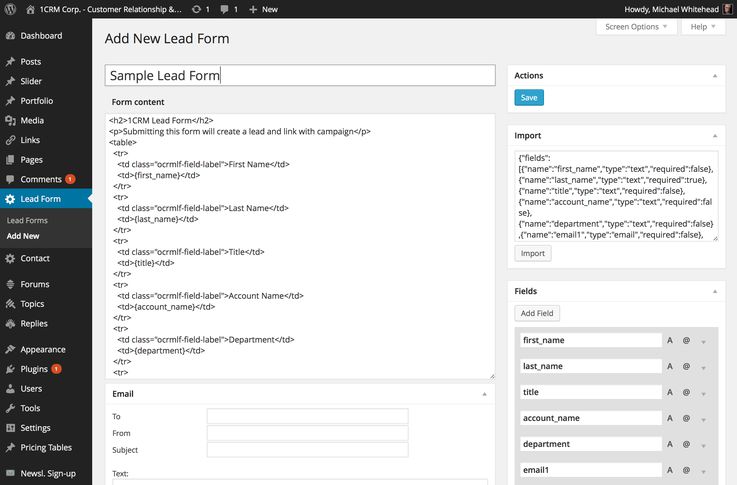
Figure 148: Importing Lead Form Data Created by 1CRM
- Just paste the code from Figure 145 into the Import text box you see in Figure 148 and click on the Import button. This will instantly cause the Form content and Fields list to appear. Now just enter a name for the lead form, and the email notification and other settings, and click on Save to create your new lead form.
- Note: Field settings can be adjusted to set Required fields, field types for validation, etc..
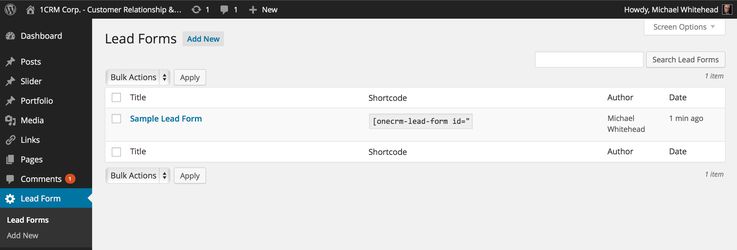
Figure 149: 1CRM Lead Form Added to WordPress Site
- Now just copy and paste the shortcode for this form, as seen above, into any WordPress page, post or widget. Publish that content, and you instantly begin collecting lead data directly into your 1CRM system from your WordPress-based website.
- 5.3.7 Advanced Lead Forms Usage
- In practice, potential clients of your business will be directed to your lead capture form pages by a link that is attached to some text, or perhaps an image, which tries to entice them to see what you have to offer.
- There are two advanced options available for you to use when linking to these lead capture pages, which you can enable by appending some special text options to the link to that page. If your lead capture form is, for example, on the web page at http://mysite.com/leadpage.html, then you could link to this page and pass it somewhat hidden Partner and Lead Source information using links of the form:
- http://mysite.com/leadpage.html?12
- http://mysite.com/leadpage.html?_3
- http://mysite.com/leadpage.html12_3
- Let’s assume the list of Lead Source values in your 1CRM system look like this:
- Cold Call
- Existing Customer
- Self Generated
- Employee
- Email
- Other
- Then example 1 above links to your lead capture page, and sets an associated Partner code to 12 for any lead that is captured. Example 2 will link to that page and will set the Lead Source value to option 3 (Self Generated). Example 3 combines both usages, and sets Partner code to 12, and a Lead Source of Self Generated.
- The value of these advanced options is that you can provide your partners with unique URLs which include their Partner codes to use as links to your lead capture pages. Any Leads, Opportunities, Accounts, and Invoices that result will be automatically linked to that Partner, who will presumably be credited with some affiliate commission, or some similar arrangement. Similarly that Partner can set an overriding Lead Source value with their URL.
- 5.3.8 Creating Target Lists from List Views
- A special feature of the list views for Contacts, Leads or Targets is the ability to take the current filtered list of Contacts, Leads or Targets, and use it to create a new Target list for use in Marketing Campaigns, or add to an existing Target list.
- On the
 button in the list view for these three modules, there is an additional Convert to Target List option available. Just select the records on the current list view that you want added to a target list, and then choose this option. (Often you will want to use the Select All feature to choose all of the current items in a filtered list view.)
- Now just choose between Create New List or Add to Existing List. For new lists enter the name and choose the list type. For existing lists, just choose which list. Once you have done that, just click to Proceed, and the new Target list will be created (if required) and the Contacts (or Leads or Targets) from the current list view will be added to the new or existing Target list.
- 5.4 The Leads Module
- Figure 150 shows the 1CRM screen with the Leads Module selected:
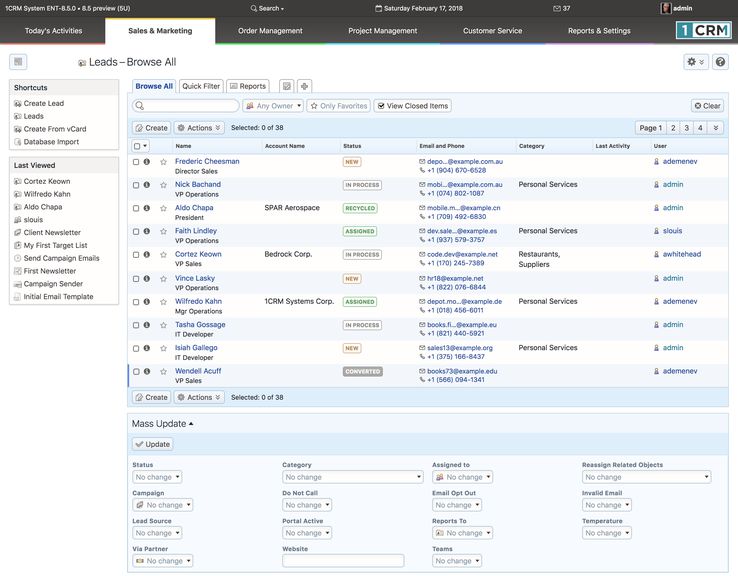
- Figure 150: The Leads Module
- Leads are early contacts in the sales process. Once they have been properly evaluated and assessed, they may be converted into Contacts, with associated Opportunities and Accounts, using the
 button.
- They may be managed and tracked through their life-cycle using the Leads module. Leads may be assigned a Lead Source of Cold Call, Existing Customer, Self Generated, Employee, Partner, Public Relations, Direct Mail, Conference, Trade Show, Web Site, Word of Mouth, or Other. They have a status of New, Assigned, In Process, Converted, Recycled, or Dead.
- Leads may be duplicated (by clicking on the Duplicate button) as a handy way of creating a number of similar leads. Leads may also be converted (by clicking on the
 button) to Contacts. Records may optionally be created for a related Account, Opportunity, and Appointment as a Lead is converted into a Contact.
- The Leads module has a
 Help icon on the title bar at the top of the main screen body, followed by a choice of layout tabs, and a list of all or selected Leads. The Leads list may be sorted by clicking on any column title that has the
  icon beside it. Clicking on a column title when it is already the highlighted sort column reverses the sort order.
- The Leads list is paginated if it contains more items than may be listed on the display, and controls are provided to go to the start or end of the list, or step to the next or previous page. Clicking on any Lead in the list displays the detail information for that Lead.
- Navigation shortcuts are provided to create a new Lead (from a vCard, or by simply typing it in), or to import bulk Lead data from Salesforce.com, etc…
- Another particularly useful feature of the Leads module is that each Lead may be set to belong to one or more Categories (it has a multi-select ability). So, once your Category options have been defined in the Studio, each Lead may be marked as to which Categories they belong to, and the list view may be filtered to show only Leads that belong to one or more categories.
- As well, you may use the filtered list of Leads (filtered by Categories as above, or whatever you like) in the list view to perform an ad-hoc bulk emailing. If you have the Leads displayed that you want to email (no more than 200 maybe selected), just choose the Email Leads option from the
 button and the Compose Email form will come up, with the email address of all these Leads added into the BCC line. Now simply select an email template or compose the text of your email, add a TO name (likely yourself), and click on Send.
- Note: Only one email is sent, not one to each Lead – so do not use a template with personalization fields inserted into it, such as $contact_first_name, as they will not be personalized to each recipient.
- Another handy use for a filtered list of Contacts is to perform a Mail Merge function with them. For more details, see the section in this guide that describes the Contacts module.
- You can see a sample of an RTF Mail Merge template by downloading this file:
- http://www.1crm.com/dl/Sample Mail Merge Document.rtf.
- You may also see a video presentation on the use of the Mail Merge function here.
- 5.4.1 Import Options: Test Run & Custom Mapping
- When importing Leads, note that as is the case with all import functions in 1CRM, you have the ability to specify that you wish only to perform a test run of the import by checking the Test Run box at the bottom of the page in Step 3 of an Import. This is an extremely valuable technique you should make full use of. If you import data (whether Leads or Products, Contacts, Accounts, etc..) that has errors or creates duplicates in your data, you have lowered the value of all the data in 1CRM. You have taken nice clean (and expensive) data and lowered its value by adding in some less clean data - potentially lowering the quality of the future usage experience for all users. What you really should do each time before you import some data is to do a trial run. This does not actually import your data, but simply produces a CSV file, probably much like your original input file but with extra columns on the right detailing any issues with errors or duplicates in the data.
- Similarly you should make use of the Save As Custom Mapping option. Once you have gone to the trouble in Step 3 of an Import to map database fields to an input file’s set of field names, if you are ever likely to use that same format again then make sure you save it for future use.
- 5.4.2 Quick Campaign
- See the Contacts module section for a description of this feature.
- 5.4.3 The Convert Button & Smart Convert
- In the Leads module, as well as several other modules in 1CRM, you will see a
 button. This is used to move information from one step of a common business workflow, to the next. Convert a Lead to a Contact/Account. Convert a Quote to a Sales Order or Invoice. Convert an Opportunity into a Project. These are popular features in 1CRM as these are processes that users perform again and again. The Convert functions are quick and easy to perform, and automatically copy over all the right fields so users don’t have to remember all the fields to copy.
- But what about when the Administrator adds some custom fields to one of these items, and would like them to copy over to custom fields of the same name in the item that is the next step of the process? Smart Convert is the feature of the
 button that makes this happen.
- How does it work? Whenever you use the
 button, 1CRM looks for custom fields on the item you are converting from. When it finds any, it looks for matching custom fields on the item you are converting to. Fields are matched by field name and type: fields that have identical names but different types in the two modules involved in a conversion are not copied to the target item.
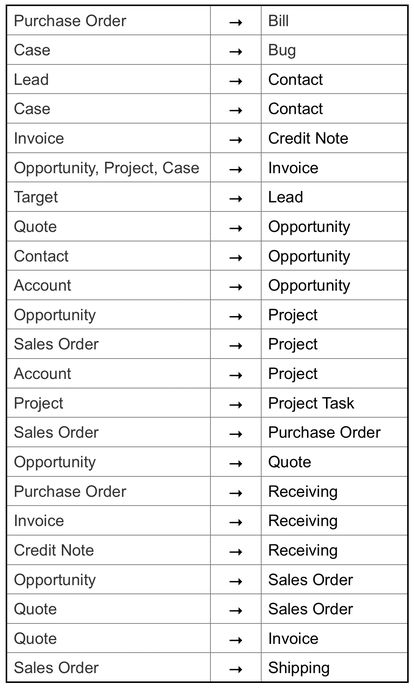
- The following Smart Convert processes are supported:
- 5.5 The Opportunities Module
- Figure 151 shows the 1CRM screen with the Opportunities Module selected. Navigation shortcuts are provided to create a new Opportunity, or to import bulk Opportunity data from Salesforce.com, SugarCRM, etc…
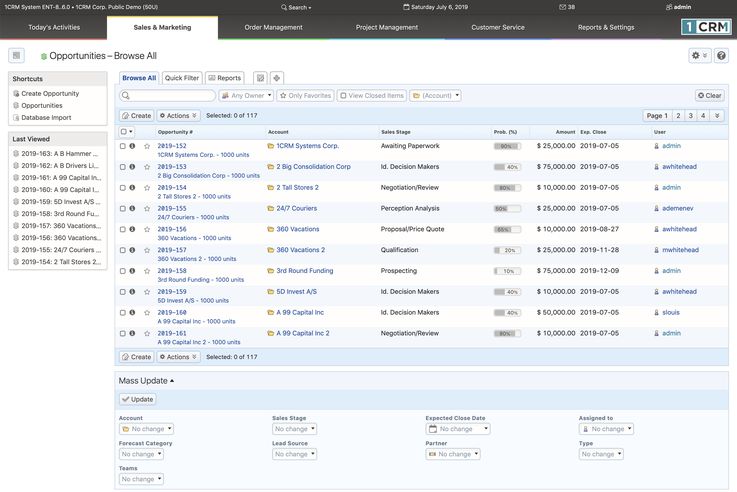
- Figure 151: The Opportunities Module
- A sales Opportunity links many aspects of your business information together – an Account, Contacts, Activity History, Leads, and Documents. An Opportunity is typically tracked closely throughout its history, and must be assigned a Sales Stage of Prospecting, Qualification, Needs Analysis, Value Proposition, ID Decision Makers, Perception Analysis, Proposal/Price Quote, Negotiation/Review, Closed Won, or Closed Lost. A Probability % must also be associated with each Opportunity, and may be set to 0, 10, 20, 25, 30, 40, 50, 65, 80, 90 or 100%. Lastly, each Opportunity also has a Forecast Category – see more details on this in the Forecasts module.
- The Opportunities module has a
 Help icon on the title bar at the top of the main screen body, followed by a choice of layout tabs, and a list of all or selected Opportunities. By default, Opportunities with the Sales Stage Closed Won, or Closed Lost are filtered out. The Opportunities list may be sorted by clicking on any column title that has the
  icon beside it. Clicking on a column title when it is already the highlighted sort column reverses the sort order.
- The Opportunities list is paginated if it contains more items than may be listed on the display and controls are provided to go to the start or end of the list, or step to the next or previous page. Clicking on the name or opportunity number for any Opportunity in the list displays the detail information for that Opportunity. Clicking on the Account Name for an Opportunity will link to the detailed information for that Account. A handy feature permits an Opportunity to be converted to a Project, once the business has been won.
- 5.6 The Partners Module
- Figure 152 shows the 1CRM screen with the Partners Module selected using the Partners navigation tab:
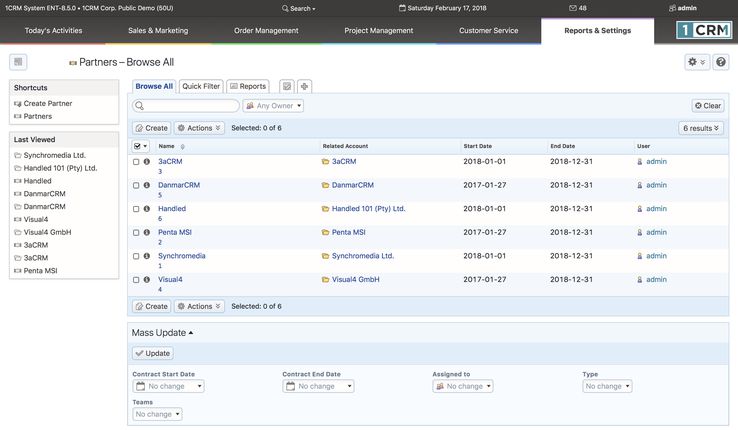
- Figure 152: The Partners Module List View
- The Partners module is used to define the sales partners your business may have, and to track their performance in finding and closing business. Accordingly, a Partner may be linked to Leads, Opportunities, Accounts, and Invoices, and on the Partner detail view you will see sub-panels for each of these four related modules. These sub-panels are extremely useful summaries of the new Leads, Opportunities, Accounts, and sales generated by a particular Partner.
- Note: If you want to have the partner data mentioned above available to your business, you will have to make sure that users are careful always to add the link to the related Partner onto any new Leads, Opportunities, Accounts or Invoices that are created.
- To create a new partner, use the Create Partner shortcut. The Partner edit view allows you to define a Partner code as a unique identifier for the Partner. As well, Start and End Dates may be defined for a contractual relationship. A commission rate may also be set, as well as the number of days the Partner retains any Lead exclusivity, or revenue sharing from Leads.
- The Partners module has a
 Help icon on the title bar at the top of the main screen body, followed by a choice of layout tabs, and a list of all or selected Partners. The Partners list may be sorted by clicking on any column title that has the
  icon beside it. Clicking on a column title when it is already the highlighted sort column reverses the sort order.
- 5.6.1 Partner Access to the Customer Connection Portal
- When Partners use the 1CRM Customer Connection Portal, it is possible for them to see not only the normal customer data shown there, but also special partner data. The additional partner functions allow partners to view the Accounts, Opportunities and Leads associated to them within 1CRM, and also to enter new leads.
- Note: In order for a portal user to be recognized as someone permitted to view partner-specific data within the Self-Service Portal, they must have their contact within 1CRM added to the Portal Authorized Contacts sub-panel on the detail view for their partner record, as seen in the Figure below. Any Contacts within 1CRM that are associated with the Account that is linked to the Partner record will only get normal portal access, unless they are specifically added to the Portal Authorized Contacts sub-panel on the Partner record. This allows some employees of the partner company to get the enhanced partner access to the Customer Connection portal while others do not.
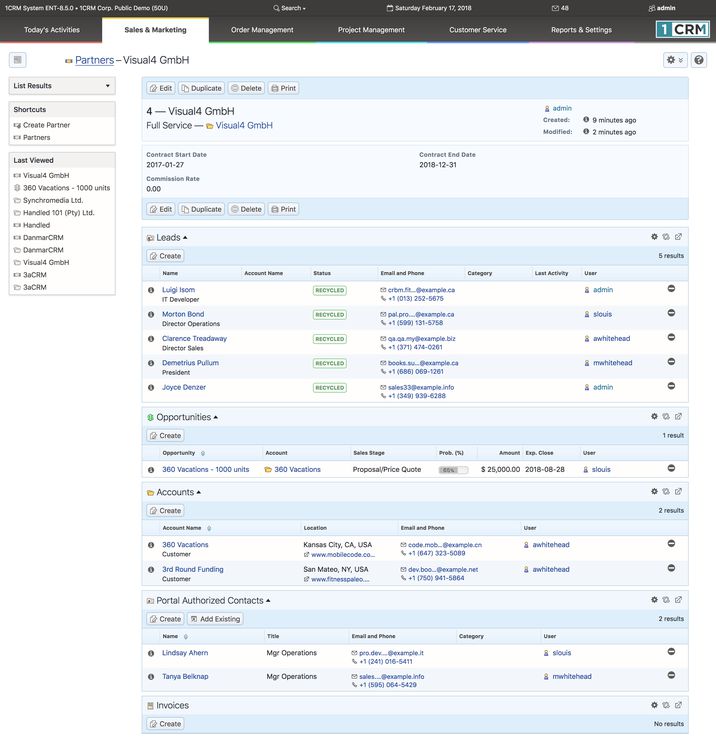
- Figure 153: The Partners Module Detail View and Portal Authorized Contacts
- 5.7 The Marketing Events Module
- Figure 154 shows the 1CRM screen with the Marketing Events Module selected using the Marketing Events navigation tab:
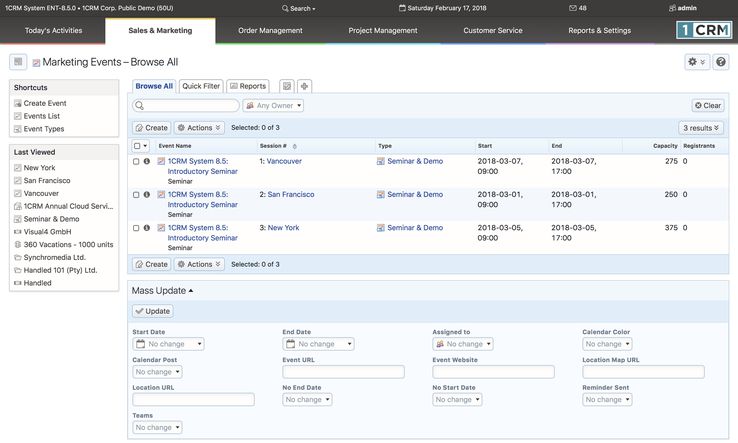
- Figure 154: The Marketing Events Module
- The Marketing Events module is included in 1CRM to provide a means to record your marketing events, and to track which Contacts and Leads registered for and attended them. As well, since invoices are linked to Marketing Events, you can also track the business generated by these Events.
- A Marketing Event may have multiple sessions to it – and customer registration and attendance may be tracked separately for each session of the Event. In fact, when you look at the list view for Marketing Events, you are actually looking at a list of the sessions – so one Marketing Event may be shown several times if it has multiple sessions. The ability to have several sessions for a single Event is intended to support prolonged Events, such as a series of product update sessions on successive Fridays, or multi-session training Events. You can even use this feature for less tangible multi-session Events, such as mailing out newsletters monthly for a defined period of time.
- Before you create any Events, you need to make sure that you have the right choices available to you for Event Type and Format. Event Format is a simple dropdown that may have its options set in the Studio. But Event Types are defined using the Event Types shortcut you will see in the shortcut list when you select the Marketing Events module. Once you have defined these two lists, you can go on to create an Event.
- When a Marketing Event is first created, you define the Event Name, # of Sessions, Event Type, Format and Description in the top section of the screen, along with the product you are trying to promote with this Event. In the lower section of the Create Event screen (the Session panel), you set the information for the first (and perhaps only) Session associated with this Event.
- This information includes the Session Name, Start Date and Time, End Date and Time, and lots of optional logistical information for the Session, such as capacity, hosts and guest speakers, URL, location, and catering information.
- When you save this Event, you actually save the Event information, and that of the first session. If you edit the Event again, if the # of Sessions is defined as greater than one, you have the option to click on Save and Next, which will change the session panel information to the information for the second Session. You may now edit that information, and save it – or click on Save and Next to go on to the next Session – and so on.
- Once you have defined all the information for all the Sessions of an Event, you can click on any Event/Session from the Event List view, and see the detail view for that Session of that Event. The Event detail view has several sub-panels:
- Contacts (or Accounts if the B2C business model has been selected in Company Information)
- Leads
- Reminders
- Invoices
- The first two sub-panels show who is registered to attend this Session of the Event, and allow you to add new registrants. The Leads and Accounts/Contacts sub-panels may also be used to record attendance, which is very handy if you have a system running 1CRM at the door of the Event.
- The Reminders sub-panel is used to define a series of reminder emails, each of which uses an Email template to define the email to be sent. By defining multiple Reminders for a Session you can maintain the level of interest and excitement in the upcoming Event for those people that are registered for it.
- The Invoices sub-panel shows all the Invoices that have been entered with a relationship to this specific Session of this Event. This is a very handy feature if you are rigorously marking Invoices with the Event/Session that generated them. If you do, this screen will show you your payback from that Event/Session.
- 5.8 The Forecasts Module
- Figure 155 shows the 1CRM screen with the Forecasts Module selected using the Forecasts navigation tab:
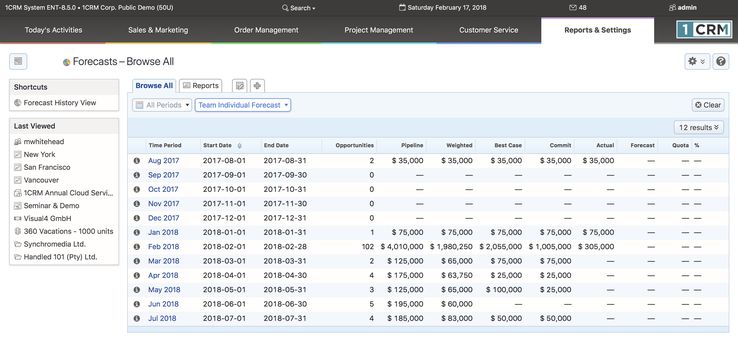
- Figure 155: Forecasts Module (Forecast History View)
- On entry, the Forecasts module shows a list view of sales forecast data for all available forecast periods (the Forecast History view). The filter panel lets you filter by forecast period. If any other employees report to you, a dropdown control is available to select between My Forecasts, My Team Individual Forecasts and My Team Roll-Up Forecasts (more on this distinction shortly). There is no mass update panel. The columns displayed are: Time Period, Start Date, End Date, Opportunities, Pipeline, Weighted, Best Case, Commit, Actual, Forecast, Quota and %.
- These columns are calculated as follows:
- Opportunities = Number of Opportunities due to close in this period (opportunities with Forecast Category of Omitted are not counted).
- Pipeline = Total value of those opportunities.
- Weighted = Total value of opportunities due to close in this period, with each opportunity weighted by its % Probability.
- Best Case = Total value of opportunities due to close in this period where Forecast Category is Best Case, Commit or Actual.
- Commit = Total value of opportunities due to close in this period where Forecast Category is Commit or Actual.
- Actual = Total value of opportunities closing in this period with Forecast Category of Actual.
- Forecast = Latest forecast committed for this period.
- Quota = Latest quota set for this period.
- % = Actual / Quota as a %.
- To understand forecasts, you must first understand that each user may have a sales quota and a sales forecast, both individually and for their team. For any user that has no reports (no other users are marked in Admin as reporting to them), their team numbers are irrelevant, and are the same as their individual numbers. For any user that does have reports, their team numbers are calculated as the totals for themselves plus all the users that report to them – either directly or indirectly (an indirect report is a user that reports to someone who reports eventually to the user in question).
- So – for example, in the screen above – if My Forecasts is selected, then the numbers shown are just for you. If My Team Individual Forecasts or My Team Roll-Up Forecasts are selected, then Opportunities, Pipeline, Weighted, Best Case, Commit and Actual are calculated as a total of the individual values from you and all your direct and indirect reports. Forecast and Quota, however, are shown differently in the two team views. In My Team Individual Forecasts, Forecast and Quota are calculated as a total of the individual Forecasts and Quotas for each member of your whole team. In My Team Roll-Up Forecasts, Forecast and Quota are the team quota assigned to you, and the team forecast you have committed. This distinction, on both the history and worksheet forecast views, allows you to see the difference between the total of a team’s individual forecasts and quotas, and the actual aggregated team forecast and quota, at all management levels in the sales hierarchy that report through you.
- There are a few other important principles you need to grasp to understand how forecasts work in 1CRM:
- In the Company Info section in Administration you can choose to forecast by Quarter, or by Month. Forecasting is initially set to Monthly - the dropdown selector can be set to Monthly, or Quarterly. There are two more fields on this screen that control forecasts - Retain xxx History Periods, and Retain yyy Forecast Periods. A scheduler task looks regularly to see if old forecast periods need to be erased, and new ones added. If the administrator tries to change from Monthly to Quarterly or vice versa – they receive a warning that all forecast data will be erased. The scheduler task is also run each time these values are saved – to ensure the right forecast periods exist. Each forecast period has a default start and end date, and they may be edited.
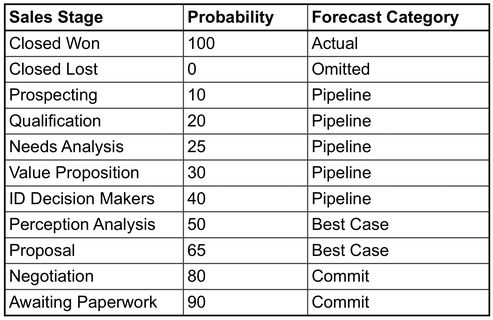
- Each Opportunity has an important field – Forecast Category. It is a dropdown field, with the choices – Omitted, Pipeline, Best Case, Commit, Closed – it is usually controlled by setting the Sales Stage or Probability % for an opportunity.
- If when editing an opportunity, the user changes the selected value for Sales Stage, then the Probability and Forecast Category for that opportunity will automatically be changed as per the table below. Probability and Forecast Category will both remain editable however. The Forecast Category determines if the value of an opportunity is included (for the user it is assigned to) in their forecast-related totals for the Pipeline, Best Case, and Commit categories. An opportunity with a Forecast Category of Best Case will be added into the user’s totals for Best Case as well as Pipeline. If it has a Forecast Category of Commit, it will be added into the user’s totals for the Commit, Best Case and Pipeline categories.
- The shortcuts in the Forecasts module let you select the Forecast Worksheet view, or go back to the Forecast History view (the default).
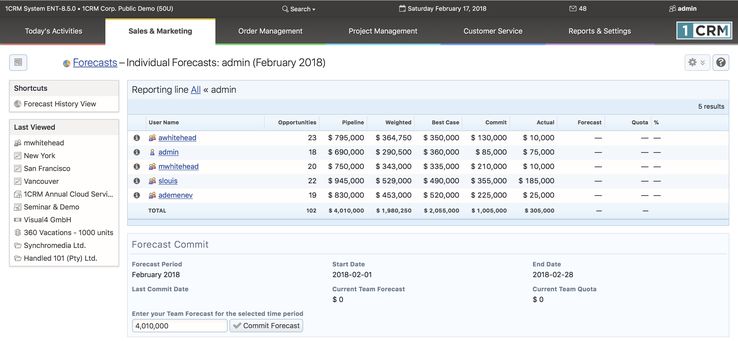
- Figure 156: Forecasts Worksheet – My Team Individual Forecasts
- In the Forecast Worksheet view, the filter panel requires you to filter to a specific forecast period (the default is the current period), and a dropdown control selects again between My Forecasts (default), My Team Individual Forecasts (where your team consists of you and all your direct and indirect reports – see an example in the figure above), and My Team Roll-Up Forecasts (where your team consists of you and all your direct reports).
- Note: The dropdown control is not displayed for users with no reports, and the My Forecasts view is shown.
- 5.8.1 Committing Personal and Team Forecasts
- On the Forecast Worksheet view – if the user selects My Forecasts, these two panels are displayed: Forecast Opportunities, and Forecast Commit. The Forecast Opportunities panel shows all opportunities belonging to the current user (columns are: Opportunity Name, Account, Amount, Probability, Forecast Category, & Weighted Amount). Totals are shown under each column.
- The Forecast Commit panel shows the name and date range for the period selected, and the last commit date and amount for that period. There is also a field prompting Enter your Personal Forecast for the selected Time Period, and a Commit Forecast button. This is used to commit the personal sales forecast by the current user, for the time period selected.
- On the Forecast Worksheet view – if the user selects My Team Individual Forecasts, these two panels are displayed: Individual Forecasts, and Forecast Commit.
- The Individual Forecasts panel shows a list of all users that are direct or indirect reports to the current user, plus the current user as well. The columns displayed are: User Name, Opportunities, Pipeline, Weighted, Best Case, Commit, Actual, Forecast, Quota and % (Actual / Quota as a %). All the numbers displayed come from each user’s individual forecast values (not their team’s forecast totals). There are totals displayed under all the columns.
- The Forecast Commit panel shows the name and date range for the period selected, and the last commit date and amount for that period. There is also a field prompting Enter your Team Forecast for the selected Time Period, and a Commit Forecast button. This is used to commit the team sales forecast by the current user, for the time period selected.
- On the Forecast Worksheet view – if the user selects My Team Roll-Up Forecasts, these two panels are displayed: Roll-Up Forecasts, and Forecast Commit.
- The Roll-Up Forecasts panel shows a list of users including the current user and all their direct reports (no indirect reports on this view). The columns displayed are: User Name, Opportunities, Pipeline, Weighted, Best Case, Commit, Actual, Forecast, Quota and %. All the numbers displayed come from each user’s team forecast totals (not their individual forecast values) – except the numbers for the current user – that user’s individual forecast numbers are used. This is because the current user’s team forecast is correctly based on adding the team forecast of all his direct reports to his own personal sales forecast. There are totals displayed under all the columns.
- The Forecast Commit panel shows the name and date range for the period selected, and the last commit date and amount for that period. There is also a field entitled Enter your Team Forecast for the selected Time Period, and a Commit Forecast button. This is also used to commit the team forecast by the current user, for the time period selected.
- 5.8.2 Setting Personal Sales Quotas
- If you click on the name of an employee in the Individual Forecasts panel (see My Team Individual Forecasts above), then the screen changes to show the forecast opportunities for that employee. These two panels are displayed: Forecast Opportunities, and Sales Quota.
- The Forecast Opportunities panel shows all opportunities belonging to the selected user (the columns displayed are: Opportunity Name, Account, Amount, Probability, Forecast Category, & Weighted Amount). Totals are shown under the Amount and Weighted Amount columns.
- The Sales Quota panel shows the name and date range for the period selected, and the last quota date and amount for that period. There is also a field prompting Set the Individual Sales Quota for this employee for the selected Time Period, and a Set Quota button, which may be used to set the personal sales quota for this user for the period selected.
- 5.8.3 Setting Team Sales Quotas
- If you click on the name of an employee in the Roll-Up Forecasts panel, then the Roll-Up Forecasts are displayed for the employee selected – the next level down in the hierarchy. These two panels are displayed: Roll-Up Forecasts, and Sales Quota. This is basically the same screen you were on, one level down in the organization – except that now you are not setting your own committed roll-up sales forecast, but the sales quota for those who work for you.
- The Roll-Up Forecasts panel is just the same as described above.
- The Sales Quota panel shows the name and date range for the period selected, the last forecast (and date) committed by that user for his team for that period, and the last quota (and date) set for his team for that period. There is also a field prompting Set a Team Sales Quota for this employee for the selected Time Period, and a Set Quota button. If a Quota is set, it is the Team Quota value for this user for this period.
- This drilling down process through the direct reports can continue until you get to users with no one reporting to them, for whom you can set a personal sales quota as above.
- 5.9 The Documents Module
- Figure 157 shows the 1CRM screen with the Documents Module selected:
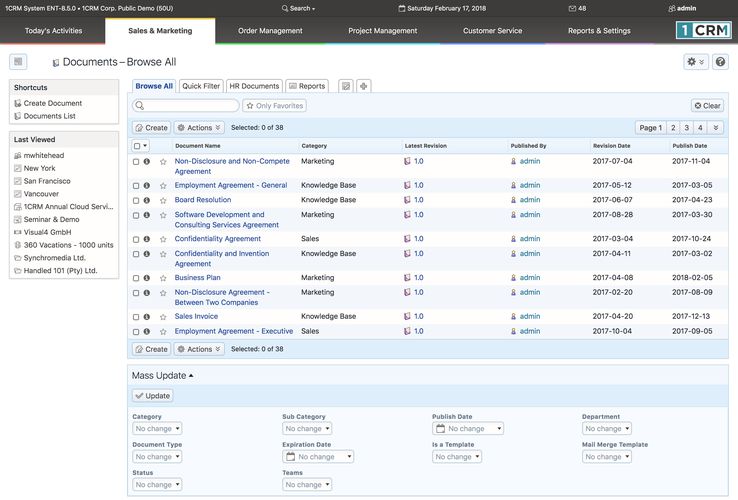
- Figure 157: The Documents Module
- The Documents module has a
 Help icon on the title bar at the top of the main screen body, followed by a choice of layout tabs, and a list of all or selected Documents. The navigation shortcuts provided will help you create a new document, or switch back to the Document List view.
- The Document list may be sorted by clicking on any column title which has the
 icon beside it. Clicking on a column title when it is already the highlighted sort column reverses the sort order. The Document list is paginated if it contains more items than may be listed on the display, and controls are provided to go to the start or end of the list, or step to the next or previous page. Clicking on any Document in the list displays the detail information for that Document.
- Successive revisions of a document may be attached to a document record within 1CRM, and so each document may contain more than one file attachment. At any given time, one (and only one) of the revisions is always marked as the current revision, and this is the version which will be downloaded when the user clicks on the file download link in the Document List view.
- The main document record specifies the category and sub-category, status (Draft, To Be Approved, Approved, or Archived), which of the attached revisions is the one currently in use, which department created and owns the document, a description (or abstract) of the document, and a list of keywords which apply to the document – to be used when searching for it. (Note: Multiple keywords should be separated by commas, both in the document record, and when performing a search. During a search, multiple keywords are OR’d.)
- Each revision attached to a document record contains its version number and Change Log notes on that revision. The default maximum file upload is 20 Mbytes, which can be adjusted by your admin.
- 5.9.1 Drag and Drop Support
- While typically a new Document might be added to 1CRM by clicking on the Create Document shortcut, or the Create button at the top of the list view, you can also create a Document by a simple Drag and Drop action.
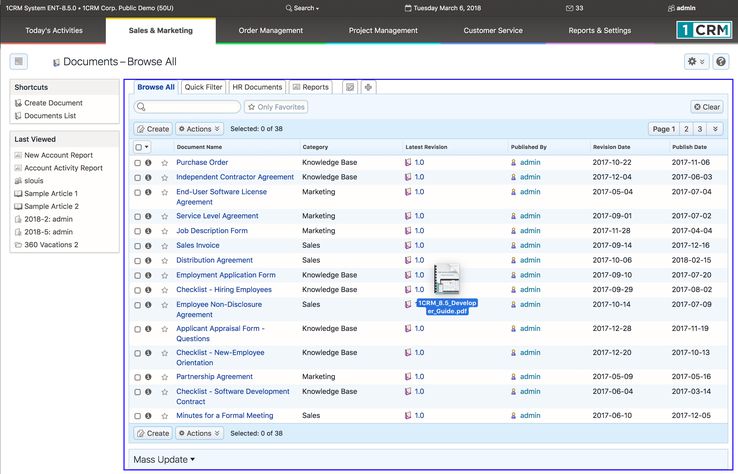
- Figure 158: Documents List View Drag and Drop
- The Figure above shows a file being dragged into the Documents list view. When the main portion of the list view is highlighted as shown one or more files may be dropped to automatically create a new Document(s).
- Settings in Admin - System Settings are used by your Administrator to define the defaults (if any) to be used for the Document’s Category, Status and Department. The Document Name is set to the full file name including extension.
- This same Drag and Drop process is also supported in the Notes module, where when a file is dropped into the Notes list view, a new Note is created and the file is saved as an attachment to that
- Note: The Note Subject is set to the full file name including extension.
- The above scenarios create a new Note or a new Document. That’s certainly useful, but sometimes you’d like those new Notes or Documents to be related to some other item of information within 1CRM, such as a Case, an Account, a Contact or a Lead.
- There is also a way to do this in 1CRM, if your Administrator enables the appropriate option in the Drag and Drop Support panel of the Admin - System Settings screen.
- If you go to an Account detail view (the same process applies for most modules in 1CRM) and Drag and Drop one or more files onto the History or Documents subpanel (see Figure below) it will create one or more new Notes or Documents just as explained above. But in addition the new Notes or Documents will be related to the Account.
- Furthermore, if you Drag and Drop a file onto a subpanel of a Case, the new Note or Document will be related to the Case, and then also related to the Account that is set on the Case. This also works for Bugs, Projects, Contacts and most other modules that can have a related Account.
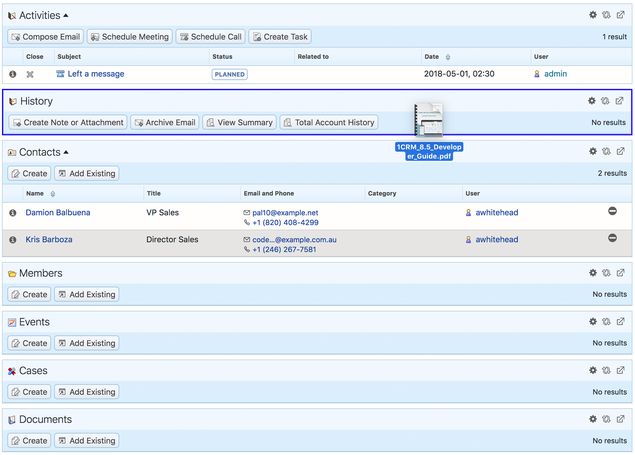
- Figure 159: Account Detail View Drag and Drop