- 6.0 Order Management
- 6.1 The Quotes Module
- Figure 160 shows the 1CRM screen with the Quotes Module selected:
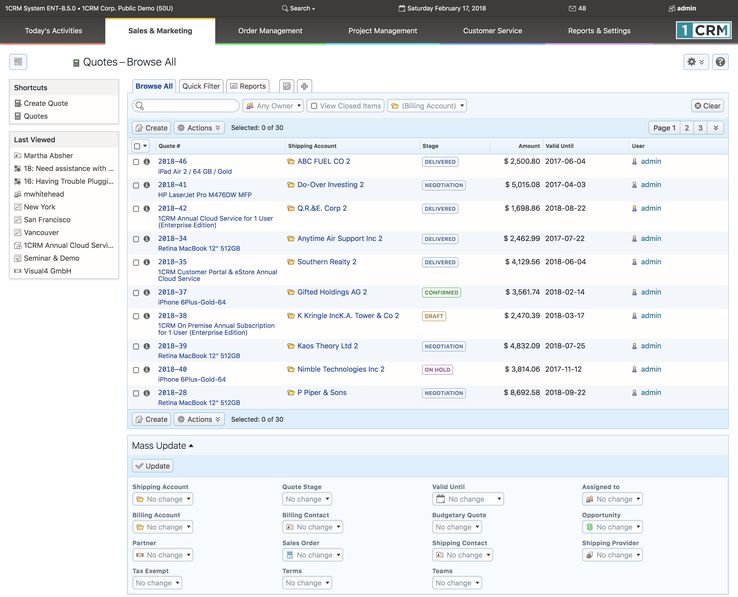
- Figure 160: The Quotes Module
- The Quotes module manages the creation of customer quotations. Quotes are created by defining a quantity to be sold for each of a number of products (or assemblies), and an account to which they are being quoted. Quotes may be managed and tracked through their life-cycle using the Quotes module. You can view a video presentation about how to create a Quote here.
- Each Quote has a Stage – which may be set to Draft, Negotiation, Delivered, On Hold, Confirmed, Closed Accepted, Closed Lost, or Closed Dead. As well, a Quote has a Valid Until date, after which the prices quoted expire. Each Quote has a Contact, an Account, and an address – for both bill to and ship to. For each Quote the shipping provider, and the currency must also be selected.
- The Quotes module provides a list of all or selected Quotes. Each Quote in the list has a check box at the left, and at the bottom of the screen is a Mass Update panel to update one or more field values for all selected Quotes. The Quotes list may be sorted by clicking on any column title that has the
 icon beside it. Clicking on a column title when it is already the highlighted sort column reverses the sort order.
- The Quotes list is paginated if it contains more items than may be listed on the display, and controls are provided to go to the start or end of the list, or step to the next or previous page. Clicking on the subject for any Quote in the list displays the detail information for that Quote. Clicking on the account name for a Quote links to the detailed information for that Account. The navigation shortcuts provided help you create a new Quote, or switch back to the Quotes list view.
- 6.1.1 Creating a Quote
- You start the creation of a new Quote by setting the Quote Subject, and then the Account - which in turn sets the Bill To and Ship To addresses, the default currency, the default terms, tax info, and a few other values, based on settings from that Account record. Then select a Contact at that Account.
- Note: When you create new Accounts, you should define the information on the Sales Information panel of the Account - the Sales Credit Limit, Default Terms, Default Discount, Shipping Provider and Tax Information. In the main panel for the Account, you should also set the Currency plus the checkbox if the Account is Tax Exempt. By setting these values when you first define the Account, in future when you prepare Quotes or Invoices for this Account, the defaults are automatically set - preventing errors and saving you time.
- 6.1.2 Grouped Items, Discounts, Taxes, Shipping
- By now you may have noticed that each Quote consists of one or more product Groups, and each product Group can have one or more products in it. Each Group has a name, and a stage (same options as the Quote itself). For each Group, one or more Discounts may be selected from those defined in the Discounts module, and as well a shipping charge (which may be taxable or not) may be specified at the Group level of the Quote.
- Now let’s carry on making your first Quote. Enter the Group name for the first Group of items, and then set the Group Type to Products, Support or Services (the default is Products, which is the option you will most commonly want).
- If your Group Type is set to Products, you can click on ✚ add product, ✚ add assembly,
✚ multiple products, or ✚ add comment to add the type of line item desired. This type of Group is primarily used to add Products from the Product Catalog.
- When Group Type is set to Support, the system will allow you to add those same three types of line items, but also Supported Products and Supported Assemblies. This type of group is useful for quoting the prices of annual support for items in the Product Catalog (i.e. items yet to be sold to the client), or Supported Products or Assemblies (i.e. Products or Assemblies which have already been sold to the client, and now are coming up for a renewal of support)
- When Group Type is set to Services, the system will only allow you to add line items that are Booking Categories, or Comments. This option is useful for quoting services that are priced by the hour. (Make sure you define Booking Categories that cover all the types of services you deliver to clients.)
- Next, set the pricing model for the Group to Catalog Prices, Profit Margin, Markup over Cost, Discount from List, Same as List or Custom Prices (they may not all be available to you, depending on what Quotes pricing options the Administrator has allowed you). Your Administrator has an option on the Company Information page to set a default for this pricing model.
- Now you can add line items to your Quote, within the first Group you have established. Your choices are as follows:
- The most common action is to add a Product, which you can do a few different ways. First, just click on the ✚ add product link. Then you can simply type in the beginning of a product name, in which case a dropdown list shows a list of possible options. Alternatively, after clicking on the ✚ add product link you can then click on the Lookup button
 at the right-hand end of the Product or Assembly field. This brings up a Product Catalog dialog box for you to look up an item and search by name, category or type, or part number. You can select a product by clicking on its name - this will close the dialog box and add that product to the Quote. Whenever a Product is added as a line item on your Quote, the product name, manufacturer’s part number, tax code, and cost, list and unit prices are shown.
- Note: When typing in a product name on the main Quote form, if you have the check box option labelled User Can Enter Products Not Present In Catalog selected on your My Account page, you will also see Custom Entry: <your text> as the last entry on the dropdown list of Product options. If you choose this option, you will be able to enter the product name, manufacturer’s part number, tax code, and cost, list and unit prices for a custom or ad hoc product to be added to your Quote. This product is only added to the current Quote, and is not added to the Product Catalog.
- Note: If a Product Catalog item is added to a Support type Group rather than a normal Product type Group, the Unit Support Cost and Unit Support Price are used rather than the Cost and Selling Price, as you are selling annual support for the item, not the item itself.
- Much the same process as the above applies when an Assembly is added by clicking on the ✚ add assembly link, but additional indented lines are added to show the components of the Assembly.
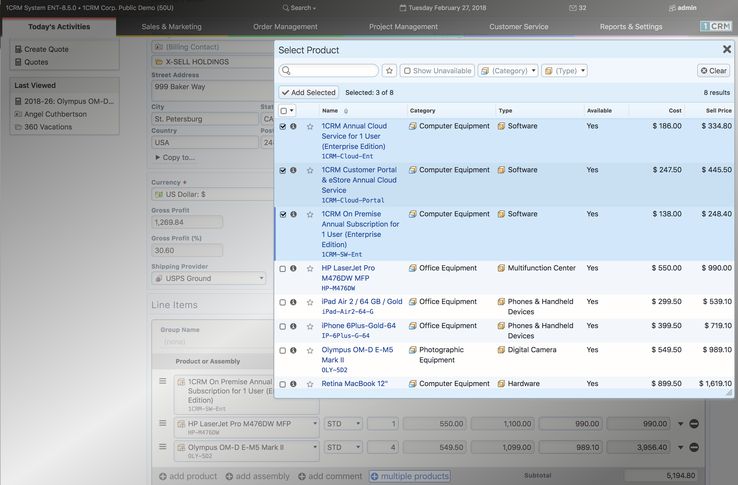
- If you need to enter multiple products, you may click on the ✚ multiple products link. A Select Product dialog box now lets you select check boxes for multiple products, and then click on the Add Selected button to close the dialog box and add multiple products to the Quote (see Figure 161 below).
- A comment line can be useful to add to any quote to add clarifying information for the client. As well, there is a very useful ✚ add comment option on the Order Management Settings panel of the Admin - Company Information screen, which may be set to automatically add the description of a Product or Assembly (you can choose to enable it for Products, Assemblies, or both) as a comment line after the line item is added to a Quote.
- When adding a Supported Product to a Support type Group within a Quote, similarly to adding a (Catalog) Product to this type of Group, the Supported Product’s Unit Support Cost and Unit Support Price are listed as part of the line item inserted in the Quote, as you are selling annual support for the item.
- Much the same is true when a Supported Assembly is added to a Support type Group within a Quote, but additional indented lines are added to show the components of the Assembly.
- When adding Booking Categories to a Services type Group within a Quote, the Billing Rate will be added as the List and Unit Prices for the new line item. The Booking Category name, plus the Location, Duration and Seniority (in the form Billed Contract Work (Onsite / Hour / Intermediate)) will be entered as the name of the Quote’s new line item.
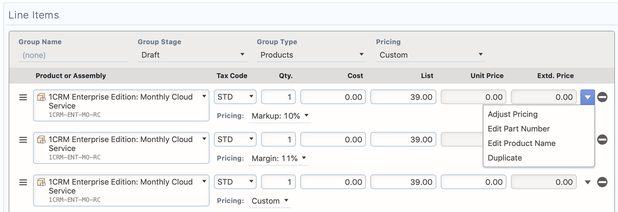
- When editing a Quote, notice the
 control to the right of each line item (see Figure 162). If you click on this control you will see a selection of functions you can perform on the current line item: Adjust Pricing, Edit Part Number, Edit Product Name, and Duplicate. You can use Edit Part Number and Edit Product Name to change these values for an existing line item.
- When you have added a few line items to your first Quote, and perhaps defined multiple item Groups of differing types, and set various tax rates and shipping charges, you can save your Quote by clicking on the Save button available at the top or bottom of the Quote Edit view.
- The Quotes detail view shown in Figure 163 illustrates the information captured by a Quote within 1CRM – complete with Bill To and Ship To addresses and contacts, shipping provider, discounts, taxes payable, and shipping costs.
- Figure 161: Adding Multiple Products to a Quote
- 6.1.3 Line-Item Level Discounts
- As seen in Figure 163 (see Special Promotions (10%)), the line items on a Quote may be discounted by using Group-level discounts. But sometimes this is not convenient, if you have several individual items that need different discounts applied to them, and you do not want to put each in its own Group. For this reason, 1CRM also supports line item-level discounts (see the Adjust Pricing option in the dropdown seen in the Figure below). Depending on the four Quote-related permissions set in User Management for the current user (User Can Enter Products Not Present In Catalog, User Can Set Prices Different From Catalog, User Can Set Arbitrary Discounts, and User Can Apply Standard Discounts) you have a range of line item-level discount options available to you.
- Figure 162: Line Item Level Pricing
- 6.1.4 Generating PDFs
- An Acrobat PDF (see Figure 164) may be generated for any Quote by using the
 button. From the pop-up dialog box displayed (see Figure 165) you would normally select the Default Quote dropdown option in the Use PDF Form field. Then choose to either generate and view the PDF (by clicking the Open as PDF button), or to generate the PDF and immediately proceed to compose an email with the PDF as an attachment and the recipient email address set to that of the Contact on the Quote (by clicking the Email as PDF button).
- This popup dialog box also includes a dropdown control to select which company address (if the business has multiple addresses) you’d like to use, plus two controls to select 1CRM Notes with PDF file attachments to merge onto the front and the back of the Quote as it is generated. These controls help you create more of a proposal-type PDF, by enclosing your Quote with standard proposal text.
- Note: The Use PDF Form field will show Default Proforma, Default Quote and Use Screen Layout options as standard. The PDF Form Designer (Enterprise Edition only) may add more options.
- Note: A Quote PDF may have specific notes added to it via the notes field, but may also have standard terms and conditions added to it by defining them in the Admin – Company Information panel. As well the Quote PDF features a signature block for acceptance of the quote.
- Note: You can choose between different layout options for the Default Quote form (and Invoices etc..) by using the Quote/Invoice Layout setting on the Admin - System Settings - Company Information screen, within the Order Management panel. One option supports US standard size #10 window envelopes, for example.
- Note: There are two PDF output options that may be set for a Quote. Show Components is an option that may be used to control the way Assemblies are shown on the PDF. The option may be set to Details & Prices, Details, or -- None --. With the Details & Prices option set, the components within an Assembly will be shown on the PDF, as well as their line item prices. The Details option omits the line item prices, and the -- None -- option omits the component item information entirely from the PDF. The Show List Prices option simply controls if a column of list prices is displayed on the Quote PDF.
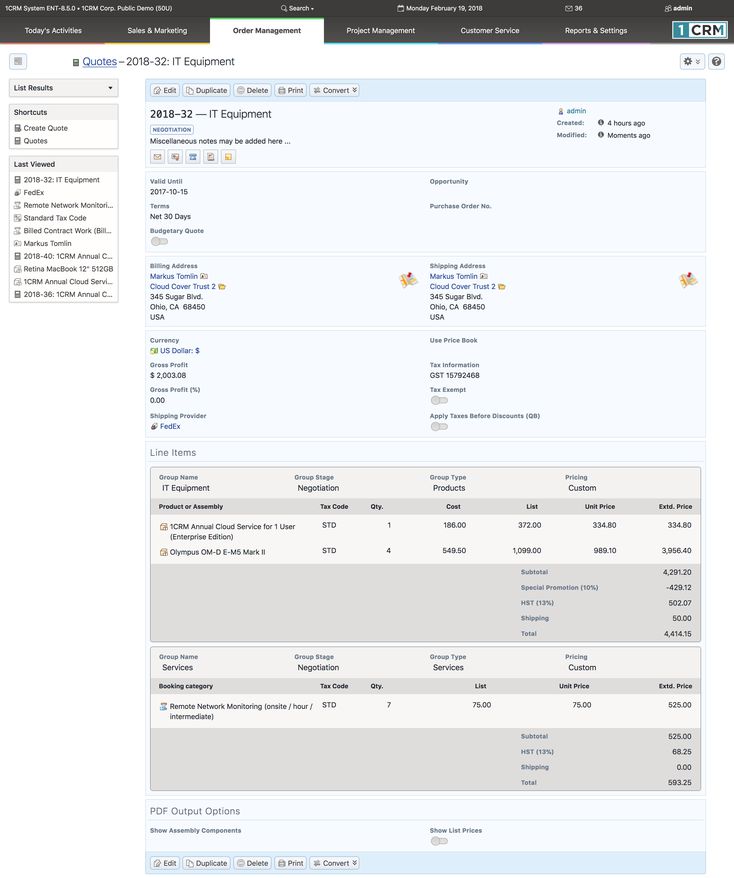
- Figure 163: Quote Detail View
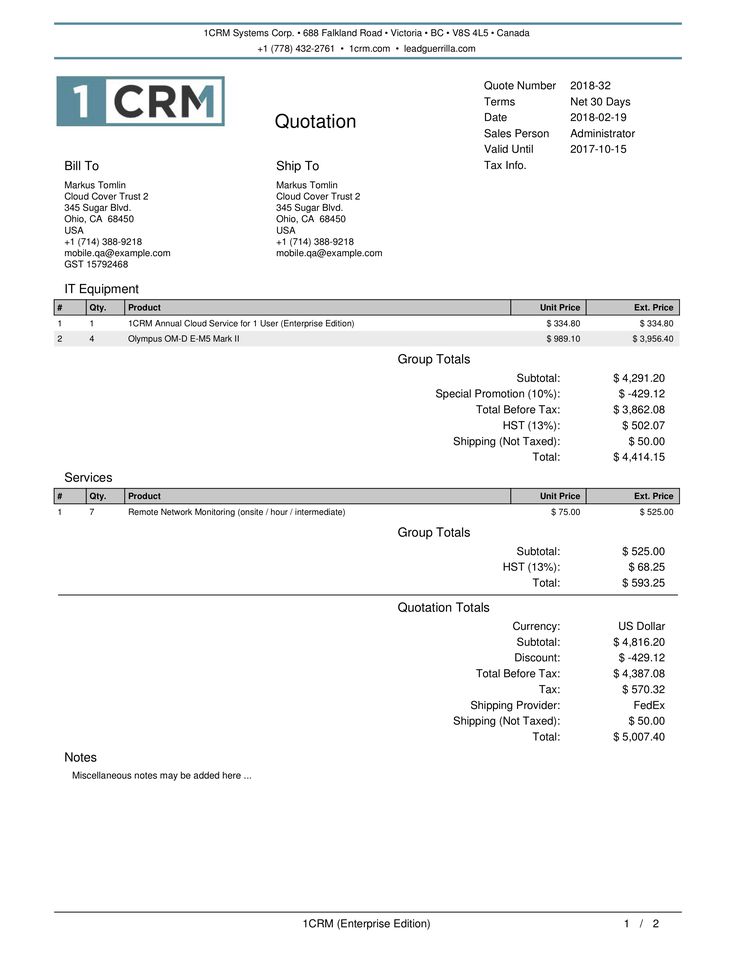
- Figure 164: The Acrobat PDF Generated for a Quote
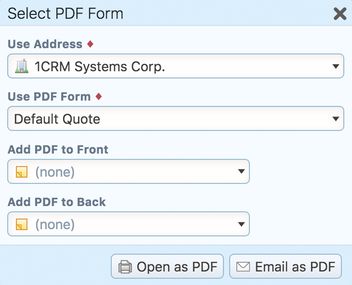
- Figure 165: Preparing a Quote PDF - Options
- 6.1.5 Business Workflow for the Sales Process
- Quotes are the first stage of the workflow for the sales process within 1CRM. Using the Convert button, a Quote may be converted automatically into a Sales Order, Invoice or Opportunity by selecting the appropriate option from the dropdown list presented. Line items may be added or removed, and quantities adjusted, in the process of this conversion.
- Usually one Quote converts into a single Sales Order, if indeed your business uses Sales Orders. One Sales Order can translate into a single Invoice, or into multiple Invoices - hence a Sales Order has a sub-panel on it for the related Invoices.
- Once an Invoice has been created, you use the Ship It! button on the Invoice to record shipping the product to the customer. This also adjusts inventory levels for the warehouse location used for the shipment. Each Invoice may have one or more Shipping records related to it, as shown on the Shipping sub-panel on the Invoice detail view.
- Then an incoming payment from the customer may be entered using the Payments sub-panel on the Invoice record. This will adjust the Amount Due on the Invoice, as well as the Balance Receivable in the Sales Information panel on the Account record for this client. As clients may make partial payments, there may be one or more Payment records related to each Invoice record on its Payments sub-panel. This is the life-cycle on the sales side within 1CRM.
- The line items on a Quote may also be automatically created as Supported Products linked to the customer Account using the Convert button. If you select this option, a Create Supported Products Pop-Up box is displayed, as shown in Figure 166 below. The options in this pop-up box allow you to associate the newly created Supported Products with a new or existing support subcontract, or with a new or existing Project.
- Also note that there is a somewhat related system-level setting which causes 1CRM to add all Products on each Invoice to the Supported Products sub-panel of the Account involved, once the Invoice is paid in full. (See the Admin - System Settings section in the Implementation Guide.) This setting is used if you want Accounts to have an associated Supported Products list that shows all the kinds of products that the Account has purchased.
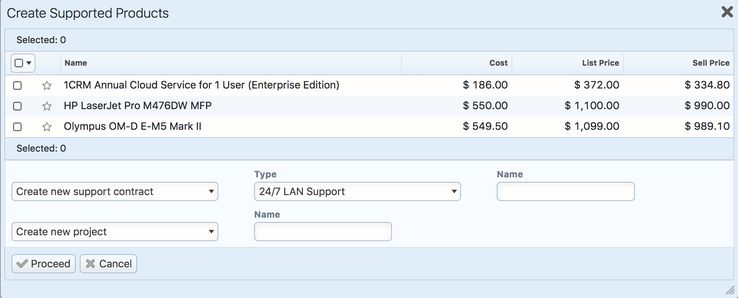
- Figure 166: Create Supported Products Pop-Up Box
- 6.1.6 Quote Approvals
- Depending on the sort of business process you wish to implement at your company, Quotes can be required to have approvals before they can be printed or emailed. The administrator can require Quote approvals by checking the Approve Quotes box in the Order Management Settings panel of the Admin - Company Information screen. A Quote Approval Threshold value may be set, and/or a Quote Margin Threshold percentage value. A Quote will require approval if Approve Quotes is enabled, and the Gross Profit percentage of the Quote is less than Quote Margin Threshold, or the total value of the Quote is greater than Quote Approval Threshold.
- Note: If Approve Quotes is enabled, then Quote Approval Threshold must have an explicit value set for it. If left blank it means all quotes will need to be approved.
- When Approve Quotes is enabled, and the user has the ability to approve Quotes (users can be given the ability to approve Quotes in Role Management), an Approval section of the Quote Edit view is displayed with some additional fields - a warning message Caution: When approving a quote - please be sure you do not approve deals above your authority, plus Approval Status and Approval Issues fields. When a new Quote is created that requires approval, until it is approved the user will only be able to convert that Quote to an Opportunity - not into a Sales Order, Invoice, or Products. The Create PDF button will not be available, and a new Submit button will allow the user to submit the Quote for approval (and will mark the status of the Quote as Submitted).
- Submitting a Quote for approval will also cause a notification email to be sent to a user with the ability to approve Quotes, with a link to the Quote requiring approval. That user may approve the Quote, or mark it as Not Approved, and add some comments in the Approval Issues field. Once a Quote has its status changed to Approved, the Create PDF button is available, the Submit button disappears, and the user is able to convert a Quote to a Sales Order, Invoice, or Products.
- 6.1.7 Exchange Rates
- For businesses that operate in multiple currencies, 1CRM has many features that make your life easier while tracking this potentially complex aspect of doing business. A key tool for managing multiple currencies is the currency dropdown selection fields within 1CRM. On a Quote for example, you will find the currency dropdown is editable when the line items of the Quote are editable (see the Figure below, left side dropdown illustration). If the Quote currency is not the system default currency, you can click on the
 icon to see the right side Info box illustration in the Figure below, which shows you the exchange rate for this Quote.
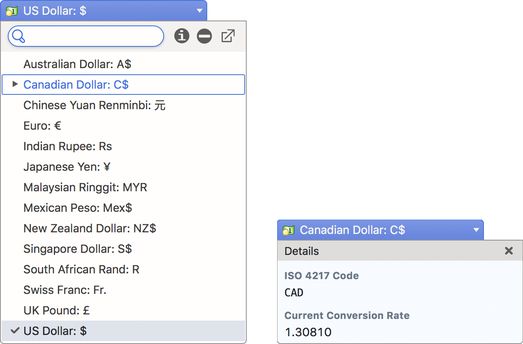
- Figure 167: Exchange Rate Dropdown & Info Box
- What this tells you is that the current exchange rate used for this Quote between the Quote’s currency (C$ - Canadian Dollar) and the system’s default currency (in this case US$) is 0.1.30810. This was the exchange rate in effect at the time the Quote was created.
- Note: Remember that the system’s exchange rates can be updated automatically (for example overnight each night) using the Scheduler task Update Rates. See the Admin section of the Implementation Guide for further details.
- Note: If your organization wishes to allow users to alter the exchange rate to be used on Quotes, Invoices etc … then your system administrator can simply use the Layout Editor to add the Exchange Rate field into the screen layout for each module where it is desired.
- Note: If you prepare a Quote in a currency other than your base currency, but then time passes and the Quote expires and has an outdated exchange rate - what should you do when your client gets back in touch and wants an updated Quote? The answer is to either manually update the exchange rate if it has been added to your screen layouts, or better yet make a duplicate of the Quote and it will automatically be updated to use the current rate of exchange.
- 6.1.8 Tax Rates and Tax Codes
- Tax Rates to be used in the Quotes and Invoices modules are defined in the Admin area. For each new Tax Rate defined, the Tax Name, Rate (enter 7, for example, if the rate of tax is 7%), and Status (Active or Inactive) must be entered. Taxes may be defined as a Compounding Tax - one that is applied on the base amount as well as on any other taxes. Fortunately, most taxes are not compounding.
- Tax Codes are also defined in the Admin area, and they are used to define the tax class of an item. Default Tax Codes are set for items in the Product Catalog, so that when new line items are added to a Quote or Invoice, they default to the Tax Code set in the Catalog.
- Note: If you are preparing a Quote or Invoice for an Account for which a default Tax Code has been set, new line items have their Tax Code set to the Account default, not the Tax Code set on the product in the Catalog, unless the product has been set to Tax Exempt in the Catalog.
- For each new Tax Code defined in Admin, the Tax Code itself, a Descriptive Name of the Tax Code, Order (order within the dropdown list), and Status (Active or Inactive) must be entered. You can also add a Description if desired.
- Then you must relate one or more Tax Rates to the Tax Code (watch out – many users forget to do this!). What you are creating is a Tax Code that says any products with this Tax Code will have the following Tax Rates applied to them – for example, federal taxes, state/provincial taxes, and even municipal taxes where they apply.
- As an example, if Federal and State Tax Rates are defined, and a Tax Code is defined called Both that includes both of these Tax Rates, then if a line item on a Quote is marked with the Tax Code Both, then both Federal and State taxes will be added to the Quote for that item.
- Creating Tax Rates:
- In Admin, select the Tax Rates option within the Quotes & Invoices section of the main Administration screen. On the screen listing any existing Tax Rates, there is a Create button for the creation of new Tax Rates. Enter the Tax Name, the Rate, Status, and finally Compounding if needed. Then click on Save. Repeat the process if you have more Tax Rates you wish to add.
- Now we have defined our Tax Rates, we can go on to create Tax Codes.
- Creating Tax Codes:
- In Admin, select the Tax Codes option within the Quotes & Invoices section of the screen. Within the shortcuts area of the screen, select the shortcut for Create Tax Code, or use the Create button.
- Enter a Name for the Tax Code (e.g. 0% tax), and a Descriptive Name (e.g. Out Of State Taxes). Set the Status to Active or Inactive. Enter a long text Description if needed, and then enter the Order (order within the dropdown list). Tax Calculation Method defaults to Apply Tax List - and normally you should leave it like that. Finally, click on Save.
- Now select the shortcut for Tax Codes, to see the list of all Tax Codes. Select the Tax Code with which you want to associate one or more Tax Rates, by clicking on the name of the Tax Code.
- On the resulting screen, in the Tax Rates sub-panel, click on the Add Existing button to add Tax Rates to the definition of this Tax Code. In the pop up Tax Rates dialog box choose one or more desired Tax Rates, and then click on Add Selected. This will add those Tax Rates to the Tax Rates sub-panel for that Tax Code, creating the desired association between the Tax Code and the Tax Rate.
- 6.2 The Sales Orders Module
- Note: Read the section on the Quotes module before you read this section!
- Figure 168 shows the 1CRM screen with the Sales Orders Module selected.
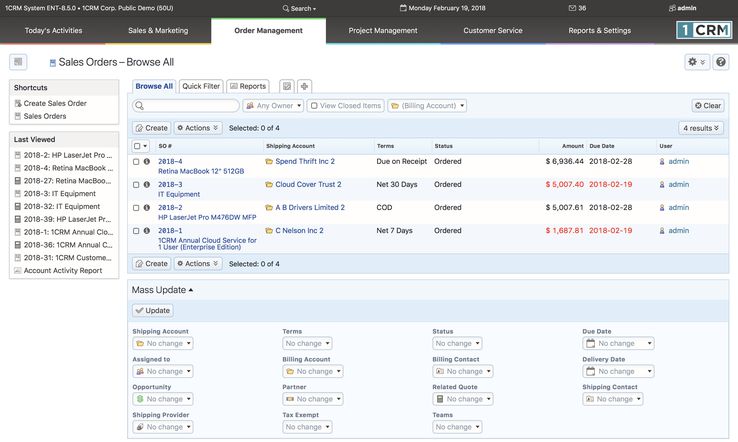
- Figure 168: The Sales Orders Module
- Sales Orders are a common intermediate step between a Quote and an Invoice. While not all businesses use them, and may proceed directly from a Quote to an Invoice, many businesses do use them – and typically operate an ‘Order Desk’ that is in charge of them. Sales Orders are often used in businesses that regularly part-ship orders, and need to track and confirm that each order processed is shipped in its entirety.
- As part of the process of part-shipping an order, a packing slip is usually generated and enclosed with a partial shipment – indicating what quantities of which items were shipped, and not showing the costs of the items shipped. While the Sales Order module itself has the ability to print a PDF of a Sales Order Confirmation, you should prepare a Packing Slip (with no prices shown) using the Shipping module, after preparing an Invoice for the partial shipment. (Note: You can create an Invoice from a Sales Order by clicking on the Convert button and then selecting the Invoice option.)
- Sales Orders are created in a manner very similar to quotes, by defining a quantity for each of a number of products (or assemblies, which are complex products defined from a set of component products), and an account that is buying them. Sales Orders may also be created by converting a Quote into a Sales Order.
- The Sales Orders module manages and tracks Sales Orders through their life-cycle. Each Sales Order has terms defined for it – selected from a standard set of terms (COD, Due On Receipt, Net 7 Days, Net 15 Days, Net 30 Days, Net 45 Days, Net 60 Days). Each Sales Order has a contact, an account, and an address – for both bill to and ship to. For each Sales Order the shipping provider, and the currency must also be selected.
- Each Sales Order has a stage - which may be set to Ordered, In Manufacturing, Partially Shipped & Invoiced, and Closed – Shipped & Invoiced. Each Sales Order consists of one or more product groupings, and each product group may have one or more products (or assemblies) in it. For each grouping, the applicable tax rate (or rates) for taxable items may be selected. One or more Discounts may also be selected from those defined in Admin, and as well a shipping charge may be specified at the group level of the Sales Order.
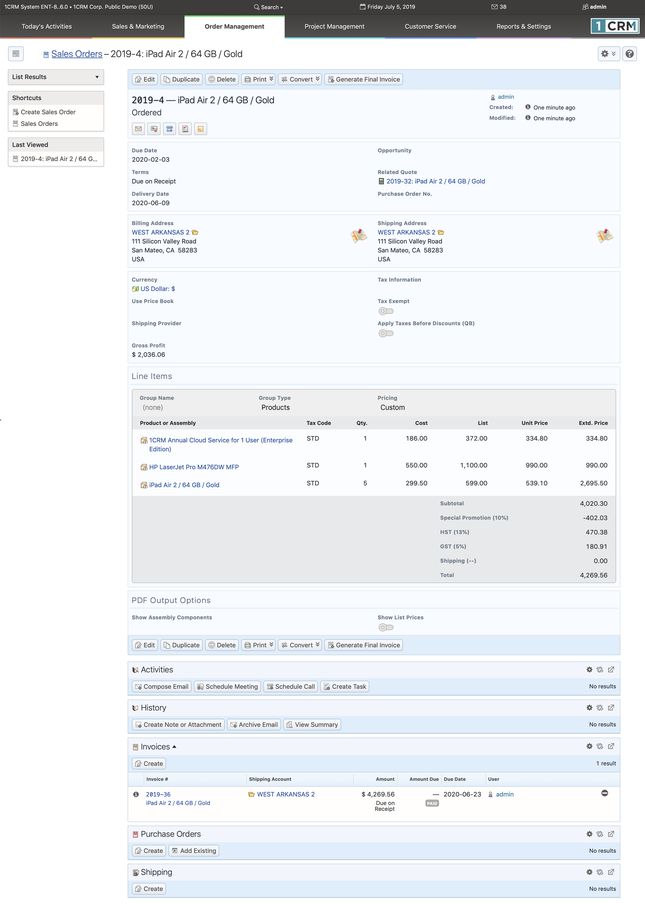
- Figure 169: Sales Order Detail View
- On entry, the Sales Orders module provides a list of all or selected Sales Orders, with any overdue Sales Orders highlighted (see Figure 168). Each Sales Order in the list has a check box at the left, and at the bottom of the screen is a facility to update one or more field values for all selected Sales Orders. The Sales Order list may be sorted by clicking on any column title that has the
 icon beside it. Clicking on a column title when it is already the highlighted sort column reverses the sort order.
- The Sales Orders list is paginated if it contains more items than may be listed on the display, and controls are provided to go to the start or end of the list, or step to the next or previous page. Clicking on the subject for any Sales Order in the list displays the detail information for that Sales Order. Clicking on the account name for a Sales Order links to the detailed information for that Account.
- The navigation shortcuts provided help you create a new Sales Order, or switch back to the Sales Orders list view.
- The Sales Order detail view shown in Figure 169 above illustrates the information captured by a Sales Order within 1CRM – complete with Bill To and Ship To addresses and contacts, shipping provider, taxes payable, discounts and shipping costs.
- An Acrobat PDF may be generated for any Sales Order – using the
 button and selecting the Sales Order Confirmation option. From the pop-up dialog box displayed (similar to Figure 165) you may then choose to either generate and view the PDF (by clicking the Open as PDF button), or to generate the PDF and immediately proceed to compose an email with the PDF as an attachment and the recipient email address set to that of the Contact on the Sales Order (by clicking the Email as PDF button).
- This popup dialog box also includes dropdown controls to select which company address (if the business has multiple addresses), and which print layout template to use when generating the PDF.
- Also note that for ease in preparing Purchase Orders for items on a Sales Order, you may convert a Sales Order into a Purchase Order by clicking on the Convert button and selecting the Create Purchase Order option.
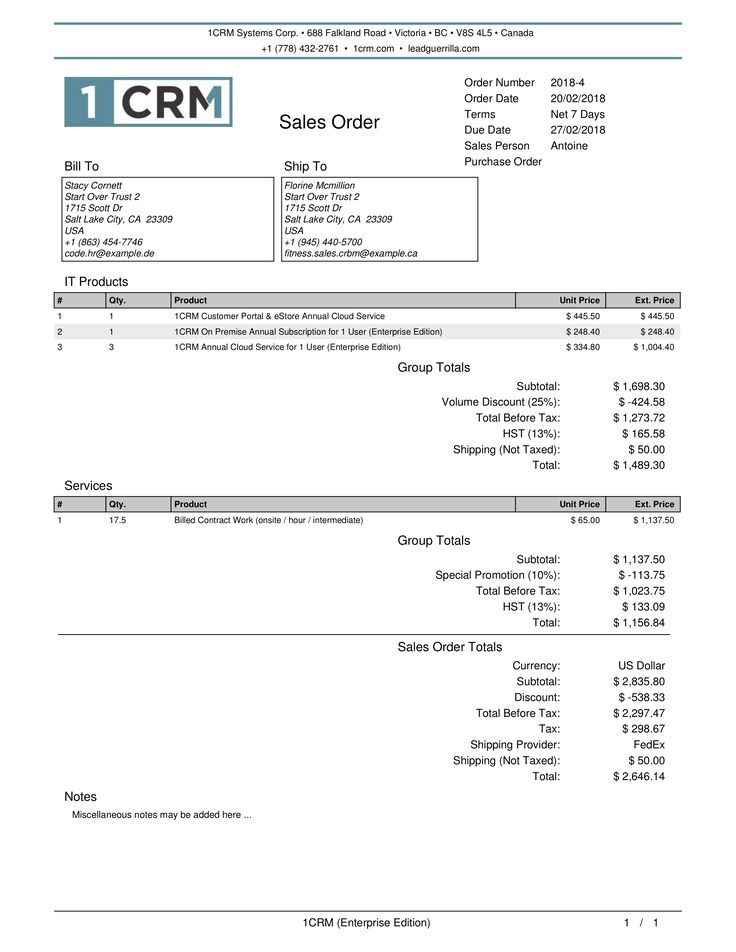
- Figure 170: The Acrobat PDF Generated for a Sales Order
- 6.2.1 Milestone Billing
- One of the main reasons for the existence of Sales Orders is to cover situations where an order is not delivered all at once. It becomes the job of someone at your company (the Sales Order Desk) to track the progress of these orders, make sure deliveries go as expected by the client, and that in the end the Sales Order is full delivered and fully invoiced.
- Usually the delivery is not made all at one time because your firm has to do some work to complete the delivery - either manufacturing, processing or professional services. In all of these cases it is common to take an initial deposit against the Sales Order - usually because your firm makes financial commitments that require some matching commitment from the client.
- In addition to an initial deposit, it is also common to take one or more interim payments as the delivery process reaches intermediate goals you have agreed with the client. The initial deposit, and these interim payments are often collectively referred to as Milestone payments. And 1CRM includes an easy process that allows you to do Milestone Billing. In bullet points, it looks like this:
- Create your Sales Order (perhaps by converting your Quote).
- Create an Invoice linked to this Sales Order for the initial deposit (sometimes called Milestone 0).
- Create any further Milestone Invoices linked to this Sales Order, as agreed with the client, as you complete delivery.
- At any point in time during the delivery process, you may need to prepare a statement for the client showing the current status of the Sales Order - the original total, milestone payments billed, and what remains.
- Create the final invoice which closes the Sales Order as fully invoiced.
- Let’s examine some of these steps in more detail.
- Billing for a Deposit:
- On the Sales Order detail view, scroll down to the Invoices subpanel and click on Create. Create a normal invoice, with just a single line item Group, and a single line item, something like this:
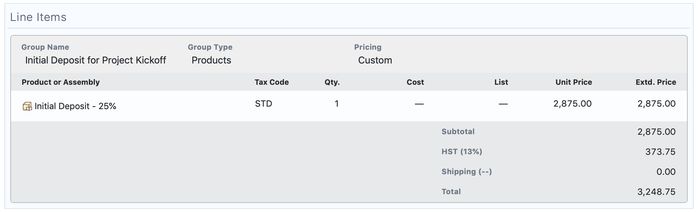
- Figure 171: Billing for a Deposit
- Once you save the Invoice, it will be visible on the Invoices subpanel of the Sales Order, as seen below. You can repeat this process for additional Milestones in your delivery process for this Sales Order, using a name for your line item such as “Milestone 3 Completion” or whatever makes sense in your context, and your Invoices subpanel will list any Invoices you create related to this Sales Order.
- Figure 172: Billing for a Deposit & Additional Milestones
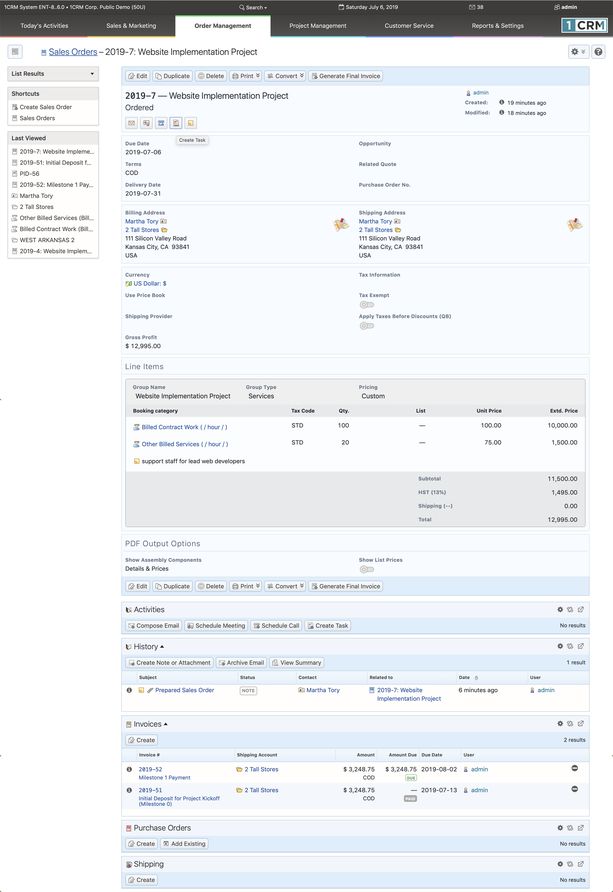
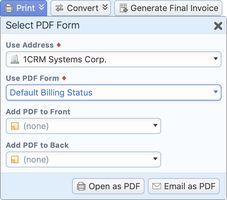
- Printing a Sales Order Billing Status:
- When your client asks for a status update on the progress of billing against this Sales Order, you use the
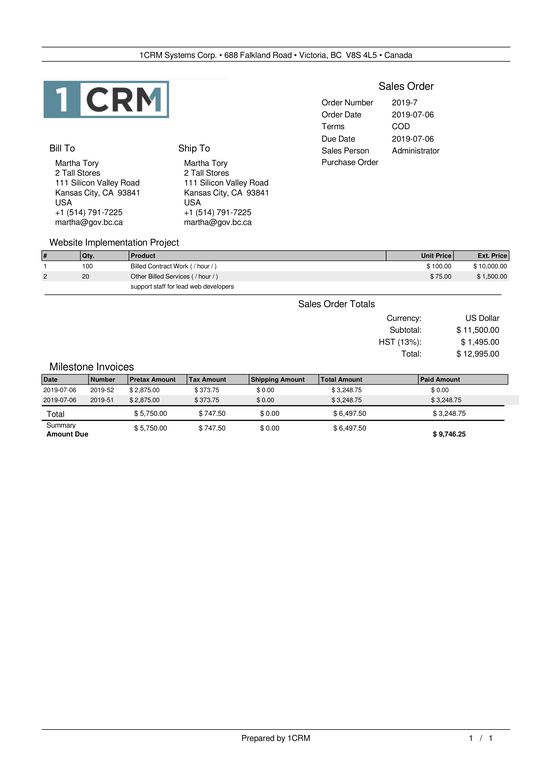
 button, and choose the PDF Form Default Billing Status. As usual this can generate a PDF for you to save locally, or to email directly to the client. An example of the PDF is shown below. It will show the total Sales Order value, and will list the Invoices created to date, and the balance.
- Figure 173: Printing Sales Order Billing Status
- Figure 174: Sales Order Billing Status PDF
- Final Billing:
- Once you have invoiced for your deposit and any intermediate milestones, and it is time to issue the final invoice against this Sales Order, click on the
 button at the top of the Sales Order detail view (see the Sales Order screen above). This will create a final Invoice linked to the Sales Order. This Invoice will list all the line items from the original Sales Order, then will add a group of credit line items which are the Milestone invoices you have already issued against this Sales Order.
- The total at the bottom of the invoice will show the total value of the Sales order, less the one or more Milestone invoices, and then the balance due. All the amounts are presented clearly, showing the amounts which are goods or services, with separate line items for the taxes involved. Here is an example of a final milestone Invoice.
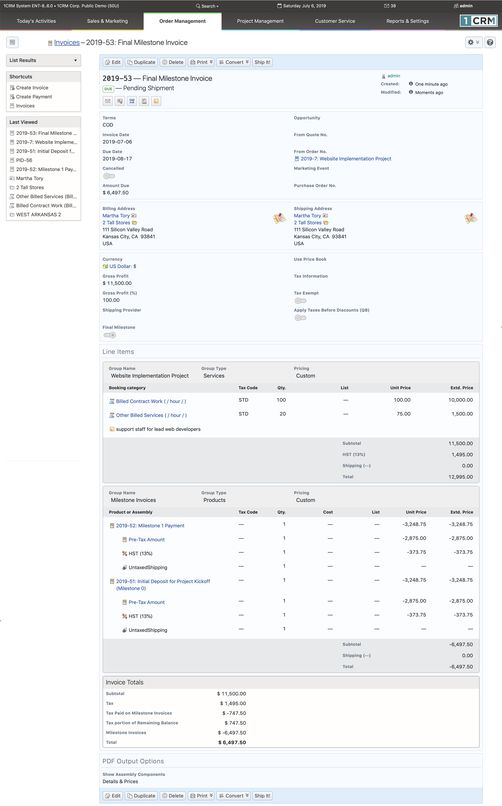
- Figure 175: Final Milestone Invoice
- 6.3 The Invoices Module
- Note: Read the section on the Quotes module before you read this section!
- Figure 176 shows the 1CRM screen with the Invoices Module selected:
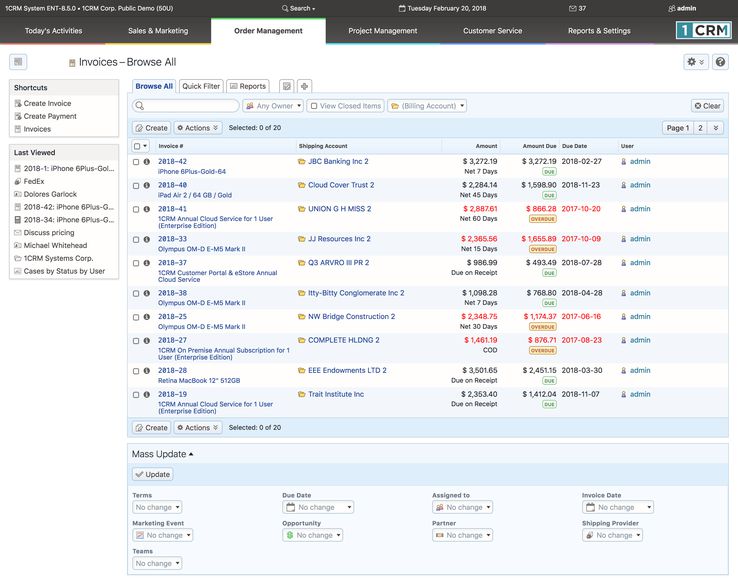
- Figure 176: The Invoices Module
- The Invoices module manages the preparation of customer invoices. Invoices are created in a manner very similar to quotes, by defining a quantity for each of a number of products (or assemblies, which are complex products defined from a set of component products), and an Account to which they are being invoiced. Invoices may be managed and tracked through their life-cycle using the Invoices module. Each Invoice has terms defined for it – selected from a standard set of terms (COD, Due On Receipt, Net 7 Days, Net 15 Days, Net 30 Days, Net 45 Days, Net 60 Days). Those terms, combined with the Invoice date, define what the due date is for the Invoice. Each Invoice has a Contact, an Account, and an address – for both bill to and ship to. For each Invoice the Shipping Provider, and the Currency must also be selected.
- Each Invoice consists of one or more product groupings, and each product group may have one or more Products (or Assemblies) in it. For each grouping one or more Discounts may be selected from those defined in Admin, and as well a shipping charge may be specified at the group level of the invoice. Taxes applicable to the items in a group will be listed underneath the group, based on the Tax Codes of each item in the group.
- On entry, the Invoices module provides a list of all or selected Invoices, with any overdue Invoices highlighted (see the Figure above). Each Invoice shows the original amount of the Invoice, as well as the current Amount Due after any Payments have been applied. Each Invoice in the list has a check box at the left, and at the bottom of the screen is a Mass Update facility to update one or more field values for all selected Invoices. The Invoices list may be sorted by clicking on any column title that has the
 icon beside it. Clicking on a column title when it is already the highlighted sort column reverses the sort order.
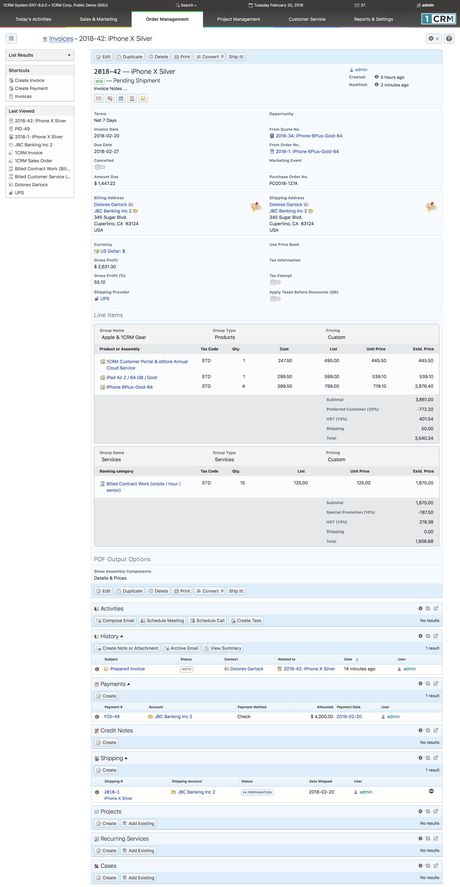
- Figure 177: Invoice Detail View
- The Invoices list is paginated if it contains more items than may be listed on the display, and controls are provided to go to the start or end of the list, or step to the next or previous page. Clicking on the subject for any Invoice in the list displays the detail information for that Invoice. Clicking on the Account name for an invoice links to the detailed information for that Account.
- The navigation shortcuts provided help you create a new Invoice, or switch back to the Invoice list view. The Invoice detail view shown above illustrates the information captured by an Invoice within 1CRM – complete with Bill To and Ship To addresses and Contacts, Shipping Provider, taxes payable, Discounts and shipping costs. Sub-panels exist to show any Activities or History associated with the Invoice, and to show or create related Payments or Shipping records.
- 6.3.1 Creating a Credit Note
- The
 button has a Create Credit Note option which is used to credit some or all of the value of an Invoice by generating a Credit Note that is linked to it. Or you can also use the Create button on the Credit Notes sub-panel of an Invoice detail view.
- Note: If the current Invoice has been marked as Shipped, then the related Credit Note should be Received (if any inventory items are being returned to stock via the credit note) to ensure that inventory levels are adjusted appropriately. For more information about Credit Notes, please see the section on that module.
- 6.3.2 Charging a Credit Card
- The
 button is used to process a credit card payment for this Invoice, immediately. This button is only visible if you have previously configured account data for one of the supported Payment Gateways in the Company Information screen in Admin, such as Stripe or Authorize.net. Clicking on this button brings up a Credit Card Payment screen (see Figure below) with most of the information pre-filled. Add the payment amount, credit card number, expiry date month and year, plus the CVV2/CVC2/CID (for MasterCard and Visa, this is three digits to the right of the credit card number in the signature area on the back of the card; for Amex it is four digits printed on the right front of the card above the credit card number). Now enter the client first and last names and click on Submit Transaction.
- If there is a problem with processing the transaction, a message will be displayed on the Credit Card Payment screen, otherwise that screen will close, and a success message will show on the main screen. The transaction ID will be captured in the Customer Reference field of a Payment record attached to the Invoice. Note: 1CRM does not retain credit card data.
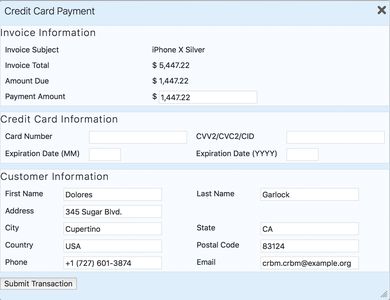
- Figure 178: Credit Card Processing
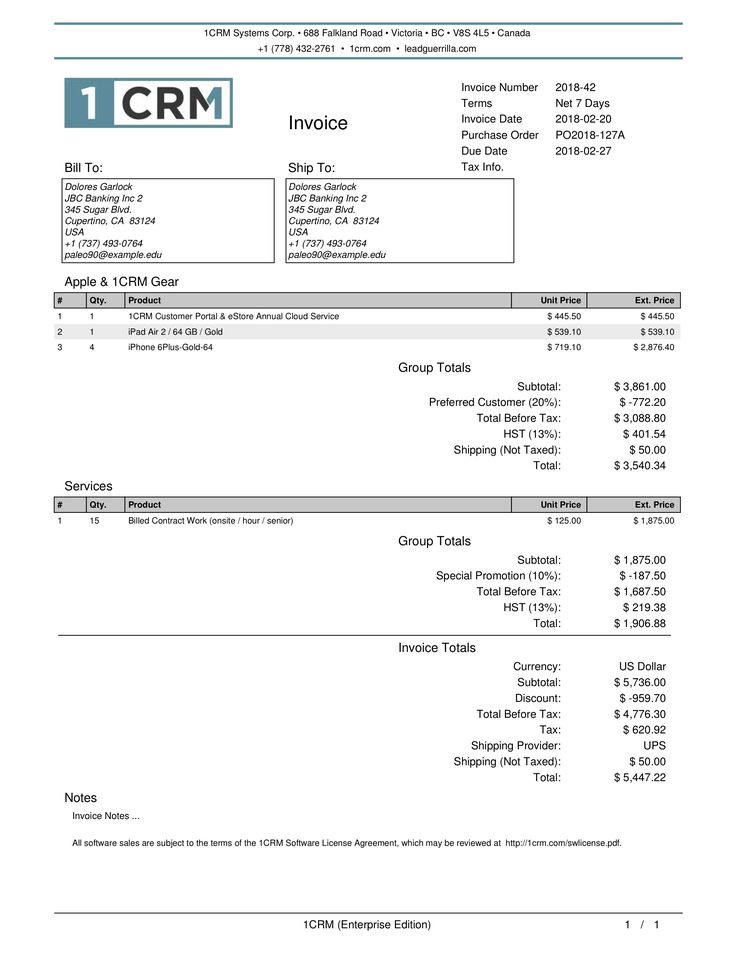
- Figure 179: The Acrobat PDF Generated for an Invoice
- 6.3.3 Shipping Products with the Ship It! Button
- The
 button is used to ship the products on your Invoice. Clicking this button creates a new Shipping record, with all the groups and line items from the Invoice on it. You may choose to remove some of the line items if only part of the Invoice is being shipped. See more information in the section on the Shipping module.
- 6.3.4 Creating Supported Products from Line Items
- The
 button has a Create Products option which is used to make Supported Products from some or all of the line items in the current Invoice, and optionally associate them with a new or existing Service subcontract, and a new or existing Project. It is a very handy tool to save repeated data entry.
- 6.3.5 Creating an Invoice or Statement PDF
- Use the
 button to Print Details, Prepare Invoice, or Prepare Statement. If you choose Prepare Invoice or Prepare Statement, a pop-up dialog box is displayed (similar to Figure 165). You may then choose to either generate and view the Acrobat PDF (by clicking the Open as PDF button), or to generate the PDF and immediately proceed to compose an email with the PDF as an attachment and the recipient email address set to that of the Contact on the Invoice (by clicking the Email as PDF button).
- Note: An Invoice PDF may have specific notes added to it via the notes field, but may also have standard terms and conditions added to it by defining them in the Admin – Company Information panel. (See Figure 179 for an example.)
- 6.3.6 Applying Incoming Payments
- To record a Payment that has been received, typically you would look up the Invoice involved, and click on the Create button on the Payments sub-panel for that Invoice, or choose the Create Payment option from the
 button. A Payment edit screen will come up, pre-set with most of the information you need to record. Just set the Payment Type, and adjust the received amount and the allocation line below if only a partial payment is being processed, and then save the record.
- Selecting the Payments module and then clicking on the layout tab for Incoming Payments will show a list of all or filtered incoming payments in the system, including the payment ID and date, amount and type (Cash, Check, Wire Transfer, Money Order, Bank Draft, PayPal, Western Union, Credit Note, Credit Card).
- The Create Incoming Payment shortcut is used to enter information about a new incoming payment that has been received, and document how that payment is to be allocated against any invoices in the system for the Account from which the payment was received.
- Note: On the Payment detail view you may use the
 button to Print Details or print a Payment Receipt. If you choose Payment Receipt, a pop-up dialog box is displayed (similar to Figure 165). You may then choose to either generate and view the PDF (by clicking the Open as PDF button), or to generate the PDF and immediately proceed to compose an email with the PDF as an attachment and the recipient email address set to that of the Contact on the Invoice (by clicking the Email as PDF button).
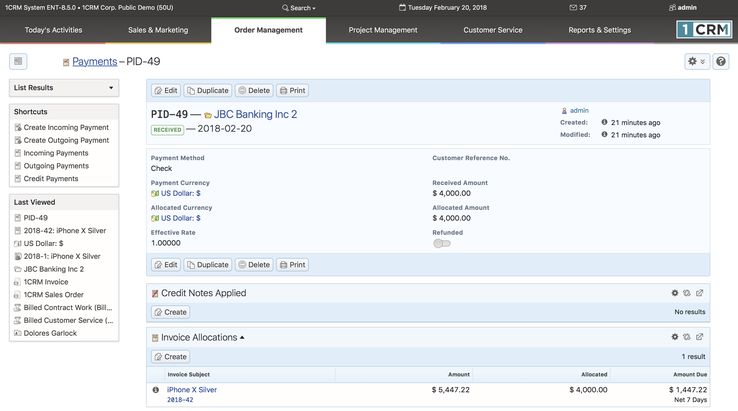
- Figure 180: Payment Detail View
- 6.3.7 Invoicing for Time Booked to Projects and Cases
- You may use the shortcut Invoice Cases/Projects in the Accounts module to automatically calculate, create and email Invoices for any hours booked to Cases or Projects. The hours must be approved, and billable, and not yet invoiced, for them to be added as line items to Invoices created using this feature. The net result of this feature is that an email will be sent to each Account that has any un-billed, yet approved and billable hours outstanding. These hours would have been booked to either Cases or Projects for these Accounts.
- Before you use this function, make sure that you design an email template for the purpose of sending invoices to clients. You’ll need this because this function will prompt you for a template to use for the emails that will be sent out to your client Accounts, with the PDF of the Invoice attached. Also make sure that your outbound email is configured, as email cannot be sent unless it is.
- The email that clients receive will have the subject and email body set by the email template you design, and will have the generated invoice and a statement attached to it. The new invoices that are created automatically will have their invoice subject (and invoice notes field) set to the name of the company being invoiced, with the text - Outstanding Hours suffixed to it.
- To use this function, just click on this shortcut within the Accounts module. You will receive the prompt:

- Confirm by clicking on Proceed. You will see the screen shown below:
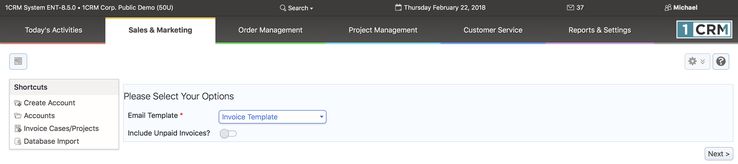
- Figure 181: Invoice Cases/Projects - Step 1, Select Options
- Select the template to use, and decide if you want the emails sent out to also include copies of any other open invoices, then click on Next.
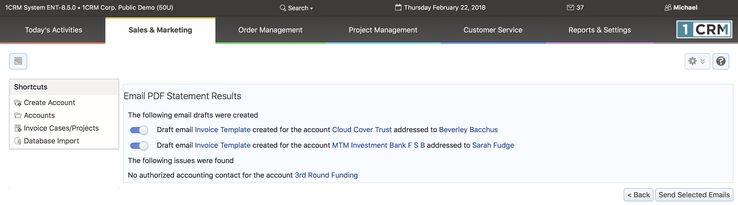
- Figure 182: Invoice Cases/Projects - Step 2, Missing Accounting Contact
- The system now scans for any booked hours that are billable and approved but not yet invoiced. It sorts them by Account, and generates an Invoice (with appropriate detail lines and totals) for each Account that needs to receive one. Then it checks that each of these Accounts has at least one Contact that is marked as an Accounting Contact. If any of the Accounts have no such contact, you will see a screen such as the one in the figure above telling you which Accounts have this issue. If you have these issues, use the links provided to correct them, then click on the Back button, and try the step again.
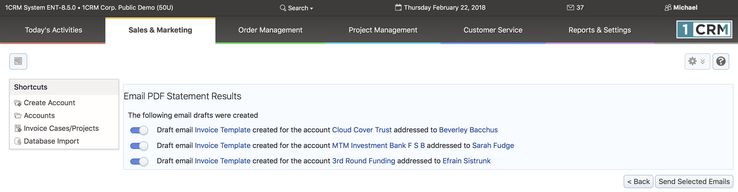
- Figure 183: Invoice Cases/Projects - Step 2, Email Created
- Once all your Accounts have Accounting Contacts, Step 2 will proceed to completion. You now see a screen like the figure above, which simply lists all the draft emails created. You may select which of them you want to send out and then simply click on the button
 . You also have links to preview any of the emails you might want to see. Note that if you use these links it is best to open them in a new tab or window so as not to lose your place in the invoicing process.
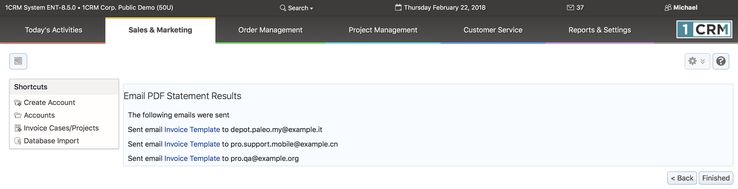
- Figure 184: Invoice Cases/Projects - Step 3, Emails Sent
- Lastly the selected emails are actually sent, and you see a screen like the figure above, summarizing the emails that have been sent, and the email addresses to which they were sent.
- Note: If you exit the invoicing process after the invoices have been generated but before they are sent, you will not be able to re-run the process - as the hours will have been marked as invoiced, and the invoices have already been added to the system. But you will be able to view, print or email the invoices using the regular facilities available to you within 1CRM.
- 6.3.8 Invoicing Individual Service Cases
- Sometimes it’s not convenient to use the all-encompassing function above that invoices all outstanding booked hours across all your Accounts. Sometimes you just want to give a client an invoice for service. To do that, your steps are:
- Book your hours on the Case. You can do that easily using the Booked Hours sub-panel on any Case, with the Create button on that sub-panel. There is also a handy button at the top of the Case detail screen.
- Make sure your Booked Hours entries on the Case have a Status of Approved.
- Check in Admin - Company Info - Customer Service Settings, that Auto-Add Hours to Case Invoice is enabled.
- Click on the Create button of the Invoices sub-panel on the Case. A new Invoice will come up for the client involved, with any Booked Hours already on the Invoice as line items.
- 6.3.9 Invoicing Individual Projects
- Follow much the same process as above, but for a Project instead of a Case. There is a separate setting in Admin - Company Info - Customer Service Settings, called Auto-Add Hours to Project Invoice that you need to check is enabled.
- 6.4 The Credit Notes Module
- Figure 185 shows the 1CRM screen with the Credit Notes Module selected:
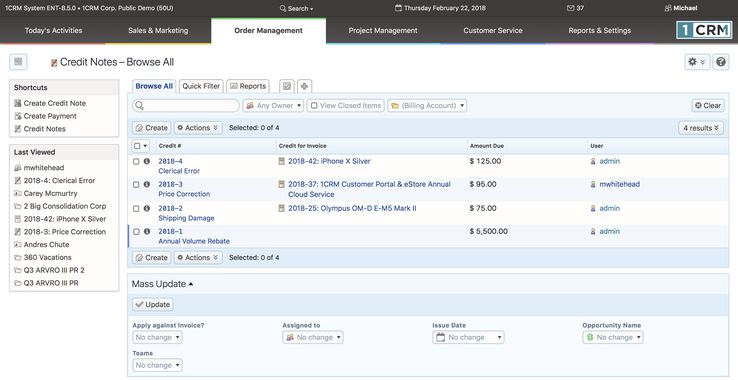
- Figure 185: Credit Notes List View
- 1CRM has the ability to create credit notes related to specific invoices, or credit notes that are simply a general credit to an Account, not to a specific Invoice (Credit Note 2018-2 in the Figure above).
- As well, 1CRM can create a credit note for an Invoice which has already been paid in full, and which will therefore require an Outgoing Payment to be made to the related client Account. Or 1CRM can create credit notes for Invoices which have not been fully paid, where the credit note simply reduces the Amount Due for that Invoice.
- 6.4.1 Crediting an Invoice
- The
 button on the Invoice detail view has a Create Credit Note option which is used to credit some or all of the value of an Invoice by generating a Credit Note that is linked to it. Or you can also use the
  button on the Credit Notes sub-panel of the Invoice detail view.
- In Figure 186 you can see a Credit Note being created. When issuing a customer credit, you may be giving a full credit on certain line items (as in this example) that were not shipped in error, or which were returned. Or you may be giving a partial credit on some line items, because the customer was over-charged initially, or because the items were damaged in shipping, or some other reason.
- Note: In either case, as you are applying this credit note against a particular invoice, you must check the option Apply against Invoice. This is critically important!
- In our full credit example below, the items are being returned to stock, and so the credit note should show the correct quantities of the items being returned, and once the credit note has been saved, it should be Received, so that inventory levels are credited with the received items. The financial amounts on the credit note should reflect the total amount (as well as refunded tax) being credited back to the client based on this Invoice. In our partial credit examples above, you will still have one or more line items on the credit note, but typically no items are returned to stock, and the credit note need not be Received once it has been saved.
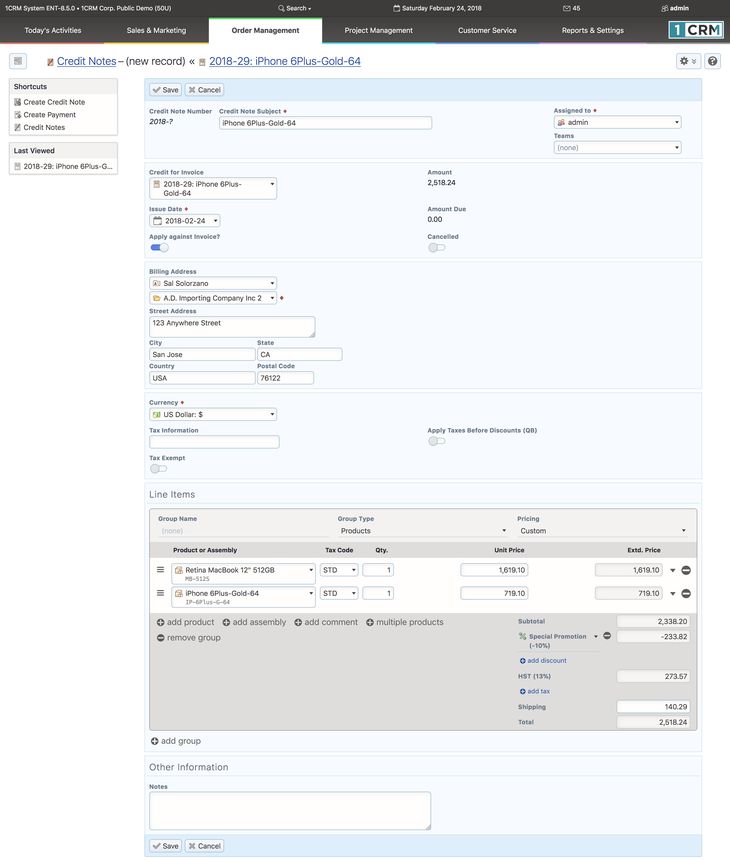
- Figure 186: Credit Note Edit View
- If after processing a credit note related to an Invoice, you see an Amount Due on the Invoice which is a negative amount, then the client has already paid more than they should, and you should create an Credit Payment for that amount to that Account, using the
 button on the Payments sub-panel of the Invoice.
- 6.4.2 Crediting an Account
- Not surprisingly, to credit an Account rather than a specific Invoice, you start from the Account detail view rather than the detail view of a specific Invoice. Click on the
 button on the Credit Note sub-panel of the Account detail view (on the Sales Information tab). You’ll see a credit note form that resembles Figure 187, and does not have a related Invoice.
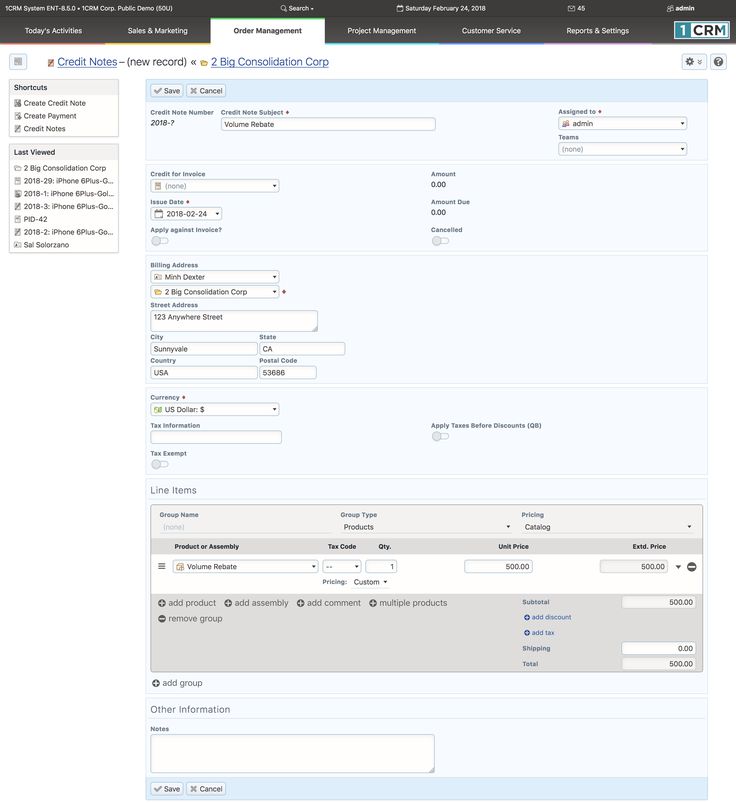
- Figure 187: Account Level Credit Note
- Once you fill in that form and Save it, you’ll see an Account detail screen like Figure 188, showing a reduced Balance Receivable, and a related credit note.
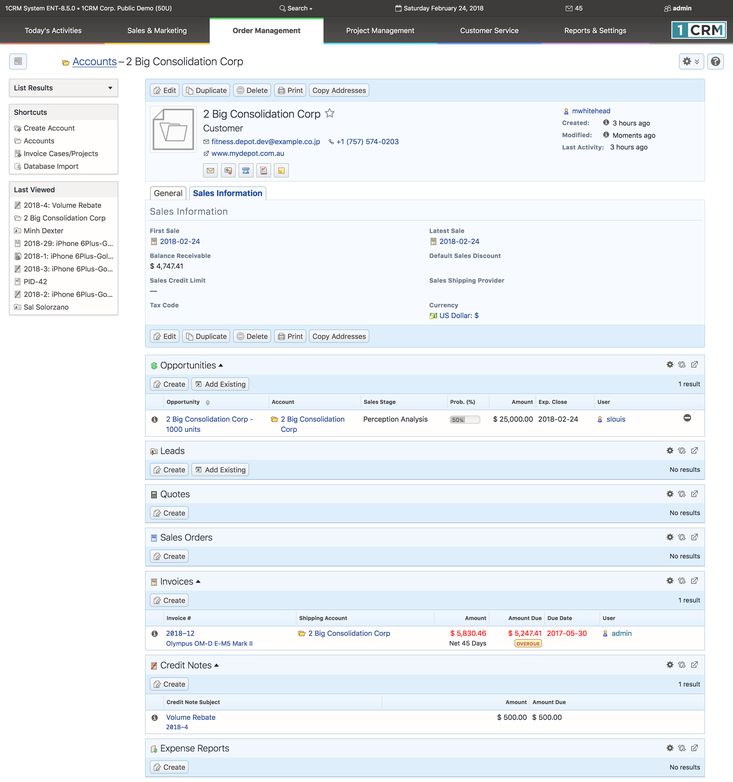
- Figure 188: Account with Credit Note, Reduced Balance Receivable
- 6.5 The Shipping Module
- Figure 189 shows the 1CRM screen with the Shipping Module selected:
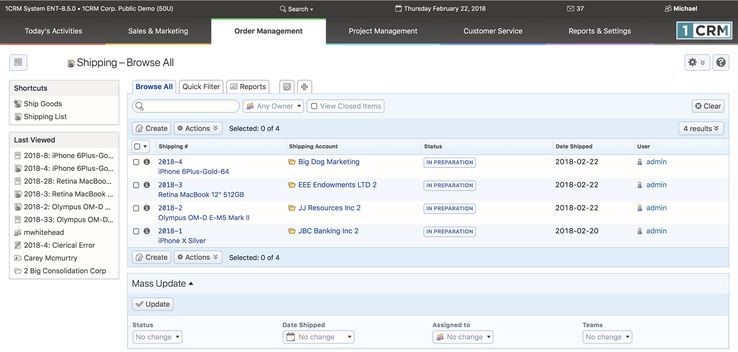
- Figure 189: Shipping Module
- 1CRM has the ability to track inventory movements and levels at multiple warehouse locations. It does this through the use of the Shipping and Receiving modules, which record stock movements from Suppliers to the business, and from the business out to Customers.
- To track inventory levels and movements, first you must define the company’s warehouses. You do this on the Admin - Company Information screen - scroll to the bottom of the screen and click on New in the Mailing Address section to define a new company location (see Figure below). Check boxes are used to specify if the location is a warehouse, and if so, if it is the main (used as the default) warehouse.
- Once the appropriate warehouses have been defined, you should define the products you carry in the Product Catalog, and also set the initial quantities in stock at each warehouse. Once this is done, you are ready to proceed to use the Shipping and Receiving modules.
- On entry, the Shipping module provides a list of all or selected Shipping records. The View Closed Items check box may be used to see shipments that have already been shipped. Each Shipping record shows the Account to which items were shipped, as well as the date items were shipped. Each Shipping record in the list has a check box at the left, and at the bottom of the screen is a Mass Update panel to update one or more field values for all selected records. The list of Shipping records may be sorted by clicking on any column title that has the
 icon beside it. Clicking on a column title when it is already the highlighted sort column reverses the sort order.
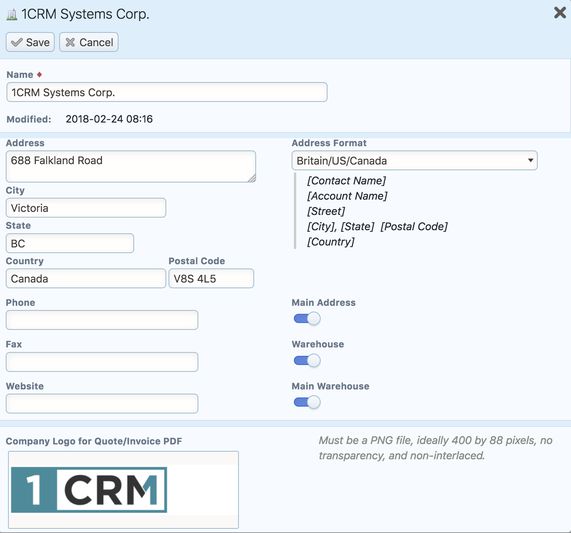
- Figure 190: Defining a New Company Address
- The Shipping list is paginated if it contains more items than may be listed on the display, and controls are provided to go to the start or end of the list, or step to the next or previous page. Clicking on the subject for any Shipping record in the list displays the detail information for that Shipping record. Clicking on the Account name for a Shipping record links to the detailed information for that Account. The navigation shortcuts provided help you create a new Shipping record, or switch back to the Shipping list view.
- Most Shipping records are created by clicking on the
 button on the detail view of an Invoice. Clicking this button creates a new Shipping record, with all the groups and line items from the Invoice on it. You may choose to remove some of the line items if only part of the Invoice is being shipped. You may also enter the serial numbers of the items being shipped, if the Admin option to show serial numbers for each line item is enabled.
- You also need to enter the shipping cost and currency, select the Shipping Provider and Warehouse location, and enter the weight of the package(s) being sent.
- A Shipping record may be saved with its Status set to In Preparation, or set to Shipped. If it is saved with a status of In Preparation, then the act of shipping the items is not considered to have happened yet, and no quantities are removed from inventory. The inventory is only removed when the Shipping record is saved with a status of Shipped.
- When the Shipping record is saved with a status of Shipped, then the associated Invoice record is also marked with a Shipping Status of Shipped. Until then, the Invoice has a Shipping Status of Pending.
- From the detail view of the Shipping record, you can print a packing slip by clicking on the
 button. In the popup that results, you may select the company address and PDF Form, and choose whether to just generate the PDF, or in addition link it to an email you wish to send.
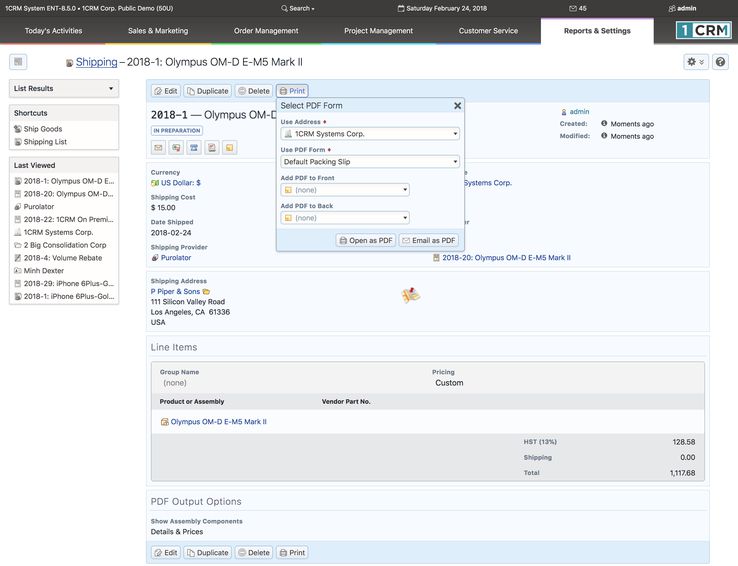
- Figure 191: Printing a Packing Slip
- 6.6 The Payments Module
- Figure 192 shows the 1CRM screen with the Payments Module selected using the Payments navigation tab:
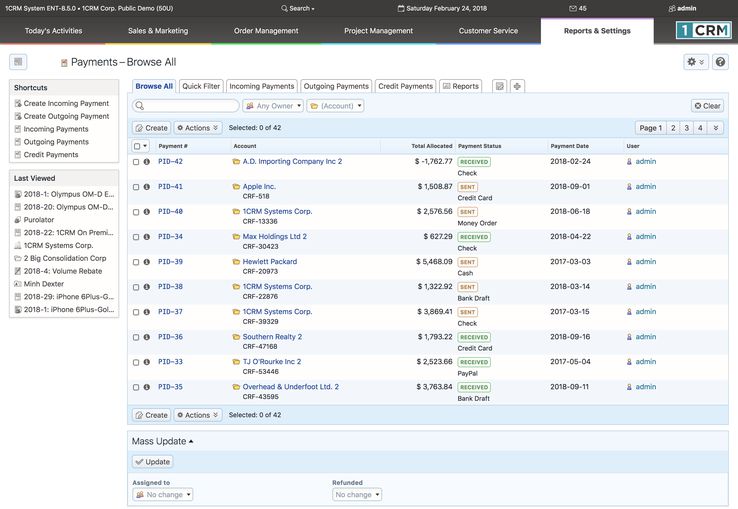
- Figure 192: The Payments Module
- The Payments list view screen has multiple layout tabs across the top, enabling the user to focus on Incoming Payments, Outgoing Payments, or Credit Payments (Payments made in association with issuing a credit note).
- As with other modules, you can search for a specific payment using the Browse All or Quick Filter tabs, or you may define your own Smart List tab to list specific payments.
- The module also offers shortcuts to create both Incoming and Outgoing Payments.
- Creating an Incoming Payment is dealt with in detail in Section 6.3.6 - Applying Incoming Payments.
- Creating an Outgoing Payment is dealt with in detail in Section 6.8.1 - Applying Outgoing Payments.
- See the section on Credit Notes for details on creating a Credit Payment.
- 6.7 The Purchase Orders Module
- Figure 193 shows the 1CRM screen with the Purchase Orders Module selected using the Purchase Orders navigation tab:
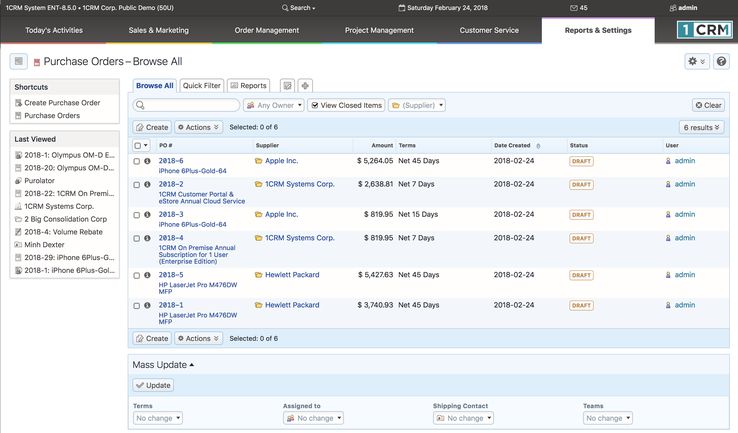
- Figure 193: The Purchase Orders Module
- The Purchase Orders module manages the creation of Purchase Orders you are sending to your suppliers. Purchase Orders are created in a manner very similar to Quotes, by defining a quantity for each of a number of Products (or Assemblies, which are complex products defined from a set of component products), and an Account from which they are being purchased. Purchase Orders may be managed and tracked through their life-cycle using the Purchase Orders module.
- On entry, the Purchase Orders module provides a list of all or selected Purchase Orders. The View Closed Items check box may be used to see Purchase Orders that have already been received. Each Purchase Order in the list has a check box at the left, and at the bottom of the screen is a Mass Update panel to update one or more field values for all selected Purchase Orders. The Purchase Orders list may be sorted by clicking on any column title that has the
 icon beside it. Clicking on a column title when it is already the highlighted sort column reverses the sort order.
- The Purchase Orders list is paginated if it contains more items than may be listed on the display, and controls are provided to go to the start or end of the list, or step to the next or previous page. Clicking on the Subject for any Purchase Order in the list displays the detail information for that Purchase Order. Clicking on the Supplier Name for a Purchase Order links to the detailed information for that Supplier Account.
- The navigation shortcuts provided help you create a new Purchase Order, or switch back to the Purchase Order list view.
- Each Purchase Order (P.O.) has terms defined for it – selected from a standard set of terms (COD, Due On Receipt, Net 7 Days, Net 15 Days, Net 30 Days, Net 45 Days, Net 60 Days). Each Purchase Order has a Supplier Contact and an Account (the Supplier). For each Purchase Order the Shipping Provider, and the Currency must also be selected.
- When selecting the Supplier for a Purchase Order, note that only those accounts will be shown in the pop-up selection box for which Is a Supplier has been checked off. You should make a point of setting this check box on the Account record for all your suppliers before you start to use the Purchase Orders module.
- Note: Is a Supplier must be checked at the time an Account is created - it may not be edited later.
- Each Purchase Order consists of one or more product groupings, and each product group may have one or more Products (or Assemblies) in it. For each grouping, one or more Discounts may be selected from those defined in Admin, and as well a shipping charge may be specified at the group level of the Purchase Order.
- Sometimes when you order items from a supplier, you want the supplier to deliver those items directly to your customer, not to your own offices. This practice is known as drop-shipping. When you are preparing a Purchase Order, if you wish the items on it to be drop-shipped directly to one of your customers, simply click on the Add Drop Ship check box in the Ship To panel of the Purchase Order Edit screen. Now you can type in or select an Account address to which you want the items on the Purchase Order delivered.
- When a Drop Ship address has been set for a Purchase Order, if you prepare a PDF for the Purchase Order it will have an explicit Ship To: address added to it.
- 6.7.1 Business Workflow for the Purchasing Process
- Purchase Orders are the first stage of the workflow for the purchasing process within 1CRM. Using the Convert to Bill option on the
 button, a Purchase Order may be converted automatically into a Bill. Line items may be added or removed, and quantities adjusted, in the process of this conversion.
- Usually one Purchase Order converts into a single Bill, but in the case of partial shipments multiple Bills are possible, and so a Bills sub-panel is linked to each Purchase Order record.
- Once a Purchase Order has been created, you use the
 button on the Purchase Order to record receiving the items ordered from the Supplier. This also adjusts inventory levels for the warehouse used for the receiving record. Each Purchase Order may have one or more Receiving records related to it, as shown on the Receiving sub-panel on the Purchase Order detail view.
- An outgoing payment to the Supplier may be entered using the Payments sub-panel on the Bill detail view. This will adjust the Amount Due on the Bill, as well as the Balance Payable in the Purchasing Information panel on the Account record for this Supplier. As you may choose to make partial payments, there may be one or more Outgoing Payment records related to each Bill record on its Payments sub-panel.
- This is the life-cycle on the purchasing side within 1CRM.
- Note: Bills may also be created manually using the Create Bill shortcut. This is typically used for Bills for which there is no Purchase Order, such as telephone bills, etc.. You can only perform the Receive It! function for a Purchase Order, not for a Bill - so you must issue a Purchase Order for any products you intend to receive into inventory using a Receiving record.
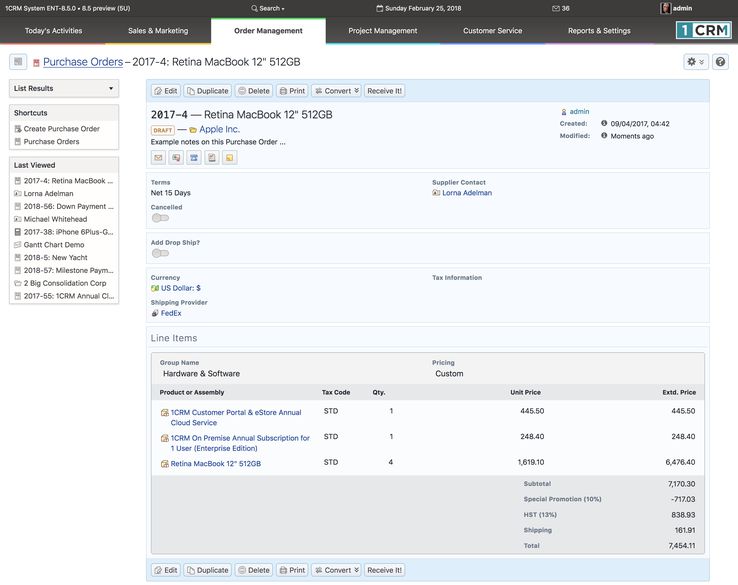
- Figure 194: Purchase Order Detail View
- When you initially create a Purchase Order, you should save it with a status of Draft, or Ordered. Use the Draft status for Purchase Orders that you are working on, but have not yet actually ordered from the supplier. Purchase Orders should have the status Ordered while they remain on order with the supplier. Then, when goods are received from the supplier, you can click on the
 button on the Purchase Order detail view to receive those goods, and add them into stock. The status of the Purchase Order will automatically be updated to either Partial Shipment, or Received, depending on whether or not the supplier shipped all items on the Purchase Order.
- The Purchase Order detail view shown above illustrates the information captured by a Purchase Order within 1CRM – complete with Supplier Contact, Shipping Provider, taxes payable, discounts and shipping costs.
- From the detail view of the Purchase Order record, you can generate a PDF by clicking on the
 button and selecting the Prepare Purchase Order option. In the popup that results, you may select the company address and print layout to use on the PDF, and choose whether to just generate the PDF, or in addition link it to an email you wish to send.
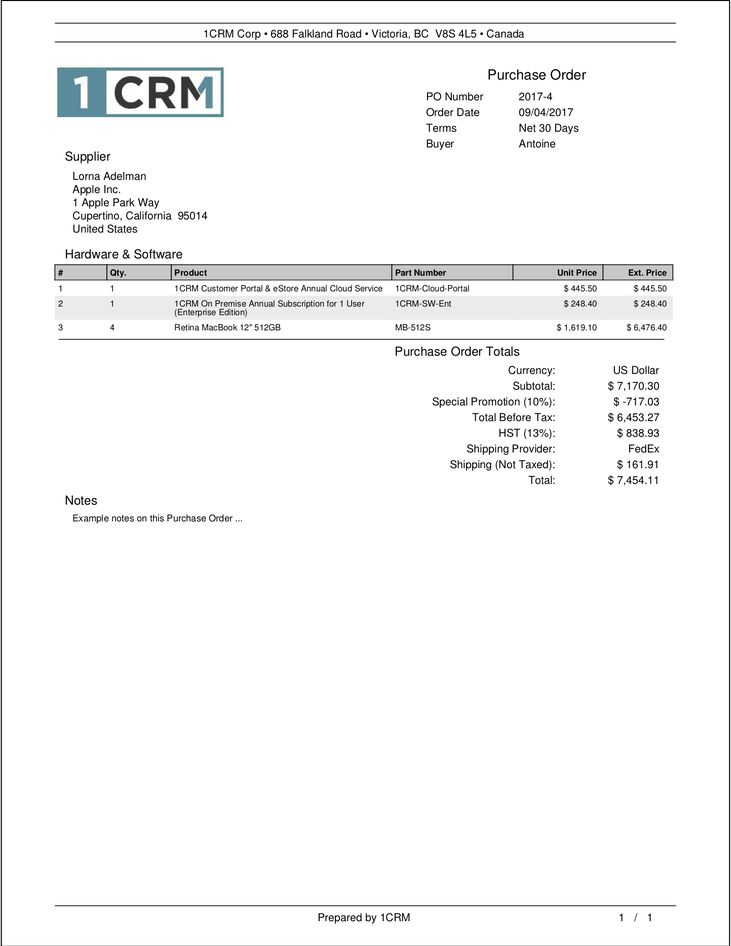
- Figure 195: The Acrobat PDF Generated for a Purchase Order
- 6.8 The Bills Module
- Figure 196 shows the 1CRM screen with the Bills Module selected:
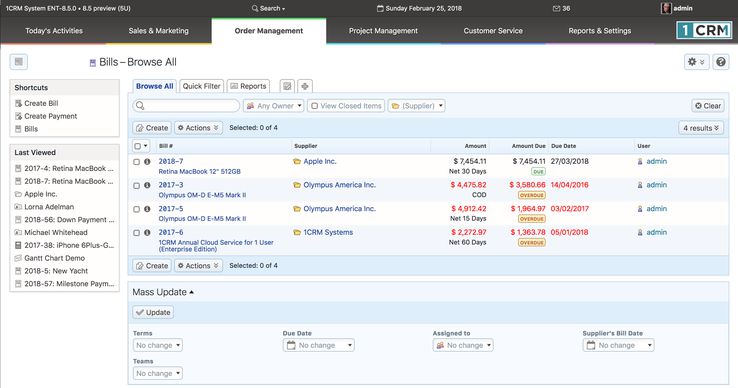
- Figure 196: Bills Module
- The Bills module is used to track bills you receive from your suppliers. They may be for items you have previously requested via a Purchase Order (there is a button to convert a Purchase Order to a Bill, which makes this easy), or they may be other types of bills such as phone bills, for which there is no Purchase Order. Bills are created in a manner very similar to Quotes, by defining a quantity for each of a number of Products or Assemblies, and an Account from which they are being purchased. Bills may be managed and tracked through their life-cycle using the Bills module.
- Each Bill has terms defined for it – selected from a standard set of terms (COD, Due On Receipt, Net 7 Days, Net 15 Days, Net 30 Days, Net 45 Days, Net 60 Days). Those terms, combined with the Entry Date of the Bill, define what the due date is for the payment of the Bill. Each Bill has an Account (the Supplier), a Contact, and an address (Supplier’s Bill To address is used), plus a Supplier’s Invoice Number. For each Bill the Shipping Provider and the Currency must also be selected.
- Each Bill consists of one or more product groupings, and each product group may have one or more Products (or Assemblies) in it. For each grouping, one or more Discounts may also be selected from those defined in Admin, and as well a shipping charge may be specified at the group level of the Bill.
- On entry, the Bills module provides a list of all or selected Bills, with any overdue Bills highlighted. The View Closed Items check box may be used to see Bills that have already been paid. Each Bill shows the original amount of the Bill, as well as the current balance payable after any outgoing payments have been applied. Each Bill in the list has a check box at the left, and at the bottom of the screen is a Mass Update panel to update one or more field values for all selected Bills. The Bills list may be sorted by clicking on any column title that has the
 icon beside it. Clicking on a column title when it is already the highlighted sort column reverses the sort order.
- The Bills list is paginated if it contains more items than may be listed on the display, and controls are provided to go to the start or end of the list, or step to the next or previous page. Clicking on the Subject for any Bill in the list displays the detail information for that Bill. Clicking on the Supplier name for a Bill links to the detailed information for that Supplier account.
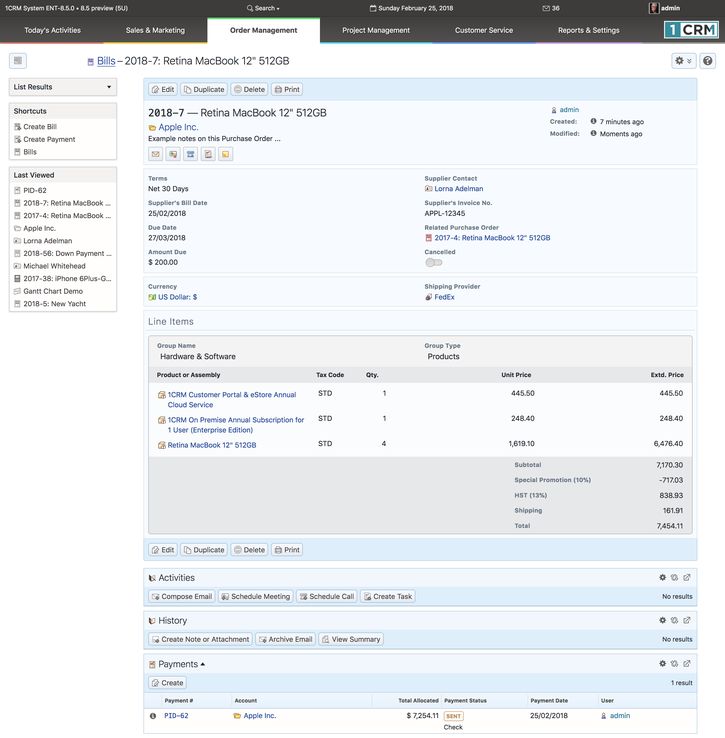
- Figure 197: Bill Detail View
- The navigation shortcuts provided help you create a new Bill, or switch back to the Bills list view. As well, there are shortcuts to show a list of payments made, or to create a new payment.
- The Bill detail view shown above illustrates the information captured by a Bill within 1CRM – complete with Supplier Contact, Shipping Provider, taxes payable, discounts and shipping costs.
- From the detail view of the Bill, you can generate a PDF by clicking on the
 button and selecting the Prepare Bill option. In the popup that results, you may select the company address and print layout to use on the PDF, and choose whether to just generate the PDF, or in addition link it to an email you wish to send.
- The Create Payment shortcut is used to enter information about a new Outgoing Payment, and document how that Payment is to be allocated against any Bills in the system for the Supplier to which the payment is being sent.
- 6.8.1 Applying Outgoing Payments
- To record an Outgoing Payment that has been sent, typically you would look up the Bill involved, and click on the
 button on the Payments sub-panel for that Bill. A Payment edit screen will come up, pre-set with most of the information you need to record. Just set the Payment Type, and adjust the amount if a partial payment is being processed, and then Save the record. It will be recorded with Payment Direction set to Outgoing.
- Clicking on the Outgoing Payments layout tab in the Payments module shows a list of all or filtered outgoing payments in the system, including the payment ID and date, Amount and Type (Cash, Check, Wire Transfer, Money Order, Bank Draft, PayPal, Western Union, Credit Card).
- Note: On the Outgoing Payment detail view there is a
 button from which you may select Print Details to simply print the information on the screen, or Payment Advice which may be used to print or email a Payment Advice document for the payment.
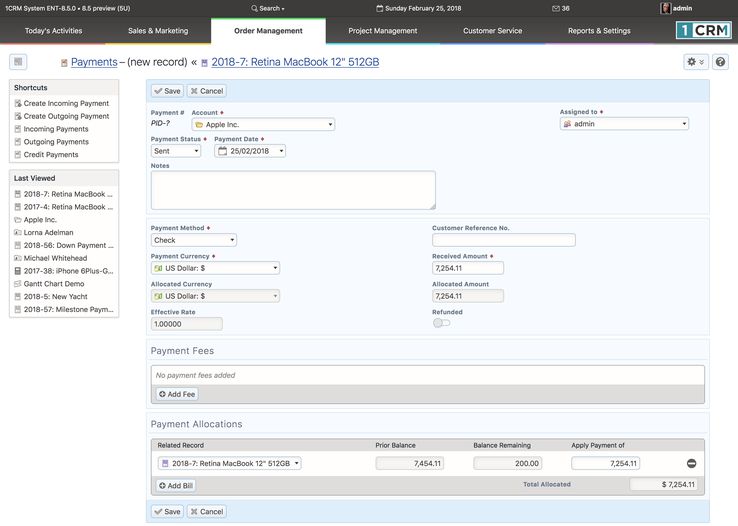
- Figure 198: Payment Edit View
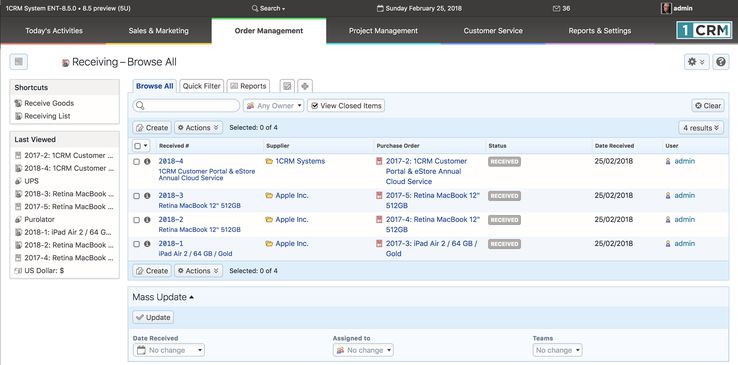
- 6.9 The Receiving Module
- Figure 199 shows the 1CRM screen with the Receiving Module selected:
- Figure 199: Receiving Module
- 1CRM has the ability to track inventory movements and levels at multiple warehouse locations. It does this through the use of the Shipping and Receiving modules, which record stock movements from Suppliers to the business, and from the business out to Customers.
- To track inventory levels and movements, first you must define the company’s warehouses. You do this on the Admin - Company Information screen - scroll to the bottom of the screen and click on New in the Mailing Address section to define a new company location. Check boxes are used to specify if the location is a warehouse, and if so, if it is the main (used as the default) warehouse.
- Once the appropriate warehouses have been defined, you should define the products you carry in the Product Catalog, and also set the initial quantities in stock at each warehouse. Once this is done, you are ready to proceed to use the Shipping and Receiving modules.
- On entry, the Receiving module provides a list of all or selected Receiving records. The View Closed Items check box when unchecked will show Receiving records marked with the Status of Partial Shipment only, and when checked it will let you see records marked with a Status of either Partial Shipment or Received.
- Each Receiving record shows the Supplier from which items were received, as well as the date the shipment were received, and the Status of that receiving record. Each Receiving record in the list has a check box at the left, and at the bottom of the screen is a Mass Update panel to update one or more field values for all selected records. The list of Receiving records may be sorted by clicking on any column title that has the
 icon beside it. Clicking on a column title when it is already the highlighted sort column reverses the sort order.
- The Receiving list is paginated if it contains more items than may be listed on the display, and controls are provided to go to the start or end of the list, or step to the next or previous page. Clicking on the subject for any Receiving record in the list displays the detail information for that Receiving record. Clicking on the Supplier name for a Receiving record links to the detailed information for that Supplier Account. The navigation shortcuts provided help you create a new Receiving record, or switch back to the Receiving list view.
- Most Receiving records are created by clicking on the
 button on the detail view of a Purchase Order. Clicking this button creates a new Receiving record, with all the groups and line items from the Purchase Order on it. You may choose to remove some of the line items if only part of the Purchase Order is being received. You also enter the serial numbers of the items being received, if the Admin option to show serial numbers for each line item is enabled. You also need to enter the Shipping Provider, and select the warehouse where the receiving is being done.
- When a Receiving record is saved, its Status is set to Partial Shipment or Received, depending on whether the entire set of items on the related Purchase Order have been received, or not. Inventory is added immediately to stock quantities at the appropriate warehouse. The Purchase Order is also marked with the Status Partial Shipment or Received, in a similar fashion.
- 6.10 The Product Catalog Module
- Figure 200 shows the 1CRM screen with the Product Catalog Module selected:
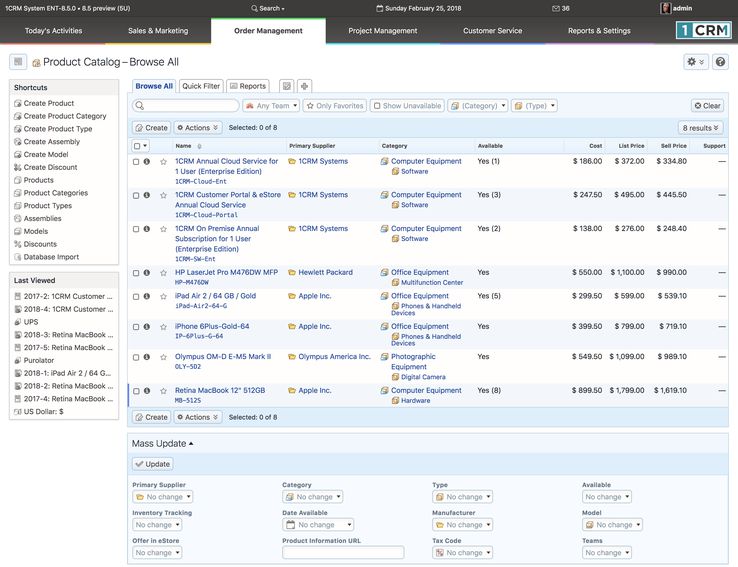
- Figure 200: Product Catalog Module
- There are five types of information which are used for maintaining the items in the Product Catalog. There are the Products themselves, of course, as well as the Product Categories, Product Types and Models to be used when defining products in the catalog.
- There are also Assemblies (see Figure 203), which are catalog items which are not simple products, but are complex products made up of varying quantities of several other component products. For example, an Assembly called a File Server might be made up of a main logic board, a case, two power supplies, four sticks of memory, a CPU, five disk drives, and so on. Assemblies may otherwise be used like products, on Quotes, Sales Orders, Invoices, and as Supported Assemblies.
- The Product Catalog screen initially displays a list view of all current products in the Product Catalog. You can choose to click on the name of a product in the list to see the detail view for that product, and potentially edit it. Or you may use the shortcuts menu to create a new product, assembly, product category, type or model, or to switch to viewing assemblies, product categories, types or models. You may also import products from a CSV file, salesforce.com or via a custom field mapping. (See the note in the Leads section about Import Test Runs.)
- Note: Product Category is a high level classification of items within the Product Catalog, and Product Type is a lower level classification. One might have a Product Category for the broad area of Software, and a Product Type for a more narrow area such as Spreadsheet or Word Processor.
- 6.10.1 Creating a New Product
- When creating a new product, or editing an existing one, you enter data including the product name, part number, associated URL, tax code, availability, quantity in stock, the Supplier, Category and Type, as well as the Cost, List and Selling prices, and their currency. There is also a Selling Price Formula, which may be set to Fixed Price, Profit Margin, Markup over Cost, Discount from List, or Same as List. This formula may be used to calculate the Selling Price automatically.
- Similarly each product has a Support Cost, Support List and Support Selling Price, as well as a Support Price Formula, which may be set to Fixed Price, Profit Margin, Markup over Cost, Discount from List, Same as List, or Percent of Selling Price. This formula may be used to calculate the Support Selling Price automatically, including the popular option of having the product’s annual support price be a percentage of its selling price.
- The Product Categories shortcut lets you maintain the Product Categories that are available for the classification of items in the Product Catalog and in the eStore. Each Product Category consists of a name and a description. The Product Types shortcut lets you maintain the Product Types which are available for the classification of items in the Product Catalog. Each Product Type consists of a name and a description, as well as which category it fits under in the product classification hierarchy.
- Models may be thought of as product families. If for example you sell Apple computers, you might define the Models iMac, MacBook, MacBook Pro and Mac Pro. All the products that you carry that are part of the Mac Pro product line (add-on hard drives, keyboards, mice, etc..) would have the Model field set to Mac Pro when defining those products. Then when a user is looking up products to add to a Quote or Invoice, they can filter for only those products for which the Model is Mac Pro, ensuring that they only quote products that are compatible with that model of Apple computer.
- Once you save a new product, you see the detail screen as shown in Figure 202. Three additional types of important product-related information are set on the sub-panels of the product detail view.
- The quantity of a given product that you have in stock is set by defining the stock quantities on a per-warehouse basis - even if you only have the one warehouse. You create your warehouse locations on the Company Information screen in Admin (see the relevant section in the Implementation Guide). Then you use the Stock sub-panel on the product detail view to enter stock quantities. You click on the Start Edit button, manually type in the Qty. in Stock for each location, then click on the Save button to update the stock quantities. The total quantity in stock for all warehouses is automatically calculated and is held in the main product record.
- Each product in the catalog may also have a number of Attributes defined for it. These are also defined on the product detail view, not on the edit view. A product attribute is something like the colour of a product. You may wish to group all of the colours of a product under the one catalog entry, and just use the product attribute of Colour to differentiate them. You define an attribute by clicking on the
 button, then entering the attribute name, value and price adjustment, and then clicking on the Save button. You might enter Colour, Red, and $10.00 for one attribute, and Colour, Black and $0.00 for another, as a way of saying the product costs $10.00 more for the Red one, and the standard cost for the Black one. Note there will not be separate stock quantities held for the different colours of this product, as the system considers them to be all the one product.
- While each product has a Supplier set in the main panel of the edit view, there is also a sub-panel for Suppliers in which additional Suppliers for the product may be selected. This enables you to remember alternative Suppliers for this product, while always knowing that the primary Supplier is the one shown in the main panel.
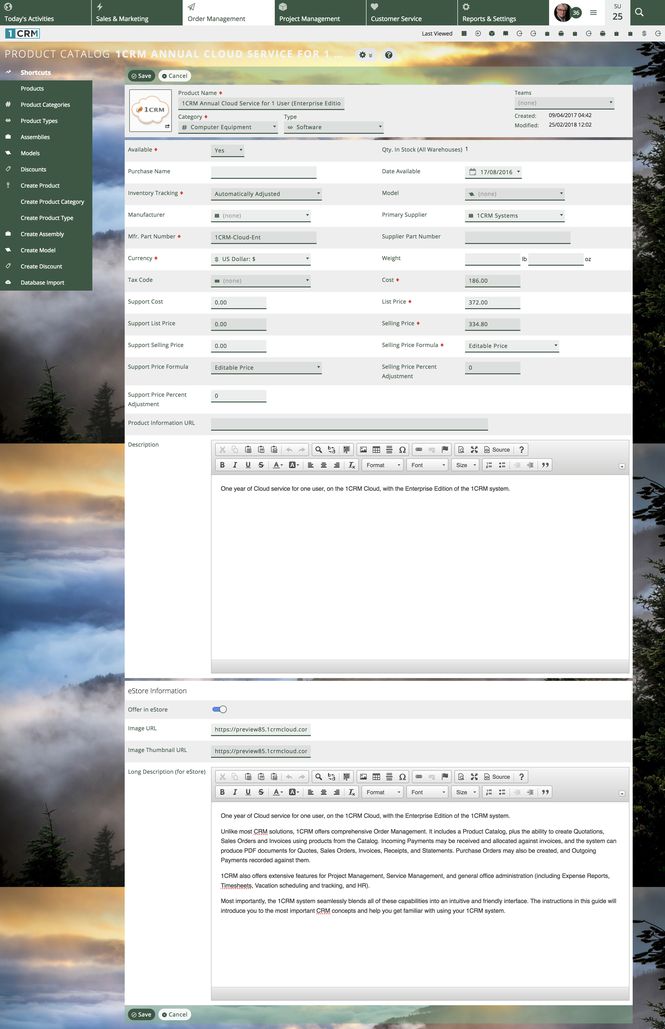
- Figure 201: Product Edit View (Flex Theme)
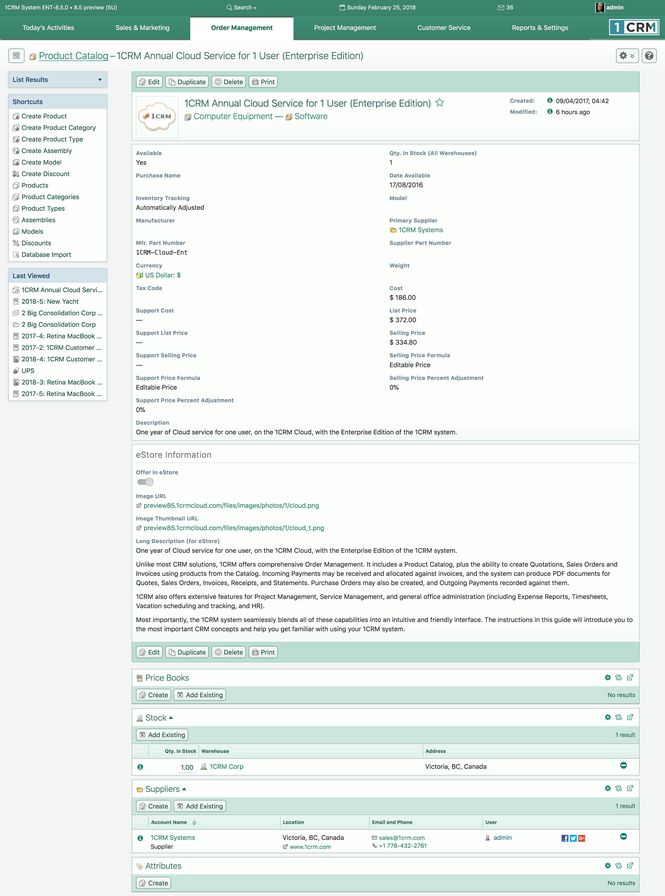
- Figure 202: Product Detail View
- 6.10.2 The eStore Product Catalog & Catalog Sync
- Each product and assembly in the catalog has a check box to indicate if it should be offered for sale in your eStore (e.g. the eStore provided by our optional Woocommerce integration). As well, large and small images of the product may be uploaded (or URLs pointing to them may be entered) to be used by the eStore. Similarly a URL may be entered that links to detailed product information, such as that at the manufacturer’s web site. Lastly, long and short product descriptions may be entered, which may be plain text or HTML, also for use in the eStore. See Figure 202 for details of these eStore data fields.
- The product catalog within Woocommerce is created and managed by synchronizing it with the catalog in 1CRM. You can choose to erase the Woocommerce catalog and re-create it from the 1CRM catalog, or you can choose to update the existing Woocommerce catalog with any changes from the 1CRM catalog. This is a handy way to retain any additional Woocommerce-specific data entered within the Woocommerce admin interface.
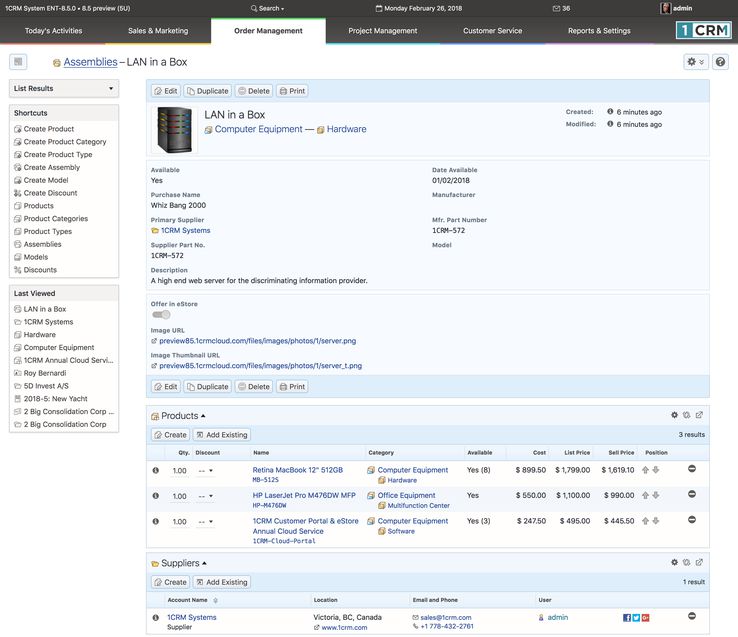
- Figure 203: Assembly Detail View
- 6.11 The Discounts Module
- Figure 204 shows the 1CRM screen with the Discounts Module selected:
- Figure 204: The Discounts Module
- From the Discounts list view (within the Order Management tab group) you can readily see that Discounts may be defined as a percentage of the selling price (Price Percentage) or as a Fixed Amount. To create a new Discount, click on the Create Discount shortcut to the left side of the screen.
- When defining a Discount, you set the name of the Discount, and the type (Fixed Amount or Price Percentage). If you select Fixed Amount, then you must set the amount of the discount, and the currency in which it is defined. For a Price Percentage discount, you just set the rate - the percentage of the Discount.
- In either case, you may also set the Discount to be Active or Inactive, and you may limit the Discount to be applied only to specific products, or to be available for use with all products.
- If you check the option that the Discount only applies to specific products, then when you save the Discount, on the detail view you will see a sub-panel of Applicable products, which you may select and relate to this Discount.
- Note: Discounts may be used when adding line items to a Quote or Invoice, but also when defining an Assembly. Each line of an Assembly may have an associated discount. This can be a handy technique for defining bundles of products with specific discount rates or amounts, which might for example be offered to different types of clients.
- The Discounts module has a
 Help icon on the title bar at the top of the main screen body, followed by a list of all the Discounts. Navigation shortcuts are provided to create a new Discount, or switch back to the Discounts list view.
- 6.12 The Subscriptions Module
- Figure 205 shows the 1CRM screen with the Subscriptions Module selected:
- Figure 205: The Subscriptions Module
- The Subscriptions module has a
 Help icon on the title bar at the top of the main screen body, followed by a list of all the Subscriptions.
- Subscriptions will be a useful module for any organization that offers recurring subscriptions to a product or service. Within this module you will see shortcuts to the related modules of: Plans, Addons, Options, Coupons and Customer Levels.
- It is important to understand right away that Subscriptions and the Plans, Addons, and Coupons they are based on are created within a linked Payment Processor system. Options and Customer Levels may be created within 1CRM. At present the only Payment Processor supported by 1CRM is Chargebee, so you need a subscription there if you plan to use the 1CRM Subscriptions module.
- Your Administrator will need to configure the link to your Chargebee subscription using the Payment Processor configuration screen within 1CRM Admin. Once that link has been setup all of the Plans, Addons, Coupons and Subscriptions defined within Chargebee will also be seen in 1CRM.
- Figure 206: The Plans Module
- Plans:
- A Plan defines a recurring schedule for ordering a Product.
- Plans can include Addons, Coupons, and Options.
- Plans can define which Addons may be linked to them, or whether they accept all Addons.
- Each Plan consists of the following information:
- Plan Name
- Status
- Product: Link the Plan to the related Product Catalog item
- Description
- Currency
- Amount
- Setup Fee
- Billing Cycle
- Pricing Model
- Volume Discounts
- Quantity Label
- Min and Max Quantities
- Pricing Tiers
- Addons:
- An Addon also defines a recurring schedule for ordering a Product.
- Addons may only be sold as part of a Plan.
- Addons may include Options and Coupons.
- Coupons:
- Coupons provide a discount against a Plan, an Addon, or an entire invoice.
- Options:
- Options are simply information gathered for a Plan and/or Addon when a Subscription is ordered.
- Options provide the seller with information about the buyer's wishes, ie size, colour, web address, image, etc …
- Options never affect the cost of a Plan or Addon.
- You can create Options in 1CRM - unlike Plans, Coupons and Addons.
- An example of an Option is provided below:
- Figure 207: Creating an Option
- Customer Levels:
- Customer Levels are used to denote different classes of customers. For example, you may have resellers who purchase subscriptions for their customers, who receive an established discount rate. A Customer Level is based on the definition of a Default Coupon for a given Customer Level.
- An example of a Customer Level is provided below:

- Figure 208: Defining a Customer Level
- Subscriptions:
- Once your Plans, Addons, Options, Coupons and Customer Levels have been defined, you can create Subscriptions - each of which will be based on a Plan, but may be modified by Addons, Options, Coupons and Customer Levels. Subscriptions also include:
- Subscription Name
- Renewal Status
- Account
- Primary Contact
- Billing Cycle
- Subscription Start Date
- Current Period Start Date
- Balance
- Current Period End Date
- Quantity
- For more in-depth information on Subscriptions, and implementing Subscriptions and a link to Chargebee for your 1CRM instance, please see further details in the Subscriptions section of the Implementation Guide.
- 6.13 The Commissions Module
- Figure 209 shows the 1CRM screen with the Commissions Module selected:
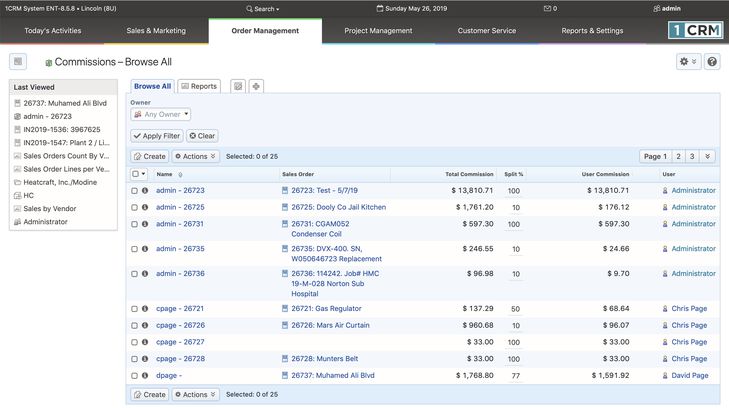
- Figure 209: The Commissions Module
- The use of this module is purely optional. You would choose to enable it when you would like to see sales commissions automatically calculated. The calculations are calculated based on rules your admin enters on a section within the Company Info panel:

- Figure 210: Configuring Commissions Options
- Your commissions may be based on Sales Orders, or on Invoices, or you can choose - None - to disable commissions. Depending on which you choose, you can see a Commissions subpanel on the detail view of your Sales Orders, or Invoices. Those subpanels look like this:
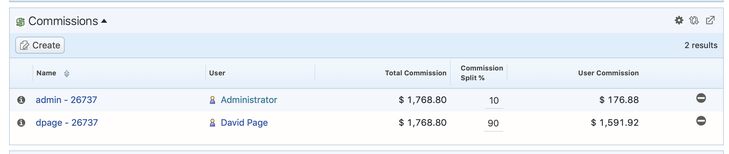
- Figure 211: Commissions Subpanel
- As you can see in the admin configuration panel, the commissions payable on a Sales Order or Invoice can be set as a percentage of the Gross Profit, or total Sale value. Once those values have been set, you have defined the total Commission payable on each Sales Order or Invoice.
- Then on each Sales Order or Invoice you can assign all of that Commission to a single sales person (by default the user to whom the Sales Order or Invoice is assigned) or you can define a split commission across any number of sales people. The Commissions subpanel allows you to edit the percentage to be received by each salesperson, and highlights those values in red if they do not total to 100%.
- To get a report of commissions due to various salespeople you can use the Commission Due interactive report to report on commissions for one or more salespeople, for any period, based on all commissions, or only those for Closed orders.
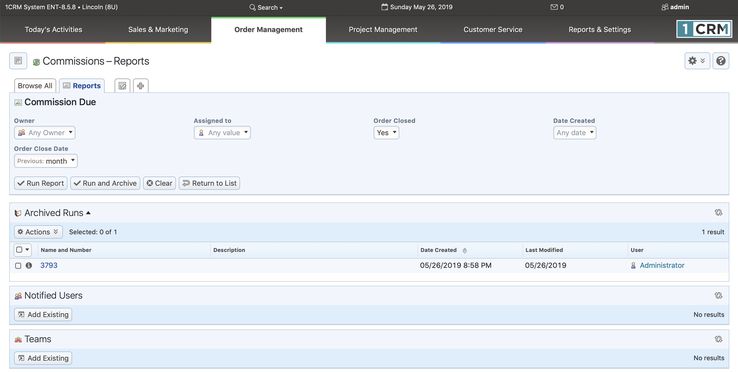
- Figure 212: Commission Due Report
- 6.14 The Price Books Module
- Figure 213 shows the 1CRM screen with the Price Books Module selected:
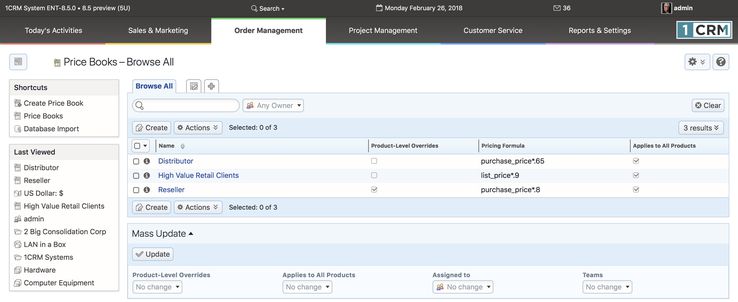
- Figure 213: The Price Books Module
- The Price Books module has a
 Help icon on the title bar at the top of the main screen body, followed by a list of all the Price Books.
- From the Price Books list view (within the Order Management tab group) you can use the Create Price Book shortcut to define a Price Book. You’ll see that it consists of a name, a formula such as purchase_price*.95, cost *1.3, or list_price/1.1, two checkboxes, and four other fields. The checkboxes are Product-Level Overrides? and Applies to All Products. The other four fields are Round to Nearest Multiple, Converts to Currency, Part Number Prefix, and Part Number Suffix.
- Formulae may only use these three variable names (purchase_price, cost and list_price), plus the basic four operators and parentheses.
- A Price Book may be set to apply to all products in the catalog. If this box is not checked, you may link a sub-set of the products directly to this Price Book, using the Products sub-panel on the Price Book detail screen, to which this Pricing Formula applies. If Applies to All Products is checked, you may still link individual products to a Price Book using the Products sub-panel, and edit the Pricing Formula for individual products if the Product-Level Overrides? checkbox is set.
- The Product-Level Overrides? checkbox also refers to whether or not the prices on Quotes and Invoices etc.. using this Price Book should be editable. In effect, it determines if prices in this Price Book are to be used as a guideline, or if its prices are locked down, and should never be altered.
- Part Number Prefix, and Part Number Suffix will add a prefix or suffix to the part number when that price book is used. Often used for Price Books organized by country. When using a Price Book for France, all products might get a -FR suffix on them, for example.
- Converts to Currency if used, sets a different currency for the price in this price book. The formula should contain a fixed exchange rate in this case.
- Round to Nearest Multiple rounds the value after converting it, for example set it to 5.00 to round to the nearest 5. This also also works for values less than 1.
- If you plan to use Price Books, the best way to use them is to define all of them, then go through all your Accounts assigning a default Price Book to each account. If some accounts get rather variable pricing, then perhaps they have no default Price Book, or at least they are assigned one which is editable.
- When editing a Quote or Invoice, when you select the Account, the Price Book for the Quote/Invoice will be set from that Account’s default Price Book, if any. If the Price Book is not editable, you cannot edit the Quote/Invoice’s Price Book setting while that Account is selected, and you cannot change pricing from that set in the Price Book.