- 7.0 Project Management
- 7.1 The Projects Module
- Figure 214 shows the 1CRM screen with the Projects Module selected using the Projects tab:
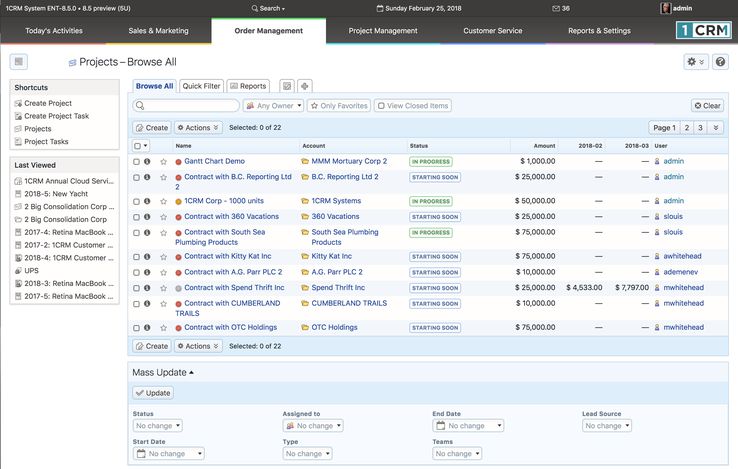
- Figure 214: The Projects Module
- Projects may be managed and tracked through their life-cycle using the Projects module. Projects may be assigned a Project Phase of Active – Starting Soon, Active – In Progress, Closed – Complete, Closed – Not Pursued, or Closed – Terminated. By default, Project Type may be set as Bid Development, Internal R&D, Services Delivery or Subcontract.
- The Projects module has a
 Help icon on the title bar at the top right of the main screen body, followed by a choice of layout tabs, and a list of all or selected Projects. The Browse All tab can filter on Project Status, and has a default filter setting which only displays Active projects – which includes both Active – Starting Soon, and Active – In Progress. Navigation shortcuts are provided to create a new Project, or a new Project Task.
- The Projects list may be sorted by clicking on any column title that has the
 icon beside it. Clicking on a column title when it is already the highlighted sort column reverses the sort order. The Projects list is paginated if it contains more items than may be listed on the display, and controls are provided to go to the start or end of the list, or step to the next or previous page. Clicking on any Project in the list displays the detail information for that Project. Clicking on the Account name for a Project links to the detailed information for that Account.
- The Projects list view includes columns for the total value of a Project, as well as the expected revenue from the Project for the current month, and the next month.

- Figure 215: Project Detail View
- When creating a new Project, or editing an existing Project, you should note that the Project Start Date and End Date are particularly important: rows of financial data for the Project will automatically be created and maintained for each month between the two dates.
- The Financial Information panel of the project detail view shows the Expected and Actual Cost, and Expected and Actual Revenue, for each month of the project. The values for Expected and Actual Revenue are entered manually. If the Use Timesheets checkbox is selected for the project, then the Expected and Actual Cost values are calculated, and may not be edited manually. If Use Timesheets is not selected, then Actual Costs are editable, but Estimated Costs are still calculated from resource costs of the Project Tasks.
- The Project Tasks sub-panel for each project defines the Project Tasks and the Resources chosen to perform each task. Each Project Task has estimated and actual hours of effort, estimated and actual costs (using a standard cost per hour for each resource, or a custom cost per hour, specified for the resource, just for this task), a Progress %, and a Status (Not Started, In Progress, Completed, Pending Input, or Deferred).
- Each Project Task is assigned to a single user, but may have additional users listed on the Assigned Resources sub-panel on the task. Each assigned resource tracks the following data:
- Estimated Hours (entered by the user)
- Estimated Cost (Estimated Hours x Hourly Rate)
- Actual Hours (From approved hours on timesheets)
- Actual Cost (Actual Hours x Hourly Rate)
- Utilization % (100 x (Estimated Hours / available working hours))
- Hourly Rate (Custom, or Standard Hourly Rate from HR profile)
- Status (Active or Inactive – when Inactive, user cannot book time to this task)
- Note: Utilization % is calculated by dividing Estimated Hours into the number of available working hours. This in turn is calculated by multiplying the number of weekdays between Start Date and Due Date (inclusive) by Hours in Work Day (from Admin – Configure Settings).
- At the level of the entire project task, Progress % is calculated as the number of hours booked to the task (and approved) divided by the total number of estimated hours for the task, across all resources. Estimated and Actual Hours and Costs are also totalled for the whole task.
- At the complete project level, the Expected Cost and Actual Cost values for each month are calculated as the relevant portion of these values from each task in the project. The Expected and Actual Revenue figures are simply entered manually. If timesheets are not in use for the project, Actual Costs are also simply entered manually.
- Note: There is a filter option on the Activities layout in the Calendar to show Project Tasks. When selected, this option causes the Calendar to show Project Tasks on the days when the filtered users are resources on Project Tasks.
- 7.1.1 Project Gantt Charts
- Clicking on the Gantt Chart tab near the top of the Project Detail screen (see Figure 215 above) will display a Gantt chart. The Gantt chart has a
 button which will print the chart in an optimised manner.
- The Gantt chart also has hyperlinks for each project task - clicking on the name or task bar of any project task will cause the detail view for that project task to be displayed.
- As well, the Gantt chart also provides up and down arrows to the left of the name of each project task. These arrows will promote or demote the project task in the sequential order of tasks in the project. Clicking on the down arrow moves the project task down one task - clicking on the up arrow moves it up one task.
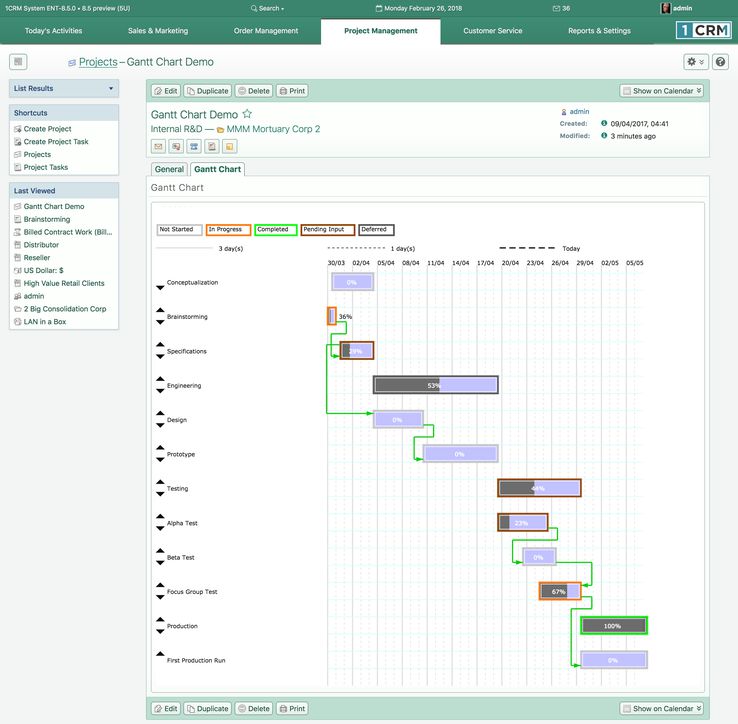
- Figure 216: Gantt Chart Display
- 7.2 The Human Resources Module
- Figure 217 shows the 1CRM screen with the Human Resources Module selected:
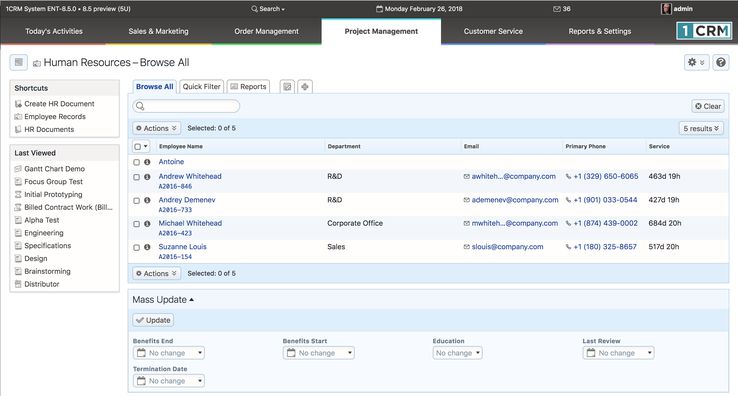
- Figure 217: Human Resources Module, Employee Records View
- The HR module keeps track of a broad range of information for each Employee, including Leave days (both Vacation and Sick days), dependants, and associated documents such as resume, job description, performance reviews, disciplinary notices, even medical records. Employee data also includes employee number, emergency contact information, SIN/SSN, salary, last review date, education, date of birth, home address, benefits start/end dates, and employment start/end dates.
- The Human Resources module is an integral part of 1CRM, but since it deals with very sensitive information, the module is only visible to those Users with access to the Human Resources module assigned to them (by the Administrator) in their User profile.
- An Employee is any User of 1CRM with Show In Directory checked in their User profile by the system Administrator. Not only are Employees shown in the Directory, but they have an HR file created for them which is viewed and managed via the Human Resources module. Users without this property might include an Admin User account which is not really a person, guest User accounts, or User accounts created for board members, advisors, contractors or consultants.
- The Human Resources module has a
 Help icon on the title bar at the top of the main screen body, followed by a choice of layout tabs, and a list of all or selected Employees. The Employee list may be sorted by clicking on any column title which has the
  icon beside it. Clicking on a column title when it is already the highlighted sort column reverses the sort order.
- The Employee list is paginated if it contains more items than may be listed on the display and controls are provided to go to the start or end of the list, or step to the next or previous page. Clicking on any Employee in the list displays the detail information for that Employee.
- Note that new Employee records may not be created within the Human Resources module – they must first be created by the system Administrator as new Users within the User Management screen, and have Show In Directory checked in their User profile. Then an HR file is created for them, which may be managed within the Human Resources module.
- Navigation shortcuts are provided within the Human Resources module to switch back and forth between the Employee Records View, and the HR Document View, as well as to create a new HR Document.
- 7.2.1 HR Documents
- Each Employee file may have associated with it a number of HR Documents. Examples of these documents might be an Employee’s resume at the time of their employment application, their performance reviews, and perhaps other Documents such as career plans, complaints, and so on. Clearly, none of these Documents should be accessible via the regular Documents module. To keep these Documents confidential, the system marks any Documents added via the Human Resources module as HR Documents. These Documents are displayed within the regular Documents list view on an HR Documents layout tab, for users with access to these documents.
- Some HR Documents are associated with a specific employee, while others are not. The capability of managing HR Documents which are not associated with a specific Employee is provided to store (and share between authorized Users) such documents as a Christmas bonus program, a down-sizing plan, an Employee option plan, etc… which relate to all or most employees, and not just one.
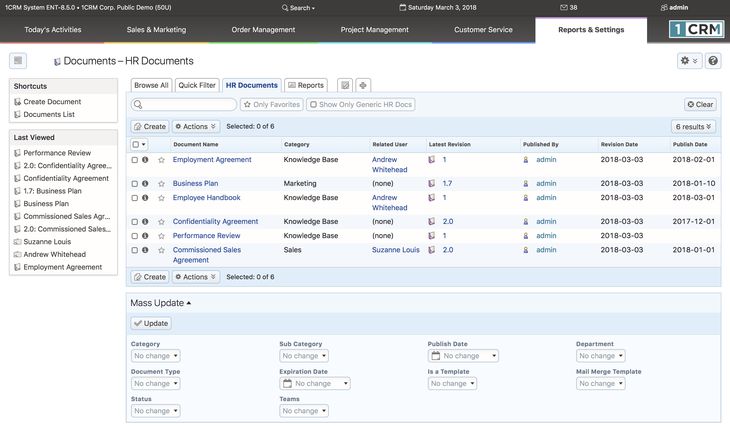
- Figure 218: HR Documents View
- As shown in the Figure above, the HR Documents layout tab and related shortcuts become integrated with the conventional Documents module, only for those Users with access to the HR module.
- Also notice the Related User column, which shows if an HR Document is one linked specifically to one user’s HR file. The filter control Show Only Generic HR Docs is used to hide HR Documents that have a related user, leaving only those HR Documents which are generic for all of HR - usually policy documents, or agreement templates, standard forms, etc...
- Figure 219 below illustrates the scope of information kept in an Employee record:
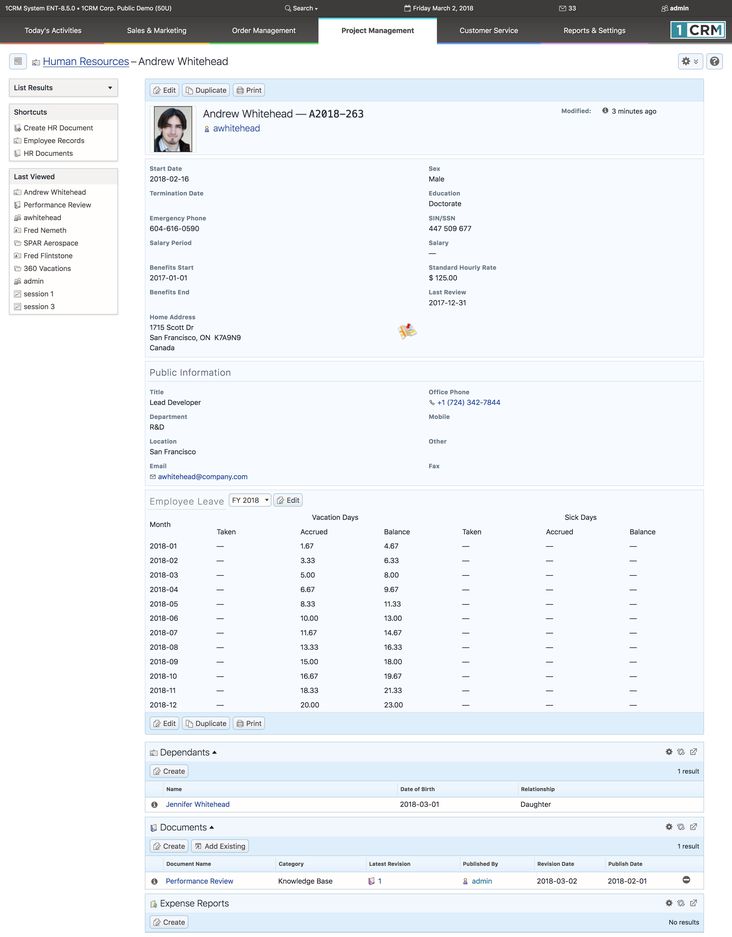
- Figure 219: HR Detail View
- 7.3 The Booked Hours Module
- Figure 220 shows the 1CRM screen with the Booked Hours Module selected:
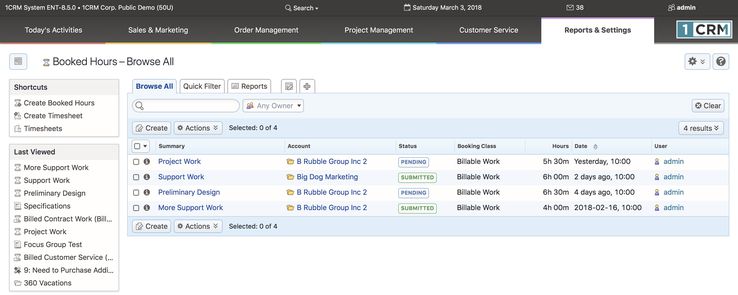
- Figure 220: The Booked Hours Module
- Many of the Booked Hours module’s capabilities are described in the section on the Timesheets module, and you should read that section in conjunction with this one.
- When employees spend their time on a customer Case or Project, your business may choose to have them record that time using the Booked Hours module. This helps a business to determine if such work is always being invoiced, and if the customer activities are profitable.
- To create a Booked Hours entry, simply select the module, and then click on the Create Booked Hours shortcut. You will see a screen resembling this one:
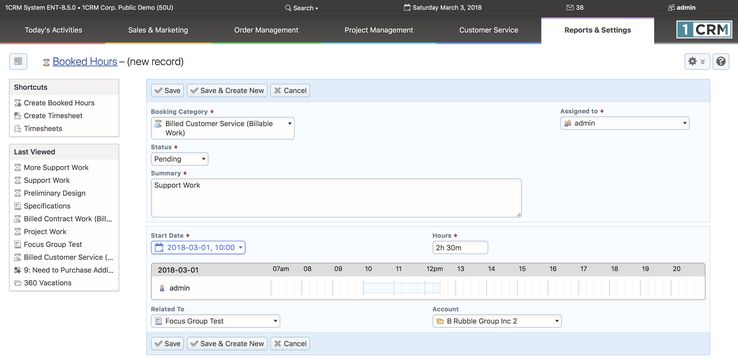
- Figure 221: Entering New Hours
- Now simply enter details of the work performed in the Summary field, set the Start Date & Time and enter the number of Hours worked. You will also need to select the Booking Category for these hours. The Booking Category determines how these hours will be treated - as billable customer hours, or as non-billable services, provided as part of support included with the sale of a product perhaps. The Booking Category will also control the rate at which the client is invoiced, and overall is a critical part of the business tracking how services employees time is spent.
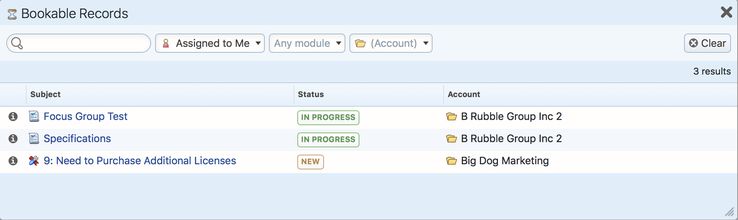
- Figure 222: Selecting Related To Case/Project Task
- Now choose the activity you are booking your time to, using the Related To lookup field. This will set the Account field as well. Listed on the screen displayed (see Figure above) will be a mix of all available Project tasks and service Cases to which you may book.
- 7.3.1 Booking Hours from Cases and Project Tasks
- The example above illustrated how to create Booked Hours entries using the Booked Hours module directly. You may also create these entries using the
 button at the top of a Case or Project Task to which you may currently book your time. Which are these?
- Project Tasks for which you are an assigned resource, for which the Project status is Active, the Project Task status is In Progress, and your status as a resource on that Project Task is Active.
- Cases which are assigned to you, and whose status is Active - New, Active - Assigned, or Pending.
- You may also book your time by clicking on the
 button on the Booked Hours sub-panel on Project Tasks or Cases which meet the conditions listed above.
- 7.3.2 Booking Hours from Calls, Meetings & Tasks
- Booking hours to Project Tasks and Service Cases as shown above is useful because you want to track billable time to add to customer invoices for Cases and Projects.
- However, it is also useful to be able to book hours to Calls, Meetings and (regular) Tasks. You do this in a similar fashion, using the
 button at the top of a Call, Meeting or Task. The Booked Hours that result will take their date/time and duration from the Call, Meeting or Task itself, which is very handy. Similarly the Summary text and related Account for the Booked Hours entry are set to the name and related Account of the Call, Meeting or Task. Simply choose a Booking Category, and Save.
- Note: If the Call, Meeting or Task was linked to a Project Task or Case, then the Related To value for the Booked Hours will also link to that Project Task or Case. Otherwise you are free to set Related To as you prefer.
- 7.4 The Timesheets Module
- Figure 223 shows the 1CRM screen with the Timesheets Module selected:
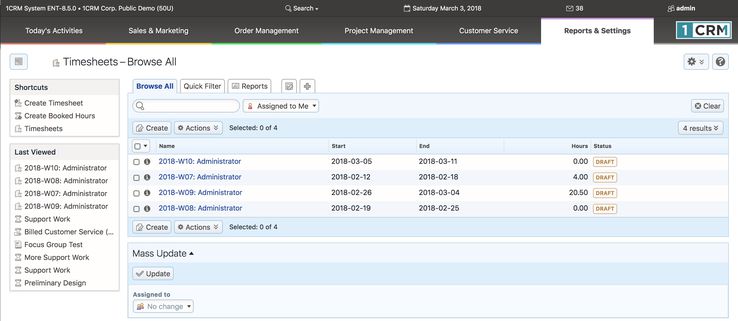
- Figure 223: The Timesheets Module
- Timesheets may be filed on a weekly, bi-weekly, semi-monthly, or monthly basis within 1CRM – as selected by a system-wide control in the Company Information section of the System Settings area within Administration. Timesheets have the status Draft, Submitted, Approved or Rejected. Timesheets are automatically named, with the format 2005-M01: User’s Full Name. The letter M in the example denotes a monthly timesheet, and W, B, and S are used for the other timesheet periods. Each timesheet is specific to a single user, and has a start date and end date. Each timesheet may have any number of lines of booked hours on it.
- It is important to understand that Booked Hours may be created for a time period for which there is as yet no Timesheet. The Timesheet itself may be created quite late in the process if desired, simply to put a wrapper around a set of Booked Hours, in order to submit them as a Timesheet for approval.
- The Timesheets module has a
 Help icon on the title bar at the top of the main screen body, followed by a choice of layout tabs, and a list of all or selected Timesheets. Each Timesheet in the list has a check box at the left, and at the bottom of the screen is a Mass Update panel. The navigation shortcuts provided will help you create a new Timesheet, Create Booked Hours or switch back to the Timesheet list view.
- The Timesheets list may be sorted by clicking on any column title that has the
 icon beside it. Clicking on a column title when it is already the highlighted sort column reverses the sort order. The Timesheets list is paginated if it contains more items than may be listed on the display and controls are provided to go to the start or end of the list, or step to the next or previous page. Clicking on any Timesheet in the list displays the detail information for that Timesheet.
- When you create a new Timesheet (see Figure 224 below), all the Booked Hours you have entered for that time period will automatically appear in the Other Booked Hours sub-panel of the edit view screen. Each entry in the this sub-panel represents a Booked Hours record. These records may be created on a Project or Case detail view screen, in which case they may also be seen after they are created on the Booked Hours sub-panels of those Cases and Projects. They may also be created in the Timesheets mode of the Calendar - where they may be linked to Cases or Projects, or simply record day-to-day business activities.
- Each Booked Hours entry in the sub-panels of a Timesheet records the following information, organized by the days within the timesheet period:
- The start time for the work performed
- The duration of the work, in hours
- The subject of the work (often used as a comment to describe the work when billing a client)
- The Case or Project to which the work is related (if any)
- The Status of the entry – Tentative, Not Yet Approved, Submitted, Approved, or Rejected
- You include Other Booked Hours in your timesheet by clicking on the ✚ icon at the right of each entry. This ‘promotes’ the entry to the Timesheet Booked Hours panel from the Other Booked Hours panel. Similarly, you can demote entries using the
 icon to the right of entries in the Timesheet Booked Hours panel.
- Once you have added Booked Hours to your Timesheet, you can Save your Timesheet for now, and wait for the end of the Timesheet period before you Submit it for Approval.

- Figure 224: Timesheets Edit View
- Once a timesheet is Submitted by the user (which is done by editing the timesheet and clicking on the Submit button), each line (or Booked Hours entry) may be Approved or Rejected. Once all lines of a timesheet are Approved, the timesheet as a whole becomes Approved. The approver has the buttons Approve All, Reject All, or Approve Selected available to them. If Approve Selected is used then the timesheet as a whole becomes Rejected, but the Approved lines are shown as Approved. (There are checkboxes to the left of each line, to select them.)
- While hours are usually booked within the Timesheets mode of the Calendar, or by clicking on the
 button at the top of a Case or Project detail view, it is also possible to enter Booked Hours by clicking on the Create Booked Hours shortcut, available in the Timesheets module.
- Things to watch for when using the booked hours features:
- You can only book hours to Project Tasks for which you are an assigned resource, for which the Project status is Active, the Project Task status is In Progress, and your status as a resource on that Project Task is Active
- You can only book hours to Cases which are assigned to you, and whose status is Active - New, Active - Assigned, or Pending
- No costs will accrue for the hours booked unless you have set a standard cost for the user in the HR module, or a task-specific cost for the user’s role on that Project Task or Case
- Make sure to set the Billing Rate on the Booking Category, and to use a Booking Category that is classified as billable, or you will not be able to invoice for the work
- A really handy feature of booked hours is that once they are approved, you can bill for the time spent on a Case or Project by simply going to the Invoices sub-panel on the Case or Project, and clicking on the Create button. A new Invoice will be created for the Account, and any billable hours that have not been previously invoiced will be added to the Invoice automatically. You will be left in edit mode on the Invoice, with the ability to add or remove line items or other details as desired. Then just Save the Invoice to bill for the time spent on that Case or Project.
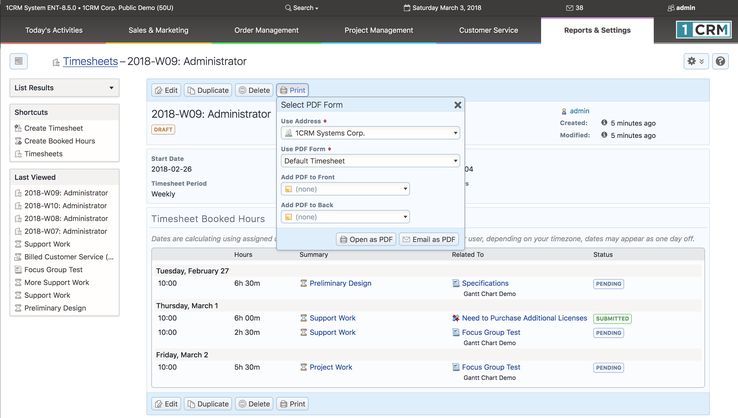
- Figure 225: Timesheets Detail View
- The Print Timesheet PDF option of the
 button on the Timesheet detail view (see Figure above) generates a Timesheet PDF. In some businesses these can be a useful part of the Timesheet approval workflow, and can also be useful when justifying client invoices.
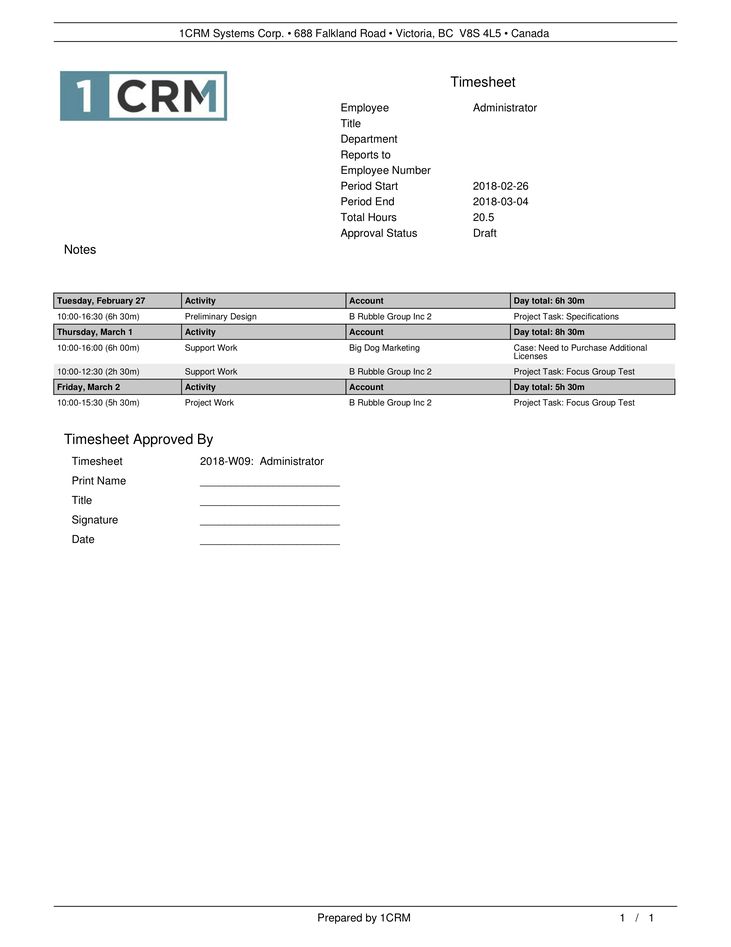
- Figure 226: Timesheet PDF
- 7.5 The Expense Reports Module
- Figure 227 shows the 1CRM screen with the Expense Reports Module selected:

- Figure 227: The Expense Reports Module
- Expense Reports may be filed by employees at any time. They are used to record personal expenses incurred on the business’ behalf, and to enable employees to claim those expenses back from the business.
- Each Expense Report describes a series of receipts, which are added as line items to an Expense Report. Receipts may be handed in for approval as a physical stack of (numbered) receipts with a printed expense report, or may be scanned and uploaded to 1CRM, with each receipt linked to the corresponding line item on the Expense Report.
- To create a new Expense Report, simply click on the Create Expense Report shortcut. You will see a screen similar to Figure 228 below.
- You can optionally select an Account to which the expenses should be linked, in the sense that these expenses were incurred in support of some company effort in this Account. This will help the business later on track Accounts that are incurring more or less than normal business expenses.
- Now select an Expense Type - from an initial set of values: Customer, Marketing, Sales, Support and Executive. These types are meant to help the business classify expenses as pre- or post-sales, for marketing, executive visits, etc..
- If you received an Advance from the business against your anticipated expenses, then enter the amount and currency of the Advance.
- Next select the Report Currency - the currency in which the expenses were incurred. Payments for Expense Report claims will always be made in the system default currency of the 1CRM installation, but the expenses themselves may have occurred in another currency. The exchange rate to be used for the currency conversion should also be entered (a default will be displayed, but will be editable).
- As receipts are added to the Expense Report, Total expenses will be displayed both in the currency in which they occurred, and in the currency in which they will be paid out. The Balance due to you net of the Advance will also be displayed, in both currencies.
- Finally enter some overall Notes for the reason the expenses were required to be incurred on behalf of the business. And optionally link an Opportunity, Project or service Case to the Expense Report - again for the benefit of later analysis.
- Now you can click on the
 button to add your first receipted item to your Expense Report.
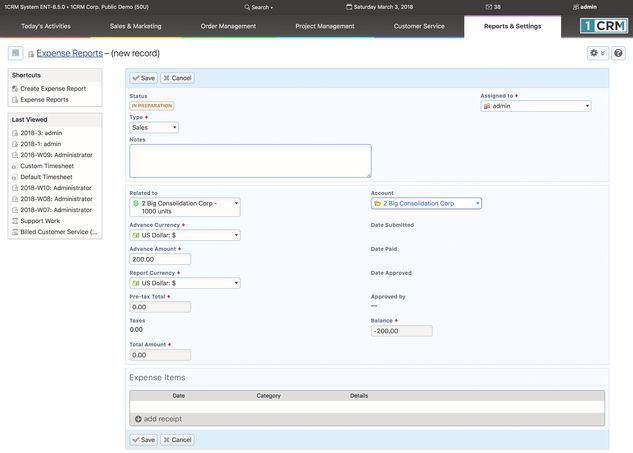
- Figure 228: Creating an Expense Report
- When you do so, you will see the Expense Items part of the screen start to resemble the Figure below. Each time you click on Add Receipt you can add a new line, which may be in the Category Personal Auto Use, Auto Rental, Other Transportation, Meals, Lodging, Telephone, Other Utilities or Other Expenses. Select a date, enter an amount, and type in a description, and the line is complete. For Personal Auto Use, the amount you enter will be the number of miles or kilometres travelled.
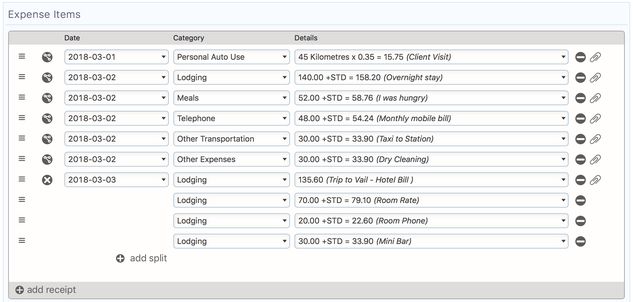
- Figure 229: Adding Line Items to an Expense Report
- Note: Your Category selection list is determined by the settings in Booking Categories. All Booking Categories with a Booking Class of Expenses will be shown on the dropdown list for Categories.
- Optionally, you may click on the paperclip icon at the end of each receipt line to upload a scanned receipt for this item. When an Expense Report is saved, all the Scanned Receipts are listed in a sub-panel below the main panel, from which they may be edited or removed (see Figure 230).
- Sometimes you will have a receipt which has several items on it, which need to go into multiple classifications (Hotels, Meals, Telephone, for example, as in the last item in the Figure above). In this case you use the Split button
 in front of the date to define a split. The indented lines are entered and then totalled automatically into the summary line above.
- Once you have added all your receipt lines to the Expense Report, you can save it by clicking on Save, or Submit it for approval by clicking on
 . When you save it, you see a screen like the Expense Report detail screen in the Figure below. (You can click on
  to see the split details.)
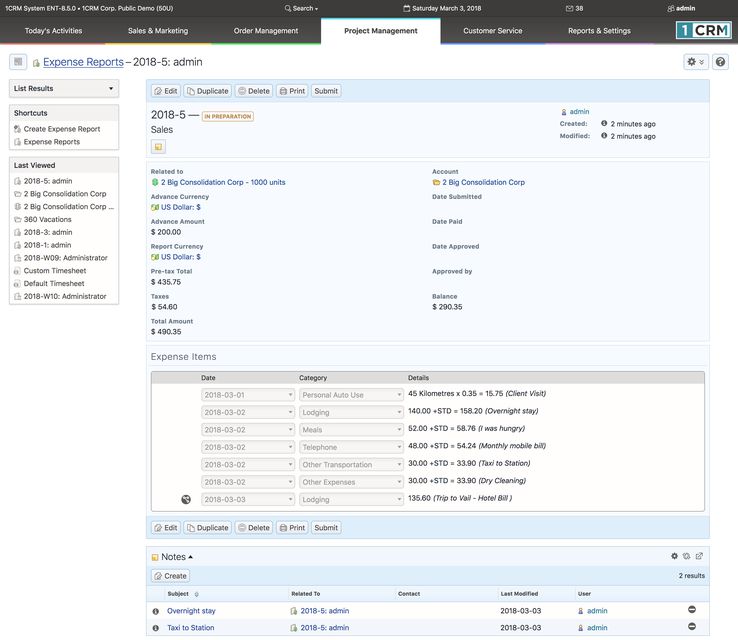
- Figure 230: Expense Report Detail Screen
- From the Expense Report detail screen, you can click on the
 button to produce a PDF of your Expense Report (see Figure 231), which you may print and submit for approval if that is how your business chooses to operate.
- As well, from the Expense Report edit screen, you can click on the
 button to submit your Expense Report for approval. This takes you to the Expense Report detail screen as does Save, but now your report has the status of being Submitted, and the Date Submitted is set. A Submitted Expense Report may be Approved or Rejected - there are buttons available on the detail screen for those users with Approval capability for Expenses in their Role. And once it has been Approved, it may later be marked as Paid. The dates an Expense Report is Submitted, Approved and Paid are tracked on the record.
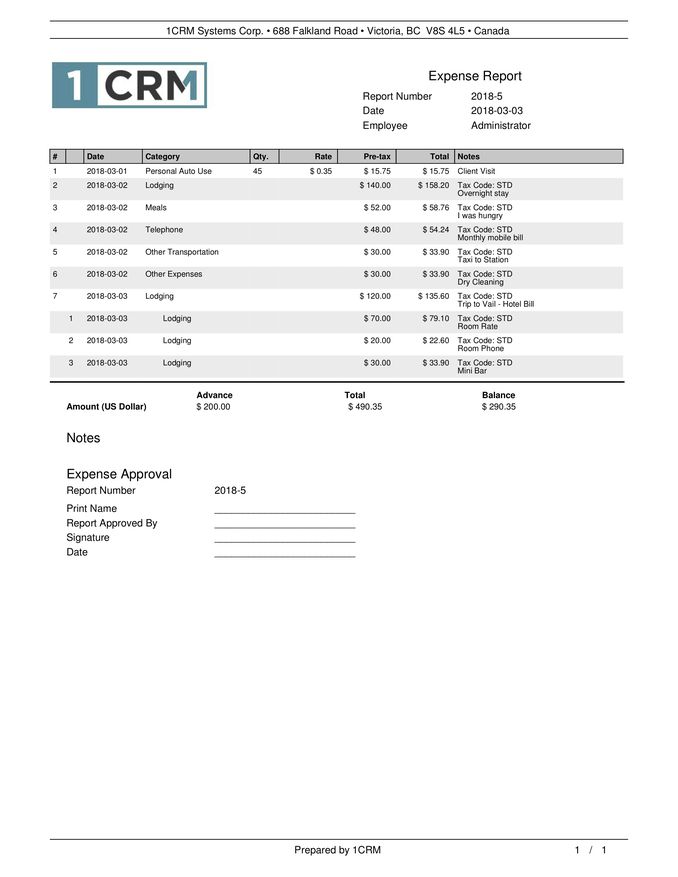
- Figure 231: Expense Report PDF
- 7.6 The Booking Categories Module
- Figure 232 shows the 1CRM screen with the Booking Categories Module selected:
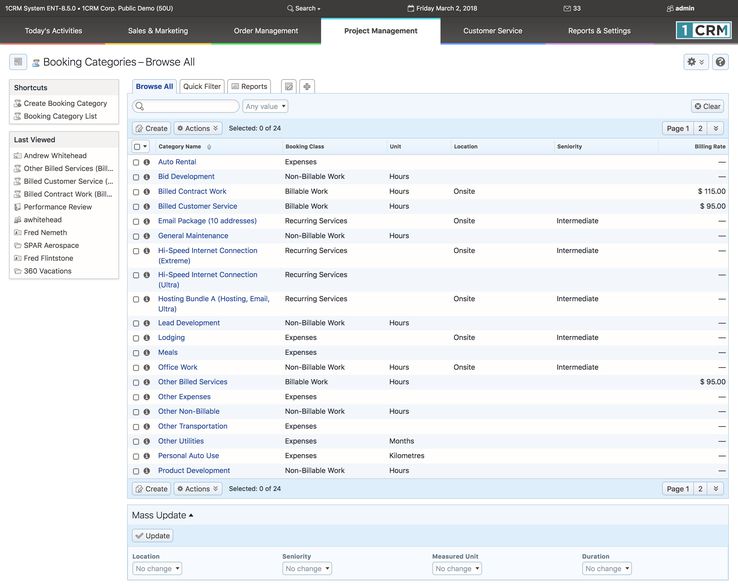
- Figure 232: The Booking Categories Module
- Booking Categories are a critical part of recording your time and expenses, as well as generating recurring invoices for Recurring Services. Each Booking Category has a Booking Class, and Booking Classes are fixed definitions which may not be changed. The options for Booking Class are:
- Billable Work
- Non-Billable Work
- Expenses
- Recurring Services
- The first two of these are used when defining Booking Categories for booking time to a Project or service Case, and control whether that time will be invoiced or not, and if so at what rate.
- As seen in the Figure below, if you create a new Booking Category with a Booking Class of Billable Work, fields are displayed for Location, Seniority, and Duration, as well as Billing Rate, Currency and Tax Code to be used for invoicing the work, and Description.
- A Booking Category in the Booking Class of Non-Billable Work will display the same fields except that Billing Rate, Currency and Tax Code are not displayed.
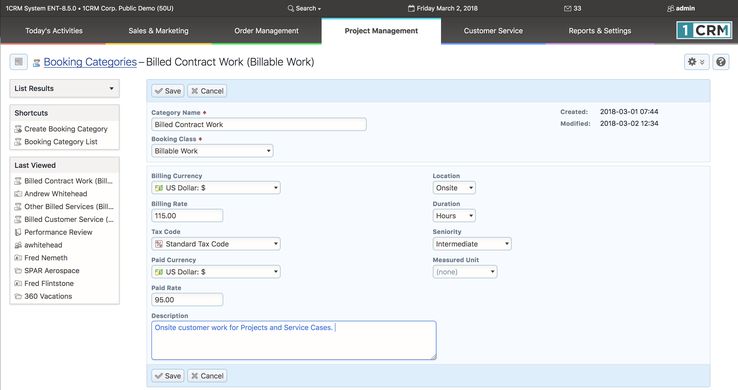
- Figure 233: Creating a Booking Category for Billable Work
- A Booking Category in the Booking Class of Expenses will display fields for Measured Unit, Standard Rate, and Description. Measured Unit is used for an expense such as Personal Auto Use, which may be measured in Miles or Kilometres. This is where an administrator would change the distance units if they are not correct for your business. Standard Rate is only used when a Measured Unit is specified. In the case of Personal Auto Use it would specify the expense rate per mile or kilometre to be paid to employees for using their own vehicle on company business.
- A Booking Category in the Booking Class of Recurring Services just shows the Category Name, Booking Class and Description. These Booking Categories are used to describe the types of services your business offers as Recurring Services. For more details see the section in this Guide on Recurring Services.