- 8.0 Customer Service
- 8.1 The Service Subcontracts Module
- Figure 234 shows the 1CRM screen with the Service Subcontracts Module selected:
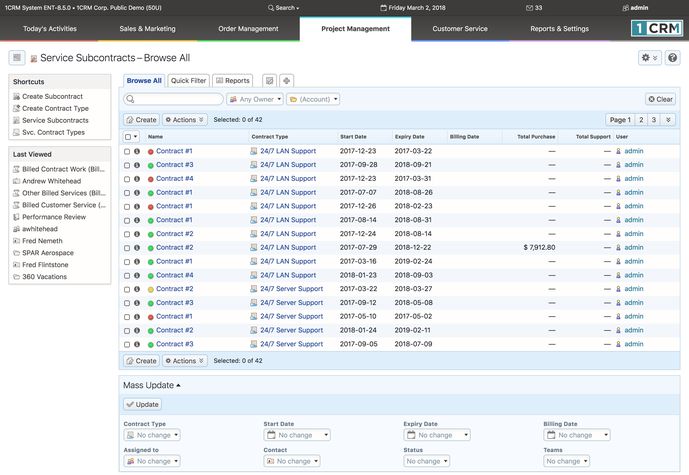
- Figure 234: The Service Subcontracts Module
- The Service Subcontracts module manages service subcontracts. On entry to the module, all service subcontracts are listed, with their associated Name and Contract Type, Start Date, Expiry Date and more. Each service subcontract can have any number of supported products associated with it for support coverage.
- Each service subcontract has a start and end date, and is colour coded accordingly – Red for expired contracts, Yellow for contracts expiring in the next 30 days, and Green for active contracts. The Service Subcontracts module combines with the Supported Products, Cases and Software Bugs modules to provide a comprehensive service management capability.
- The Service Subcontracts module has a
 Help icon on the title bar at the top of the main screen body, followed by a choice of layout tabs, and a list of all or selected Service Subcontracts. The service subcontract list may be sorted by clicking on any column title which has the
  icon beside it. Clicking on a column title when it is already the highlighted sort column reverses the sort order. Contracts are initially sorted by their Account name.
- The service subcontract list is paginated if it contains more items than may be listed on the display, and controls are provided to go to the start or end of the list, or step to the next or previous page. Clicking on the name for any service subcontract in the list displays the detail information for that subcontract. Clicking on the Account Name for any subcontract in the list links to the detailed information for that Account.
- Navigation shortcuts are provided to create a new service contract, to switch back to the service subcontract list view, and to list Contract Types and create new ones. A Contract Type is a specific type of service subcontract – it has a name, a supplier, a description, and a response time. Examples might be an On Site LAN Support Contract, a 24/7 Server Support Contract, a 9-5 Desktop Support Contract, etc..
- Note that the scheduler has a function that may be set to provide automated reminders of service subcontracts that are coming up for their renewal dates.
- Some organizations allow their clients to make pre-payments for support contracts. To accommodate this sort of business workflow, 1CRM allows you to add prepaid amounts to a service subcontract. See the figure below, in which the Prepaid Amounts sub-panel on a subcontract shows a prepaid amount which has been added to the subcontract by clicking on the Apply Credit button on that sub-panel. Also see the Prepaid Balance field in the main panel of the subcontract.
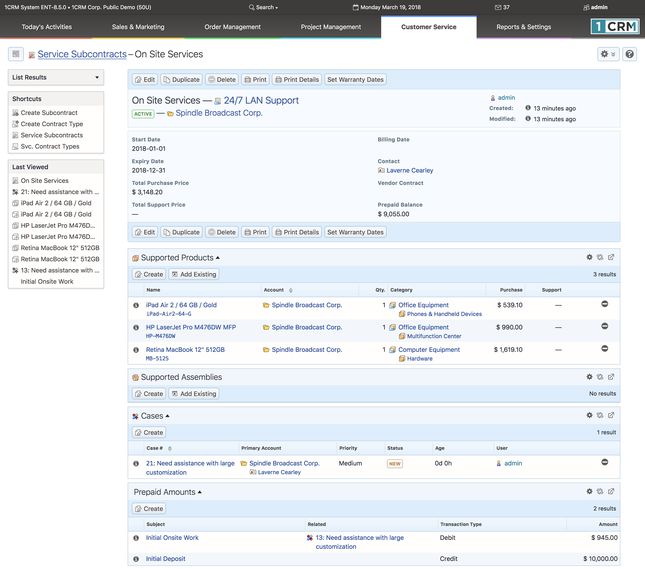
- Figure 235: Service Subcontract and Pre-payments
- Service Cases may be charged to the prepaid balance on a service subcontract by clicking on the Apply Debit button on the Applied Prepaid Amounts sub-panel of the Case detail view. The Prepaid Amounts sub-panel on a subcontract then lists all of its prepayment credits and debits, and the Prepaid Balance field will show the current balance of credits less debits. For more information please see the section that describes the 1CRM Cases module.
- 8.2 The Supported Products Module
- Figure 236 shows the 1CRM screen with the Supported Products Module selected:
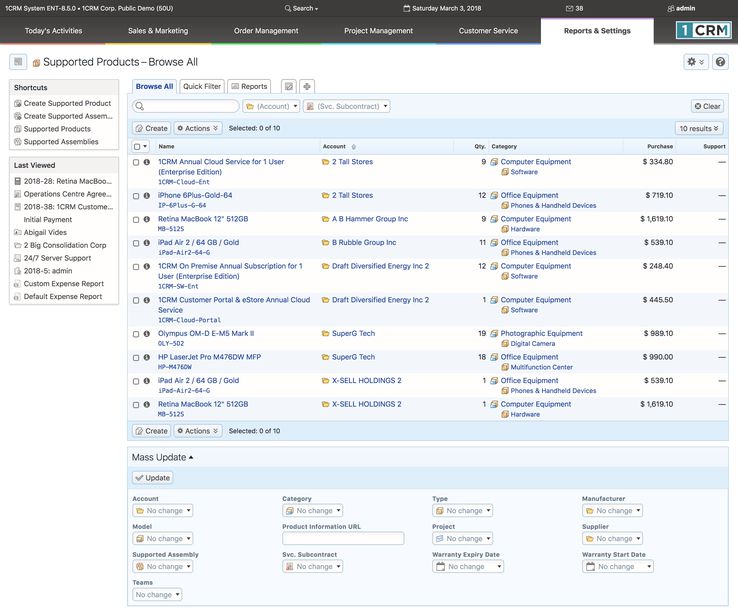
- Figure 236: The Supported Products Module
- Supported Products (a.k.a. Assets) are specific items that are associated with a Service contract. Take care not to confuse the Supported Products module with the Product Catalog module, which defines the Products that are available to be sold. Supported Products may be managed and organized by their Product Type and Category – and you can define all the Types and Categories you would like. Supported Products are also tracked by their Supplier. Suppliers are stored as Accounts, with the ‘Is a Supplier’ checkbox selected.
- A Supported Product may be created from an item in the Product Catalog, or may be created ad hoc by simply entering any name desired. Supported Products have a quantity associated with them, and have a sub-panel for related serial numbers.
- The Supported Products module has a
 Help icon on the title bar at the top of the main screen body, followed by a choice of layout tabs, and a list of all or selected Supported Products. Each Supported Product in the list has a check box at the left, and at the bottom of the screen is a Mass Update panel to update one or more field values for all selected Supported Products.
- The navigation shortcuts provided will help you create a new Supported Product, or switch back to the Supported Product list view. There are also shortcuts to create or list Supported Assemblies, and to import supported product data from a CSV file.
- The Supported Products list may be sorted by clicking on any column title which has the
 icon beside it. Clicking on a column title when it is already the highlighted sort column reverses the sort order. The Supported Products list is paginated if it contains more items than may be listed on the display and controls are provided to go to the start or end of the list, or step to the next or previous page. Clicking on any Supported Product in the list displays the detail information for that Supported Product. Clicking on the Account Name for a Supported Product links to the detailed information for that associated Account.
- 8.3 The Recurring Services Module
- Figure 237 shows the 1CRM screen with the Recurring Services Module selected:
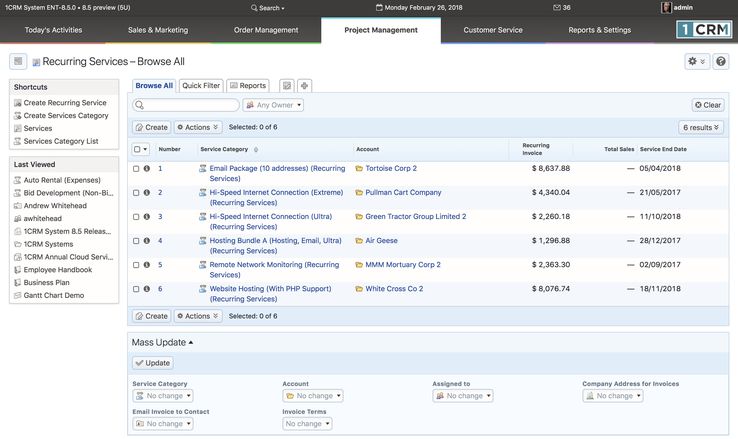
- Figure 237: The Recurring Services Module
- Recurring Services are just what they sound like - services for which you invoice on a regular basis. These could be services from an Internet provider, for a high speed connection, mail services, firewall protection, etc.. Or they could be for an apartment rental, equipment leasing, magazine subscription, hot-water heater, … any number of things.
- You define a new Recurring Service by selecting the shortcut Create Recurring Service. This will bring up a screen which resembles the Figure below. But before you do, you will need a Services Category. These define the sorts of Recurring Services you offer. And you use the Create Services Category shortcut to create these.
- Once you have created a few Services Categories, you define a Recurring Service as follows:
- Select the Services Category. (i.e. select which Recurring Service you are selling to a specific client.)
- Select the Account that is purchasing this recurring service.
- Select the Quote Template. This is a critical part of the process. The Quote Template will be used to set the contents of the Invoice to be created for this client each invoicing period. The Group names and lines items, tax settings, discounts, and total values from the Quote will be used on each invoice, as will the Account information. Invoice Terms, and Purchase Order No. will be set from the values specified here, however. As well, a Note will be added to each generated invoice specifying the service period covered by the invoice.
- Set the Service Frequency. This can be Monthly, Quarterly or Annually. This Recurring Service will generate an invoice for this account once each Month, once each Quarter, or once each Year.
- Set the Service Start Date. This will also set the Billing Day and (with the Service Frequency) the Service End Date. (Note: Often a Recurring Service will start in the middle of the service period, or for some other reason have a duration that is not an exact number of service periods. Just for now we will assume that all Recurring Services are an exact number of service periods in duration. Information on how to manage exceptions to this is provided a bit later on.)
- Set the Service End Date. It defaults to a date of one year less a day after the Service Start Date. There are controls to change the Service End Date while ensuring the duration of the Recurring Service remains an exact number of service periods.
- Set the Invoice Terms and Purchase Order No. These will be used on all generated invoices.
- Select the Email Invoice to Contact. (Ensure that the Contact has an email address entered for them.)
- Select the CC Email Invoice to User. (Ensure that the User has an email address.)
- Then click on Save.
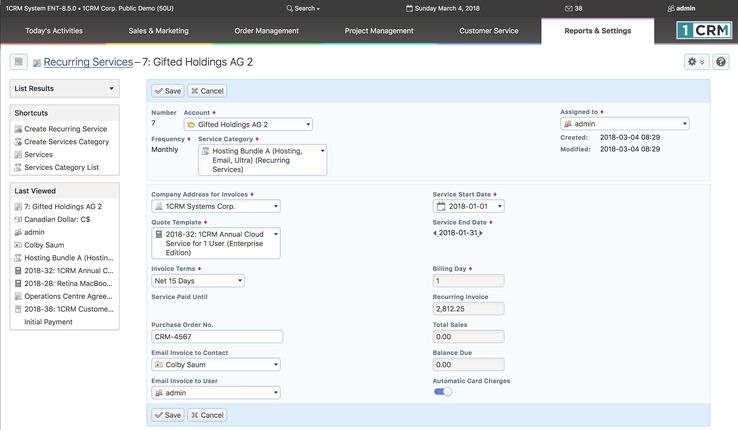
- Figure 238: Creating a Recurring Service
- And that’s all there is to it!
- In the Admin screens there is a scheduler task called Send Recurring Services Invoices. For Recurring Services invoices to be generated automatically, your Administrator must configure your scheduler, and enable this specific scheduler task with a run interval of one day.
- 8.3.1 Collecting Payment for Recurring Services
- In the Figure above, note the checkbox Automatic Card Charges. This field is only shown if the Stripe payment gateway account has been configured in Admin - Company Information. If this checkbox is selected then the Recurring Service defined will not only generate and email an invoice on a recurring basis, it will also process the payment using the authorized Credit Card (see below) defined for this account. The resulting email advice note will specify if the payment process was successful, or if the payment failed.
- 8.3.2 Authorizing a Credit Card
- In order to automatically collect payment for Recurring Services invoices, you must add an Authorized credit card to the account to be invoiced. This process is analogous to the now old-fashioned process of putting a credit card on file for a client.
- In the Figure below, note the button on the Account detail view Authorize Credit Card. This button is only shown if the Stripe payment gateway account has been configured in Admin - Company Information. When you click on this button you will see the Authorize Credit Card popup shown in the next Figure. Simply fill in the information required, and then click on Authorize.
- One you have done this successfully, the Account now has a valid credit card on file within the Stripe system, and this card is available to charge Recurring Services invoices against it.
- Note: No credit card information is retained within the 1CRM system.

- Figure 239: Authorize Credit Card Button on Account Detail View

- Figure 240: Authorize Credit Card Popup
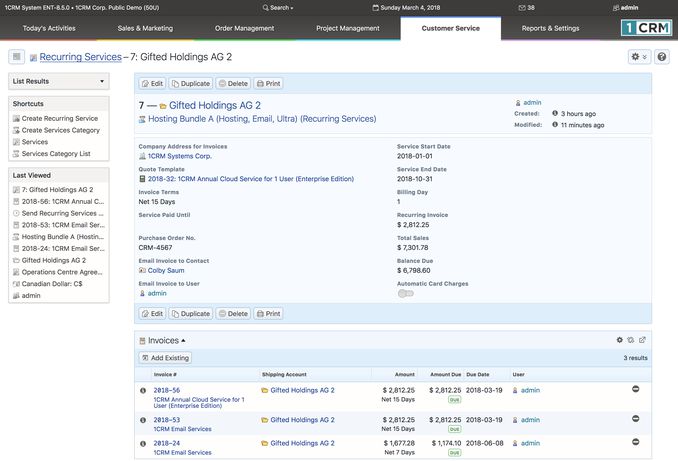
- Figure 241: Recurring Service Detail Screen, Showing Invoices
- 1CRM will generate an invoice each service period on the Billing Day, and you will see these invoices gradually accumulate on the detail screen for each Recurring Service, in the Invoices sub-panel. As well, each new invoice will increase Total Sales and Balance Due. When payment is processed for one of these invoices, Balance Due is reduced, and the Service Paid Until date is adjusted.
- Each Invoice generated will be emailed automatically to the Contact specified, and CC’d to the User specified. As well, 30 days before the expiration of the final service period, an expiration reminder email will also be emailed separately to both the Contact and User.
- So far we have only discussed a recurring service with a duration of an exact number of service periods (Months, Quarters or Years), each with an identical invoice. But a recurring service sometimes has an initial invoice that is not the same as all the later invoices, due to some special initial setup charge or similar initial fee. Or the service may start mid-period and you prefer all agreements to end exactly at the end of a month, so the term of the agreement is not an exact number of service periods.
- For both of these cases, you will need to do the following:
- Manually create an initial invoice using the Invoice module for the initial invoice that will not be like all the following invoices. This may be for the extra initial charges plus the first period’s services, or just for the initial charges. Or it may be for the service for an odd length of time in an initial service period, so that all following periods’ invoices are the same as each other (and so may be defined using a Quote Template).
- Link the manually-created invoice to the Recurring Service record using the Invoices sub-panel on its detail screen. Click on the Add Existing button there, find the invoice you just created, and select it. It will add to Total Sales and Balance Due.
- To create a report of Recurring Services, there is an Active Recurring Services report, which lists and totals all Recurring Services still active, sorted by their start date.
- 8.4 The Cases Module
- Figure 242 shows the 1CRM screen with the Cases Module selected:
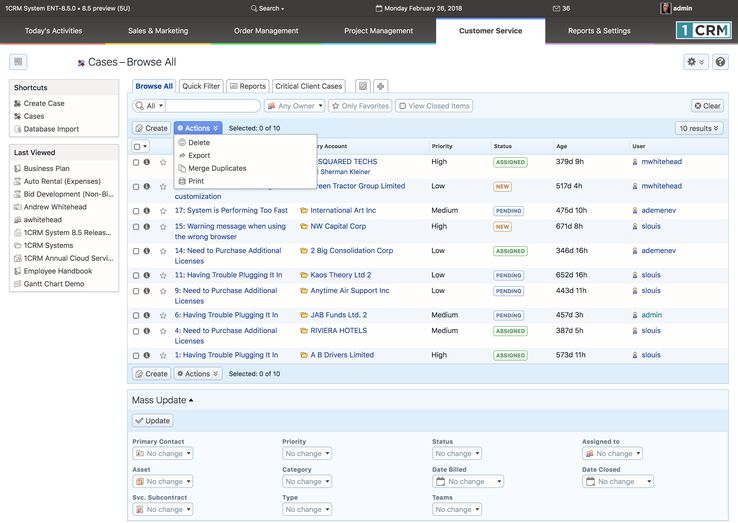
- Figure 242: The Cases Module
- Cases are issues or problems (also often known as Trouble Tickets) associated with an account. They may be managed and tracked through their life-cycle using the Cases module. Cases may be assigned High, Medium or Low priority. They have a status of Active - New, Active – Assigned, Pending, Closed – Complete, or Closed – No Fault. Each Case tracks the related service subcontract, and the description and serial number of any hardware asset involved in the Case.
- The Cases module has a
 Help icon on the title bar at the top of the main screen body, followed by a choice of layout tabs, and a list of all or selected Cases. The Browse All layout tab can filter on Case Status, and has a default filter setting of showing only Active cases – which includes only those marked Active – New, or Active – Assigned.
- The Cases list may be sorted by clicking on any column title that has the
 icon beside it. Clicking on a column title when it is already the highlighted sort column reverses the sort order. Cases are initially sorted by their Age (time and date now, less time and date of creation), with the oldest first.
- The Cases list is paginated if it contains more items than may be listed on the display, and controls are provided to go to the start or end of the list, or step to the next or previous page. Clicking on the subject for any Case in the list displays the detail information for that Case. Clicking on the Account Name for a Case links to the detailed information for that Account. Navigation shortcuts are provided to create a new Case, or switch back to the Case list view.
- 8.4.1 Case Queue Workflow
- While Cases may be created and assigned to users in much the same way as any other form of data within 1CRM, there is a special workflow available that is unique to the Cases module.
- If in Admin – System Settings a Case Queue user is assigned (a person that will manage the list of outstanding service cases), then by default, all new cases created are assigned to that user. (When creating a new case, a user may, if desired, over-ride this default and assign the case directly to another user.)
- When operating with a Case Queue user, a new Get a Case option is available on the
 button at the top of Cases List View (see the Figure above) and the Cases Dashlet offers a
  button. When a service technician clicks on this button, he will be assigned a case that matches his skill set. How does this magic happen?
- Skills relevant to your business are defined on the Admin – Users – Service Skills screen. Each skill is simply entered as a name, and saved.
- Each user may be rated by a system admin as to his or her skill level for each skill defined in the system. A skill level of 0 is assumed for any skills not given a level for any user. Skill levels must be positive integers. Most businesses define them in the range 1-3, 1-5, or 1-10. This rating is set for users with the Admin – User Management screen. Just select the profile for a user, edit it, and click on the Add button in the Service Skills section of the profile. Select the skill, enter a number for the skill level, and save the user profile.
- Each new case may have defined on it the skills (and the levels of those skills) required to address the service case.
- When the
 button is clicked, the system automatically looks for the oldest and highest priority case available that matches the skill set of the requesting service technician.
- Now, all of this may sound very interesting – but still many organizations may choose not to enable this workflow, as they are overloaded with service cases, and do not have the luxury of having a service tech request his next case. That being said, if your organization works that way, maybe you need some additional service technicians!
- If a service technician requests a new case, and does not feel they can resolve it, they can elect to escalate the case. They do this by clicking on the
 button on the case detail view screen. This will cause a slide-out panel to appear, which asks the technician to check which skills they feel they are deficient in for this case. Then the case is re-rated for skills required, and put back into the service case queue.
- 8.4.2 Cases Notifications
- Within 1CRM, there is a generic ability for email notifications to be sent when new items are assigned to users. This capability is controlled by the Admin – Email & Notification Settings screen. The Notifications On checkbox enables this feature. As well, each user must have the Receive Email Notifications checkbox selected on the My Account screen to receive these notifications. (The user must also have entered their proper email address in the Email Address field of the Email Options tab of the My Account screen.
- Similar to the generic notifications capability, 1CRM has two special user notification capabilities for Cases. Again, they enabled by settings on the Admin – Email & Notification Settings screen. (Notify Users on Case Creation? and Notify Users on Case Update?) And again, each user must have the Notify On Case Changes? option selected on the My Account screen to receive these notifications.
- But there is a key difference with these notifications, in that they may also be sent to your customers. Any contacts that are associated with a Case will receive an email notification when the Case (or any related data) is updated if the options on the Admin – Email Email & Settings screen are selected. (The options are called Notify Contacts on Case Creation? and Notify Contacts on Case Update?)
- This capability works very well with the 1CRM Customer Connection Portal. Clients may update a Case via the portal, and relevant users can receive an email to let them know. Conversely, when users update a case, clients can get an email prompting them to use the portal to see the update to their case.
- 8.4.3 Booking Time to Cases
- Within 1CRM you have the ability to book time to Projects and Cases, and then invoice for that time if it is billable. As well, you can file Timesheets, and time booked to Cases or Projects will automatically appear on Timesheets for the periods within which the work was done.
- To book time to a Case, simply click on the
 button at the top of the Case detail view screen, and a popup dialog box allows you to enter the information. Click on the Save button, and the time is booked. That time will be visible on the Booked Hours sub-panel of the Case, as well as on your timesheet. When Approved, it will be added into the Time Used and Total Activity Time for the Case.
- Note: Cases must be assigned to you and Active for the
 button to be visible.
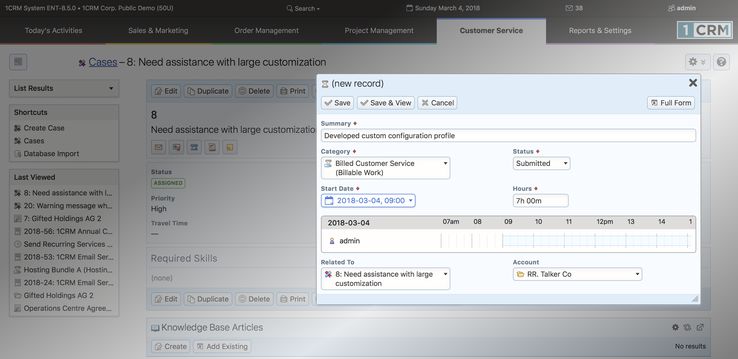
- Figure 243: Booking Time to a Case
- 8.4.4 Using Service Parts on a Case
- Within 1CRM you also have the ability to record the Service Parts you have used on a Case, and then invoice for those parts if they are billable. From the Case Detail view, simply scroll down to the Service Parts sub-panel, and Create a new entry. You can choose from all the parts in your Product Catalog. Users frequently define special Categories for Service Parts to make them easier to find and to reduce data entry errors.
- 8.4.5 Invoicing a Case
- Once you have entered all the Booked Hours and Service Parts to a Case, you will eventually want to invoice for that Case. From the Case Detail view, simply scroll down to the Invoices sub-panel, and click on the
 button. A popup dialog will appear (see Figure below), allowing you to include or exclude any Products on the Invoice. Click on Add Selected for that popup, and you’ll see another similar one for Services.
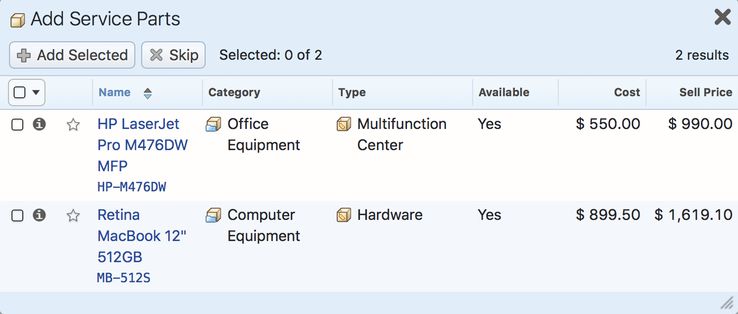
- Figure 244: Adding Service Parts to a Case Invoice
- After that, the Invoice Edit view will then come up on your screen (see Figure below), with a Products type Group for any Service Parts used on the Case, and a Services type Group for any Booked Hours used on the Case. You can edit the Invoice as desired, and then save it, produce a PDF, and send it to the client - as you would with any other Invoice in 1CRM.
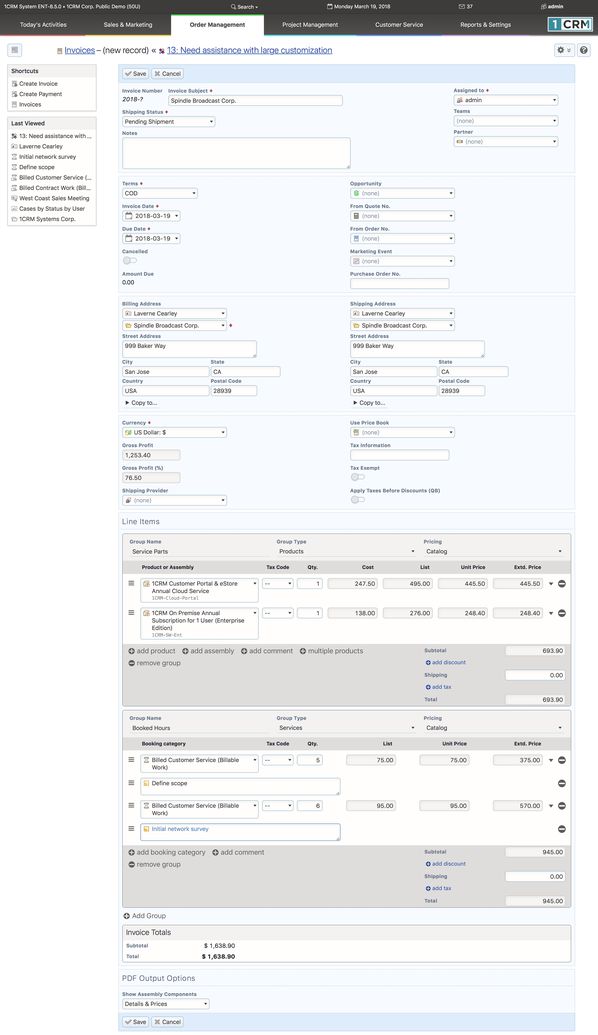
- Figure 245: Invoicing a Case
- 8.4.6 Debiting Case Costs to a Subcontract Pre-payment
- Rather than invoicing for a Case that has been completed, its cost can instead be debited to a service subcontract that has a prepaid credit balance. (Note: You can see more on this topic in the section on Service Subcontracts.)
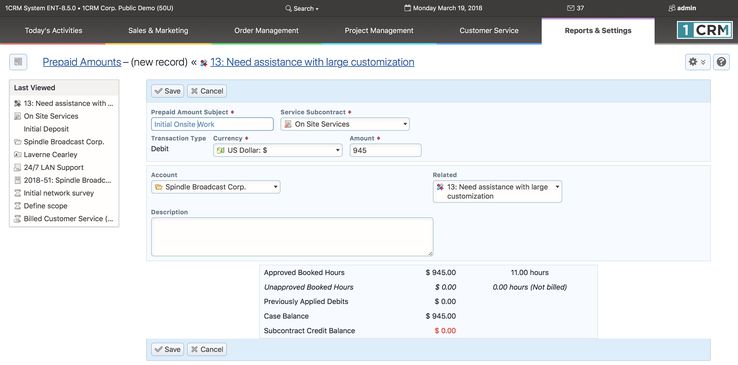
- Figure 246: Debiting Case Costs to a Subcontract Pre-payment
- The figure above shows the process in operation. On the Case detail view, on the Applied Prepaid Amounts sub-panel, you click on the Apply Debit button. The system will then display a screen like the one shown above. The mandatory amount field is calculated as the Amount Due on the Case from approved booked hours. The system checks that the credit balance on the support subcontract is sufficient to cover the amount due on the Case. Then you just need to enter some text for the Prepaid Amount Subject and click on the Save button.
- The net result is that the booked hours are marked as paid, and the Case costs are debited to the prepaid balance on the service subcontract.
- 8.4.7 Email Interaction on a Case
- When a service technician works on a service case, it often involves emailing back and forth with the client. 1CRM makes this an easy process - just click on the email icon in the top panel of the case, just below the case name and number to send an email to the client. (You can also click on the Compose Email button in the Activities sub-panel of the case.)
- When you compose an email related to a case in this manner, you will see a screen like the Figure below. The email address is pre-filled (always make sure the Case has a Primary Contact, as this is where the email address comes from), and the email subject is also pre-filled with text in the format:
- Re: <<Case Subject>> [Case ID#: xxx]
- The email’s Related to field will be set to link to the Case involved, and the email’s Account field will link to the Account related to the Case. Already this feature has saved you a lot of running around setting these fields, but there are two more nice features involved here.
- When you email the client, they often will reply back to you. When they do, usually they will not edit the subject line on the email - so when the reply comes back into 1CRM, the special text in the subject line [Case ID#: xxx] will still be there. And 1CRM checks all incoming emails for this Case ID information, and if it finds it, the email will automatically be linked to the case involved (in addition to the Contact and their Account, as usual for all emails). In turn this can trigger the Case as having received an update, and the related user can be automatically notified, or a workflow triggered!
- On the screen below you also see the New Case Status field. By default, New Case Status is set to Pending, so your case status will be set to Pending while you wait for a reply back from the client, but you can choose another status setting if you prefer. And as you see on the form below, you can also enter information into the Case Resolution field of the case involved.
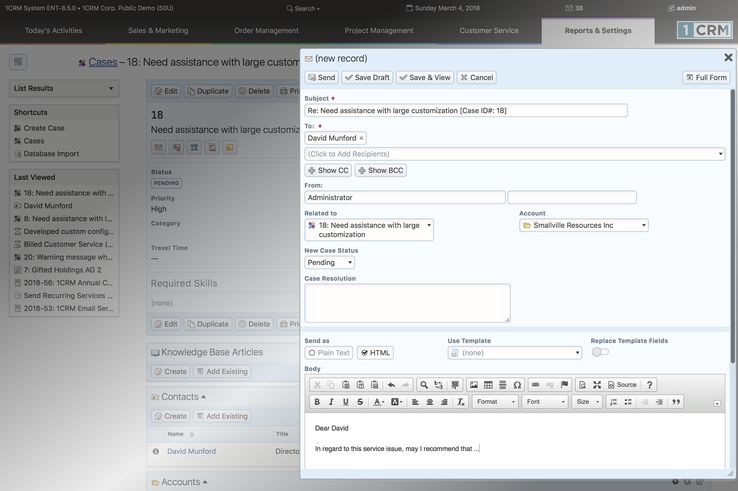
- Figure 247: Sending an Email Linked to a Case
- If your 1CRM system has Case Auto-Close enabled on the Admin - Company Information screen, then the case will automatically be closed (set to status of Closed - Expired) after the selected number of days of Inactivity after being set to Pending status. So now you don’t have to keep reviewing Pending cases to see if they should be closed due to being Pending for too long.
- All in all, if you look back over this section, you see quite a few common tasks involved in case management are made much easier for you, or completely automatic, by 1CRM.
- 8.5 The Software Bugs Module
- Figure 248 shows the 1CRM screen with the Software Bugs module selected:
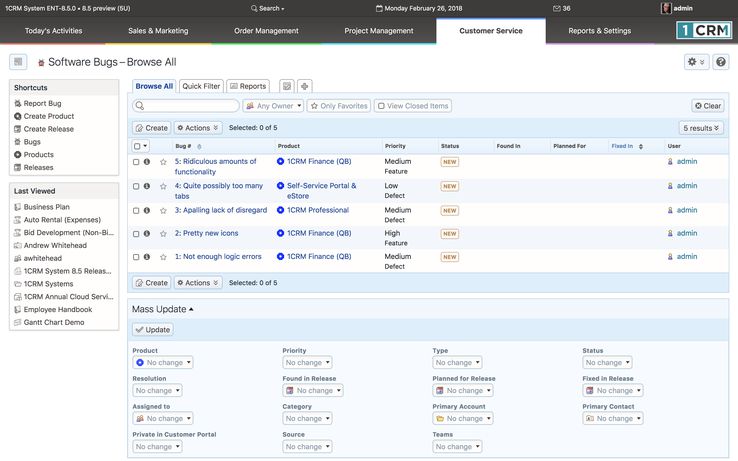
- Figure 248: The Software Bugs Module
- Software Bugs are defects or features associated with a specific revision of a particular software product. They may be managed and tracked through their life-cycle using the Software Bugs module. Bugs may be assigned a priority of Urgent, High, Medium and Low. They have a status of New, Assigned, Closed, Pending Input, or Rejected. Each Bug specifies the product and release in which the bug was found, the release in which it is planned to be fixed, and the release in which it actually was fixed. Each Bug may also be assigned a resolution status of Accepted, Duplicate, Fixed, Out of Date, Invalid, or Later.
- The dropdown list of choices for products is populated by the System Administrator using the Products shortcut within the Bugs module. Each product has a name, and a description. Then for each product you can create a series of releases using the
 button on the Releases list view, reached using the Releases shortcut. Each release specifies the product it relates to, a release version, a status (Active or Inactive, where Inactive releases are no longer shown on dropdown lists as options for data entry), and an order (to set the order this release will appear in the Release dropdown lists for this product).
- The Software Bugs module has a
 Help icon on the title bar at the top of the main screen body, followed by a choice of layout tabs, and a list of all or selected Bugs. Each Bug in the list has a check box at the left, and at the bottom of the screen is a facility to update one or more field values for all selected Bugs.
- The Bug list may be sorted by clicking on any column title that has the
 icon beside it. Clicking on a column title when it is already the highlighted sort column reverses the sort order.
- The Bug list is paginated if it contains more items than may be listed on the display and controls are provided to go to the start or end of the list, or step to the next or previous page. Clicking on the subject for any Bug in the list displays the detail information for that Bug.
- The navigation shortcuts provided will help you create a new Bug report, or switch back to the Bug list view.
- 8.6 The Knowledge Base Module
- Figure 249 shows the 1CRM screen with the Knowledge Base module selected, showing a list of the Knowledge Base Articles:
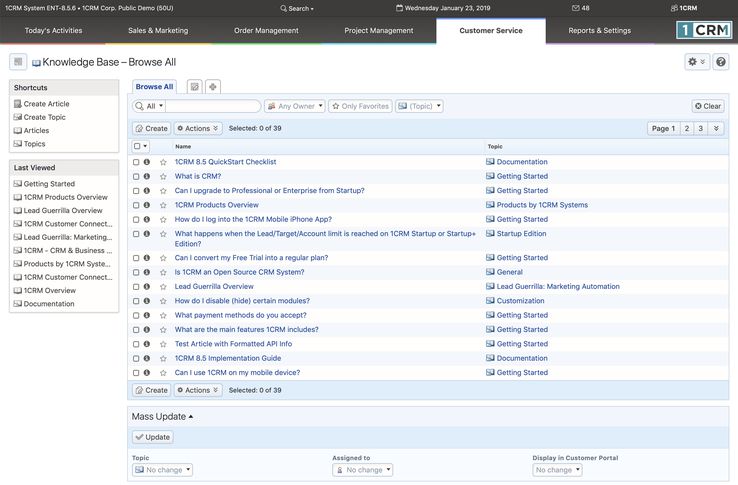
- Figure 249: The Knowledge Base Module, Articles List View
- This module allows you to create Articles in a Knowledge Base, search them using full-text search, and optionally expose them to your customers as valuable information that they can search through using the 1CRM Customer Connection Self-Service Portal. The figure above shows the default Knowledge Base list view of Articles. Note the shortcuts for listing all Articles, creating a new Article, and creating or listing the Topics used to group your Articles.
- You begin by defining one or more Topics, using the Create Topic shortcut. Each Topic contains this information:
- Name: Topic names will be how users in the 1CRM Customer Connection portal see and navigate the organization of all your Articles. They should be meaningful for users.
- Parent Topic (optional): Used to create a hierarchy of Topics to organize your Articles. Choose the name of a Topic within which your new Topic will be contained if you want a multi-level organization for your Articles.
- Icon (optional): Choose a standard icon, or upload a custom icon, used as a visual cue for the meaning of this Topic.
- Display After: Choose a Topic, or Top of the List. This sets the order in which your Topics will be presented to visitors in the 1CRM Customer Connection portal. If you do not edit this field, by default each new Topic will go in at the top of your list of Topics, and push older Topics downwards.
- Description: A brief description of what types of Articles this Topic will contain, which will be presented to users as they browse your Help/KB content in the 1CRM Customer Connection portal.
- The two Figures below show the process of entering a new Topic, and then the Topics List View. Notice how the Topic we create has a Parent Topic, and how that is shown in the Topics List View. With this capability you are able to create a hierarchy of topics with multiple levels, which any user of the 1CRM Customer Connection portal can navigate.

- Figure 250: Creating a New Topic
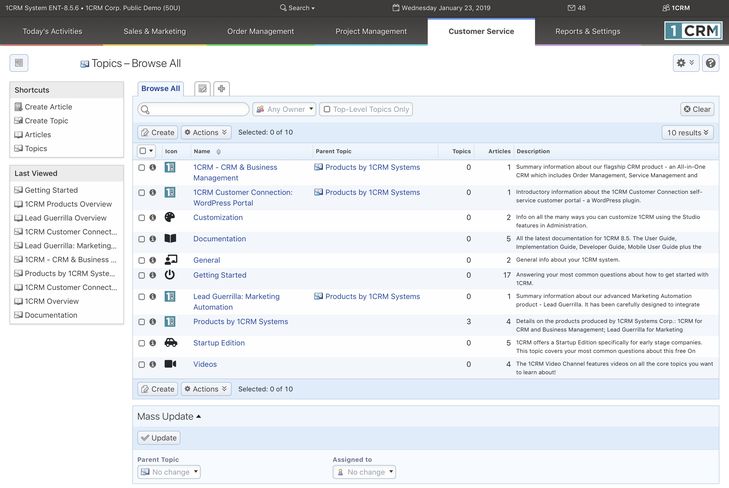
- Figure 251: Topics List View
- Once you have added the first few Topics you want, you’ll need to create some Articles. The figure below shows how an Article is entered. (Note: An Article can also be created fairly automatically using the Add to Knowledge Base button on the Case detail view.)
- Each Article contains this information:
- Name: Article names will be how users in the 1CRM Customer Connection portal see any reference to your Articles. They should be meaningful for users.
- Topic: Choose the Topic within which your Article will be seen.
- Summary: A brief description of the content of your Article. This will be presented to users as they browse your Help/KB content in the 1CRM Customer Connection portal.
- Display in Customer was Portal: A checkbox which controls if this Article is only available for CRM users, or if it will be available within the 1CRM Customer Connection portal.
- Display After: Choose an Article, or Top of the List. This sets the order in which your Articles will be presented within this Topic to visitors in the 1CRM Customer Connection portal. If you do not edit this field, by default each new Article will go in at the top of your list of Articles, and push older Articles downwards.
- Content: The HTML content of your Article. It can contain HTML links to external web content, as well as links to Knowledge Base Topics or Articles.
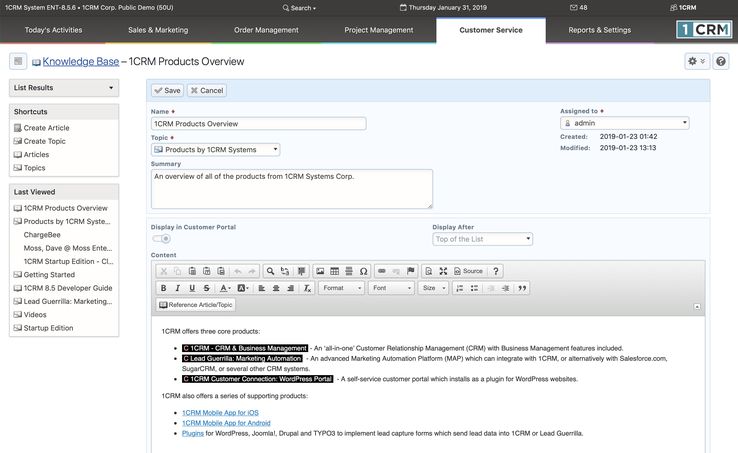
- Figure 252: Creating or Editing an Article
- Simply enter the Article’s Name, Summary (optional) and Content. Note that the content may be HTML or just text. Then set the checkbox Display in Customer Portal as appropriate to control public viewing of the Article. Choose an Article in the Display After dropdown list if you want to set a specific display order for your Articles under this Topic. Finally, choose a Topic for your Article.
- Click on Save, and your new Article is added to the Knowledge Base.
- Note: When using the HTML editor controls as you create the Content of your Article, you can add HTML links as normally possible in this editor (see Section 4.8.1). But you can also add a special kind of link in Articles using this extra button
 you’ll see in the Editor control bar above. When you click on this button you’ll see a popup asking you if you want to add a link to a Knowledge Base Article or Topic. Once you make that choice, you’ll be presented with the ability to select the desired Article or Topic.
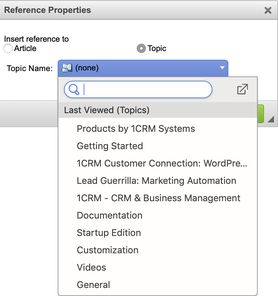
- Figure 253: Linking to an Article or Topic within Article Content
- After you add this link, your HTML document display will gain a special item of the form
 . In the 1CRM Customer Connection portal, this will be presented to the user as the link to the related Article or Topic. (See the Figure above for Editing or Creating an Article.)
- Once you have created all your Articles and Topics, if you have the 1CRM Customer Connection installed on a WordPress site the Help capability within it will look something like the Figure below:
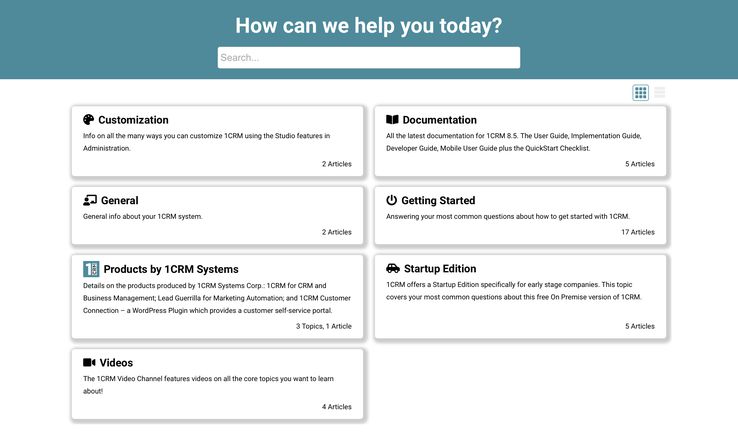
- Figure 254: 1CRM Customer Connection - Help System
- Note: You can link Documents or Notes (with optional attached binary files) to Knowledge Base Articles, and they will be accessible by customers in the portal if the Article is displayed there.
- Portal visitors can navigate the Help system by clicking on Topics or Articles. A breadcrumb trail is displayed at the top left, as seen below. A control at the top right
 is available to select grid or list view format.
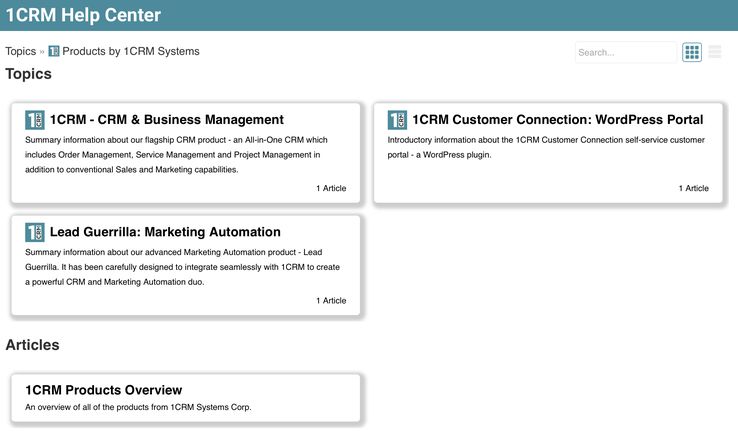
- Figure 255: 1CRM Customer Connection - Navigating the Help System
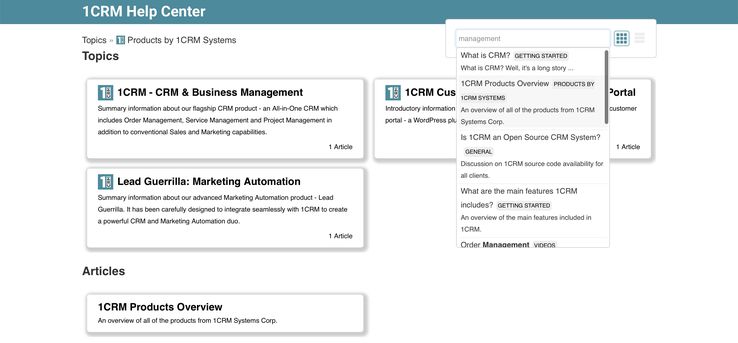
- Figure 256: 1CRM Customer Connection - Searching the Help System
- As shown above, users can also click in the Search box and get dynamic feedback on matches as they enter their search text. The results are shown in a scrollable list, with each entry showing the Article subject, the Topic it falls under, and the first portion of the Article Summary text. Simply click on any result in the list to read that Article.
- Figure 257: 1CRM Customer Connection - Reading an Article in the Help System