- 10.0 Your User Profile
- 10.1 My Account
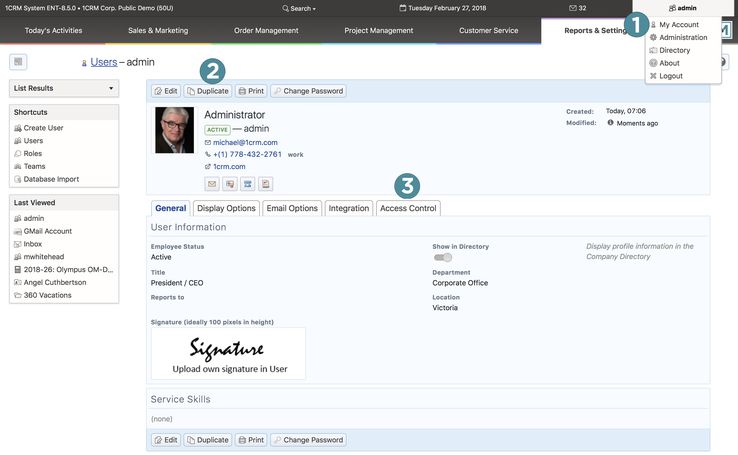
- To enter your own User profile screen, click the My Account link (see highlighted item 1, on Figure 281 below, which shows the General tab of the User profile screen). The highlighted items 2 & 3 show the Duplicate button and the Access Control tab, which are only present for Users with Administrator capability. The Duplicate button allows an Administrator to duplicate a User account record (and then edit it briefly) as a quick way of creating a new User. The Access Control tab may be used by an Admin to control which data within 1CRM you will be able to see, and what you will be able to do with it.
- As discussed in the section on Managing Your Password, the
 button should be used periodically by each User of the system to change their User password.
- To edit the User profile, and change User preferences, click on the tab that relates to the area you are interested in, then on the
 button on that tab. The 5 tabs in your user profile collectively let you define:
- General Tab:
- Header information (First and Last Name, Status, and User Name)
- User Information (email address, title, department, and phone numbers)
- User Settings
- Service Skills
- Submit User Photo (Your 75x90 pixel User Photo)
- Display Options Tab:
- Locale Settings
- Layout Options
- Email Options Tab:
- Email Options
- Outbound Email Settings
- Monitored Mailboxes (Not set in the edit mode, but by using a button on the detail view)
- Integration Tab:
- Phone Calls
- RingCentral Settings
- Google Account Settings
- Google Calendar Settings
- Google Drive Settings
- Google Contacts Settings
- CRMSync: CardDAV Server Options
- CRMSync: CalDAV Server Options
- GoToMeeting Credentials
- DropBox Integration Settings
- LiveChat Integration Settings
- These groups of information are known collectively as the User Profile.
- 10.1.1 Header Information
- The header information is fairly straight-forward. It sets the system user’s first and last names, and their system username. Also set here is the user status, which is one of the following values:
- Active – An active user that counts towards the system’s limit of licensed users.
- Inactive – A user that may shortly become active, or perhaps was once active but is on leave, or has left the business. Inactive users do not count towards the system’s limit of licensed users, and they may not login.
- Info Only – A user that is in the system only for documentation purposes. They may be viewed in the Company Directory, and an HR file may be created for them, but they may not login, and they do not count towards the system’s limit of licensed users.
- 10.1.2 User Information
- In this section, a number of items of user information are entered, including Employee Status, Title, Department, office and mobile phone, fax, Instant Messaging (IM) info, and the user to whom you report. This last item is quite significant, as it affects who can see your data within the 1CRM system, as well as how your sales forecasts roll-up if you are in Sales.
- Note: The information in this section will be publicly available in the Company Directory.
- 10.1.3 User Settings
- User Settings include such items as check boxes for Administrator rights and inclusion in the Company Directory. (Note: Only Users with Administrator capability are able to check these off.)
- Other User Settings include:
- Receive Email Notifications (if selected, you receive an email when you are assigned a responsibility)
- Notify on Case changes (if selected, you receive an email when information on one of your Cases changes)
- Display reminder (if selected, you receive on-screen pop-up reminders when meetings are approaching)
- List Export Format (choose the file format to use in your exported files)
- Import/Export character encoding (to support international character sets)
- Show full name (use full name when referring to users rather than the system username)
- File Download Mode (download file, or display in browser)
- 10.1.4 Service Skills
- Any number of Service Skills may be defined here. They are used for the assignment of service cases to service personnel with the appropriate skill set. Cases may be rated for the skills required, just as users may be rated for their skill sets. Skills relevant to your business are defined in Service Skills, within the Users section of the Admin page.
- Use the
 button to add a skill to a user profile (only Admins can do this.). You will need to select the skill, and the rating. The rating is a positive integer, and the greater the skill level, the greater the number. Typically a business may use skill levels of 1 to 3, 1 to 5, or 1 to 10.
- 10.1.5 Submit User Photo
- Use this section to upload a 75 x 90 pixel photograph for display in the Company Directory.
- 10.1.6 Locale Settings
- 1CRM has substantial international localization capabilities. While the system has defaults for all these settings, in this section you may select your own personal settings for:
- Date and time formats
- What time zone you are located in (it will default to where your server is)
- Currency (this sets the number of decimal places used for currency values, the currency symbol and several other related values)
- Number format (this sets the thousands and decimal separators)
- The format in which to display names – for example Salutation, First Name, Last Name would be the s f l option
- The format in which to display addresses – there are formats for Britain/Canada/USA, France, Germany, and Japan. The different formats are used to display addresses on screen, and in PDFs such as Quotes and Invoices.
- The first day of the week (used in formatting the calendar date selector, for example). It may be Sunday or Monday or indeed any other day, although we don’t know of anywhere that uses anything but Sunday or Monday!
- Start and end times for the business day – used to format the daily and weekly calendar displays.
- Select the Holidays you wish to have displayed on your calendars - may be set to System Default (as selected in System Settings by the Admin) or to a specific Holidays pack loaded on the system by the Admin.
- 10.1.7 Layout Options
- Using Layout Options, users can modify what tabs they see when logged in. Administrators define the master list of available tabs for all users in the administration screens, but users can then modify their own tab list by removing any unneeded tabs.
- As well, layout options control:
- Display Tabs – Controls which of the system’s modules that are accessible by you that you wish to have displayed in your user interface
- Number of tabs – The number of tabs shown across the top of the page before the rest are listed on an overflow dropdown at the end
- Number of sub-tabs – The same, but for the sub-tabs used when the Grouped Modules option is active
- Sub-panel tabs – If this option is selected (which it is by default) the sub-panels shown on the detail view for each module are grouped into tabs, which may be selected one at a time. This makes the screens not nearly so long, and ensures that the sub-panel data most important to you is closer to the top of the screen.
- Last viewed on side – If this option is selected, the Last Viewed list is shown on the left side of the screen, rather than as the pop-down list which it is by default. Not relevant to all themes.
- Shortcuts on top – Moves shortcuts to the top, rather than the left side. Not relevant to all themes.
- Navigation Paradigm – A very important option, the navigation paradigm may be set as Modules or Grouped Modules. The Modules option shows a one-level menu system across the top of the screen, or down the left-hand side, depending on the theme selected. When Grouped Modules is selected with the Spectrum theme, the system offers a two-level menu system across the top of the screen, as shown in all sample screen images in this User Guide. When the Grouped Tabs option is in effect, the grouping of the tabs is controlled by the Studio function Configure Group Tabs.
- Module Links in Footer - If checked, links for all the modules will appear in the footer of the screen layout.
- 10.1.8 Email Options
- Email Options are used to configure many aspects of your email capabilities within 1CRM. The options are as follows:
- Email address – sets your email address. If not set, you cannot receive any system notifications.
- Other email address – used as documentation only.
- Reply-to name – sets the reply-to name as seen by the recipient of your emails.
- Reply-to address – sets the email reply address for all the emails you send.
- Auto BCC Address - If a valid email address is entered here, every email you send from 1CRM will automatically be blind copied to this email address. (Very handy for making sure your main email client gets a copy of every email you send from 1CRM.)
- Signature – lets you edit and save multiple text and/or HTML email signatures, and select which one is currently to be used.
- Signature above reply – controls where in your email replies the signature is to be automatically added.
- Email client – selects the use of the 1CRM email client, or an external email client, when an email address hyperlink is clicked within 1CRM.
- Outbound character set – chooses the character set encoding used for your outbound emails.
- Out Of Office – select this option when you are out of the office. Each monitored mailbox has a selector to set the email template to be used to automatically notify of your absence.
- Default Display Format – Select Text or HTML.
- Default Send Format – Select Text or HTML.
- Inline Images – These may be displayed or not, as you choose (often suppressed to reduce bandwidth use)
- Messages in Trash cleanup – Select the retention period for email sent to the Trash. Options are 5 days, 1 week, 2 weeks, 3 weeks, 1 month, 3 months, 6 months, 9 months, and 1 year.
- Received messages without associations cleanup – select the retention period for received emails that are not related to any other data in the system (normally valuable emails will be related to an account, a contact, a lead, a project – something!).
- Received messages with associations cleanup - select the retention period for received emails that are related to at least one other item of data in the system.
- Sent messages without associations cleanup - select the retention period for Sent emails that are not related to any other data in the system.
- Sent messages with associations cleanup - select the retention period for Sent emails that are related to at least one other item of data in the system.
- 10.1.9 Outbound Email Settings
- In this section you must select Sendmail or enter your SMTP user and server settings, so that you can use Email within 1CRM to send outgoing email. If your server has been set up to use Sendmail, then you simply select that as the Mail Transfer Agent (MTA), and you’re done. The server has already been taught how to send mail and you are just telling the server to take care of it. (Note: This option is not available in the 1CRM Cloud.)
- If you need to use SMTP, you have two ways to proceed:
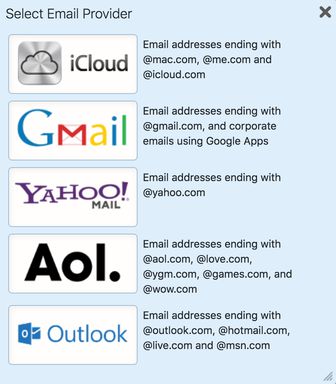
- Click on
 if you use a common email service such as GMail/Google Apps, Outlook, AOL, iCloud or Yahoo.
- Manually define your SMTP Settings.
- Defining SMTP Settings Using Quick Setup
- Click on
 and select the applicable email service from the options provided. In this example, we will choose Gmail.
- Figure 272: Quick Setup Email Options
- Now you’ll see a small dialog popup asking you to enter your email address and password:
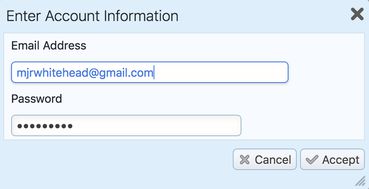
- Figure 273: Email Quick Setup - Account Information
- Enter that information, and click on OK, and you’ll see a screen much like the Figure below. Just click on Save to save your Outbound email settings.
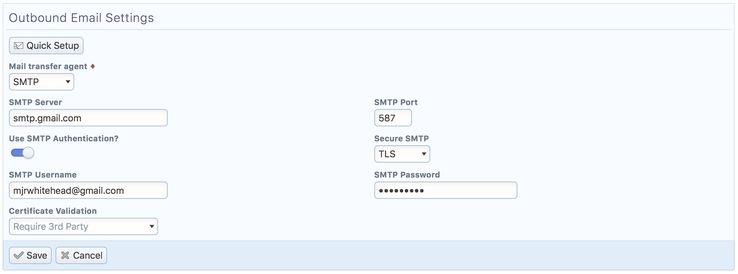
- Figure 274: Using Gmail for SMTP
- Defining SMTP Settings Manually
- If none of the Quick Setup options apply to you, then you must manually define your SMTP Server name, and SMTP Port number (usually 25). If SMTP Authentication is required by your SMTP email server, you need to specify that, and enter the SMTP Username and Password you use to access it.
- You can use SSL (Secure Socket Layer) to ensure all data transferred to the SMTP server is encrypted (of course, in this case the SMTP server you are using must support SSL connections). To do so, simply select SSL from the Secure SMTP dropdown. Also note that SMTP servers usually use a port number different from 25 for accepting SSL connections, often port 925.
- Another option for Secure SMTP is TLS (Transport Layer Security), which performs a similar job to SSL. The most common use of TLS is for Google’s Gmail. To use GMail for sending your email, use
smtp.gmail.com as the SMTP host name, select TLS from the Secure SMTP dropdown and use port 587, as seen above. (These settings were done by Quick Setup, as it covers GMail.)
- If Secure SMTP is set to either SSL or TLS, you will also need to set the Certificate Validation dropdown. Email servers should have certificates to confirm their identity. This dropdown sets the conditions under which 1CRM will allow an email to be sent via the specified SMTP server. Available options are: None (Send email even if no certificate on the server), Self-Signed OK (At least a self-signed certificate is required in order to send email), and Require 3rd Party (3rd Party Signed Certificate required to send email).
- Special Notes for Using GMail
- After you use the above screen to setup 1CRM properly to work with GMail/Google Apps you are not quite done yet. Google have decided that anything other than their own email clients are insecure ways to access your email. So you need to go into your Google My Account settings, select Sign-in & Security, scroll to the very bottom of that screen and toggle ON a switch called Allow Less Secure Apps. You may also have to go here, and follow instructions to allow sign-in from a new device.
- 10.1.10 Monitored Mailboxes
- Each user may edit the Monitored Mailboxes from which they wish to receive email delivery within 1CRM. Click on the
 button on the Email Options tab of the My Account screen to add a new POP3 or IMAP email account.
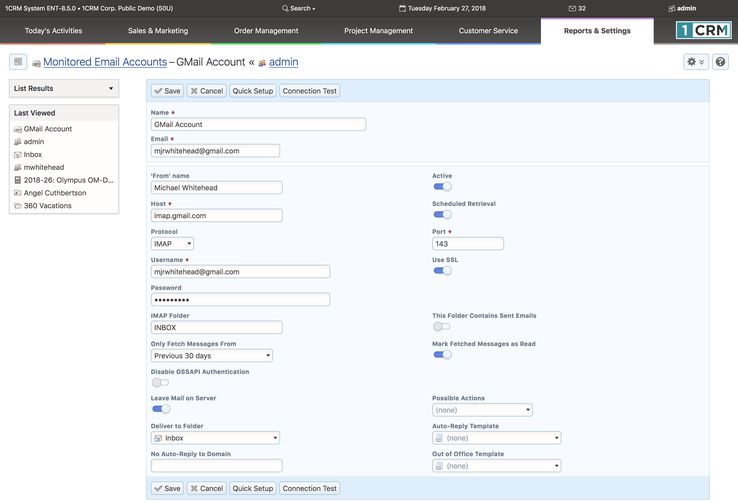
- Figure 275: Adding a Monitored Mailbox (Gmail example)
- On the screen above, the Name field is used to enter the name by which you refer to your email account, such as Company Email, Yahoo Email, etc.. The Active check box may be unchecked to leave the details of the mailbox in your configuration data, but temporarily inactive. When it is checked, this mailbox will be read whenever you use the Check Email function, or the email scheduler task is run. From Name should generally be set to your full name - first and last.
- Similar to the way it works for defining Outbound Email Settings, you have a
 button here to speed the process of defining your new Monitored Mailbox. If you use a common email service such as GMail/Google Apps, Outlook, AOL, iCloud or Yahoo simply click on
  and select the applicable email service from the options provided. You’ll see a small dialog popup asking you to enter your email address and password. Enter that information, and click on OK, and you’ll see a screen much like the Figure above.
- How should users change their email habits and setups once they become regular CRM users? We recommend most users adopt the following solution: (more details in the Implementation Guide)
- Users should keep using their current email client for day-to-day email.
- Link their email client software to their email server using the IMAP protocol.
- In each user’s email client, create a folder called CRM. Because of how IMAP works, this will create a CRM email folder on the email server for that user as well. (If using Gmail, create a new Label with the name CRM.)
- Every time a user has an email they feel should be filed in the CRM, they drop a copy in the CRM folder within their email client.
- Through IMAP, this will put that email in the CRM folder for that user on the email server.
- Create a 1CRM Monitored Mailbox that retrieves email using IMAP from that email account for that user - not from folder INBOX, but from folder CRM (this is the key to this approach!).
- Now - every email that is dropped in the CRM folder in any user’s email client will turn up in the CRM automatically - and will be automatically linked to any related Leads, Contacts or Accounts, as well as to the User that filed it in the CRM.
- Users are free to use the CRM to send emails to customers. Records of campaign emails are only kept within the CRM, but to make sure that other individual emails composed within the CRM and sent to customers are also filed within the user’s normal email client, the CRM should be configured to blind copy to the user’s normal email account every individual email sent out from the CRM. (1CRM has an Auto-Bcc option you can set to do this.)
- Finally, you can if you wish add another Monitored Mailbox to monitor your Sent items folder. If you do, check the box marked This Folder Contains Sent Emails, and select Sent as the Deliver to Folder. This will bring in to 1CRM all the emails you send using another email client, correctly mark them as Sent emails, and drop them in your Sent folder in 1CRM.
- Implemented properly, this solution addresses all of the initial considerations for an email solution, and obviates the need for administratively intensive, and sometimes unreliable email client plugins.
- 10.1.11 Phone Calls Settings
- With this setting each user may set a preference for dialling when using 1CRM in the browser of their Smartphone via the CRMFlex capability. There is only one setting in this section - Call method when using a mobile device. This is a dropdown offering just two options:
- Choose Use the Global preference if you want to use an app on your Smartphone which corresponds to the Global IP telephony setting your admin has selected in Admin - Locale Settings. For example if the Global preference is set to Skype, and you want to place 1CRM phone calls from inside your Smartphone browser using Skype, and you have installed and configured the Skype app on your Smartphone, then this is the setting you will want. All the same information applies similarly for the RingCentral option.
- Choose Use the built-in phone if regardless of the Global IP telephony setting selected in Admin - Locale Settings you wish to place 1CRM phone calls from inside your Smartphone browser using the phone built into your device.
- 10.1.12 RingCentral Settings
- Each user planning to use RingCentral must edit these RingCentral settings:
- Your Direct Phone Number
- Expand RingCentral Window on Incoming Call (see section on Receiving RingCentral Calls)
- Press 1 to Start Call option (checkbox to Enable / Disable)
- Your administrator should be able to provide your phone number.
- Note: This section is only displayed if RingCentral is selected in Admin - Locale Settings.
- 10.1.13 Google Account Settings
- In order to allow 1CRM access to Google services, 1CRM must be authorized first. Click the Authorize button to go to the Google web site. When a popup window opens, click Accept to generate an access token. Copy the generated token, and paste it into the box to the left of the Authorize button, then click on Save. You may need to login to your Google account first.
- If everything is successful, you will see the message in green 1CRM system is authorized to access Google services.
- Note: For this Google account synchronization of Calendar, Contact and Google Drive data to operate properly, your Administrator must have set the Scheduler running, with the Sync Google Calendar Events, Synchronize Google Contacts and Synchronize Google Drive scheduler entries enabled. A run interval of 15 minutes is the recommended value.
- 10.1.14 Google Calendar Settings
- Use the Sync Setting dropdown to choose if the flow of data is one way from 1CRM to Google, or the reverse, or two way. You may also disable the sync by choosing the - Sync Disabled - option.
- You may choose which calendar items (Calls, Meetings, Tasks) are synchronized between Google and 1CRM:
- For Meetings you can choose No Sync, Assigned To Me, or Meetings I Am Invited To.
- For Calls you can choose No Sync, Assigned To Me, or Calls I Am Invited To.
- For Tasks you can choose No Sync or Assigned To Me.
- Note: New activities created in Google are synchronized into 1CRM as Meetings.
- You may also need to enter your Google Calendar ID. Leave this field blank if you want to sync with your main Google calendar. But if you have additional calendars, you can choose to sync with one of them specifically by entering its Google calendar ID in this field.
- 10.1.15 Google Drive Settings
- Use the Sync Setting dropdown to choose if the flow of data is one way from 1CRM to Google, or the reverse, or two way. You may also disable the sync by choosing the - Sync Disabled - option. Dropdowns are available to select the file formats in which Documents, Spreadsheets and Presentations are downloaded from Google Drive to 1CRM.
- 10.1.16 Google Contacts Settings
- Use the Sync Setting dropdown to choose if the flow of data is one way from 1CRM to Google, or the reverse, or two way. You may also disable the sync by choosing the - Sync Disabled - option. You can either sync all the contacts you can see, or only the contacts you are assigned. Note that a maximum of 50 entries are transferred per sync to manage server load.
- An important tip for those using Google Contact Sync: In Gmail settings, General tab - there is an option called Create contacts for auto-complete. Please set that option to I’ll add contacts myself. This lets 1CRM push the Contact info to sync with Google. Otherwise Google will find the Contact already exists and will block the sync from 1CRM of that contact.
- 10.1.17 CRMSync for Contacts (CardDAV Server)
- The CRMSync feature in 1CRM uses a CardDAV server to provide excellent Contact data exchange capabilities. To use the CRMSync feature, simply set the option here to choose what Contacts to sync: Assigned To Me, All I Can See or My Favorites. Enable Automatically create Accounts if you would like incoming synched Contacts to create new Accounts for the company names in their Contact records, if they do not already exist as 1CRM Accounts.
- Next, in any other system that supports CardDAV, such as Contacts on macOS, or iOS (for iPhone and iPad), Android phones and tablets, or Microsoft Outlook (via a number of Outlook add-on options), simply subscribe to the CardDAV service using the Principal or Address Book URL, as shown in Figure 284 below (but of course use the actual Principal URL value shown on your own My Account - Integration tab).
- Syncing Contacts Using CRMSync and iOS (10.1) for iPhone & iPad
- In iOS go to the general Settings screen (using the Home screen icon for Settings) and scroll down to select Contacts in the left column. Tap on Accounts, then on Add Account, and select Other for the kind of Account. Then choose Add CardDAV Account under Contacts (See Figure 276.)
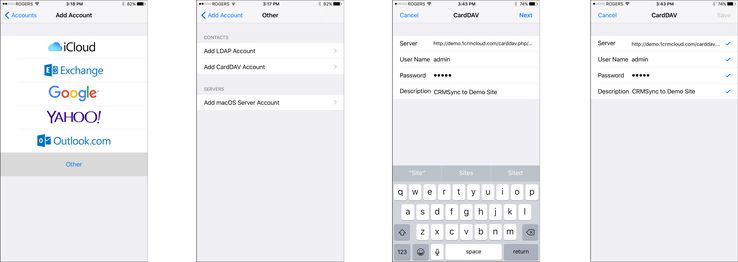
Figure 276: Using CRMSync for Contacts on an iPhone
- Enter your Server name using the Principal URL as illustrated in Figure 284 below, but of course use the actual Principal URL value shown on your own My Account - Integration tab in the CRMSync (CardDAV Server) section. In our example above we enter:
http://demo.1crmcloud.com/carddav.php/principals/admin.
- Then enter the User Name and Password you use to login to 1CRM. (If you have set the optional DAV Password, then use that password instead of your normal one.) Enter any Description you like or leave the default, then click on Next. Your account settings will be verified, and if they check out properly you are all done. Your 1CRM Contacts should now become visible within the Contacts app. You can edit them either in 1CRM, or in Contacts, and the changes will be reflected everywhere.
- Note: This provides a great offline mode for all your 1CRM Contact data. On your iPhone or iPad you can add new contacts, or edit existing ones, even while offline. Once you are back online any changes will be sync’ed back up to your 1CRM server.
- Syncing Contacts Using CRMSync and macOS (Sierra)
- In macOS go to the Contacts application and choose Add Account from the Contacts menu option. From the options presented, choose Other Contacts Account.., and click on Continue.
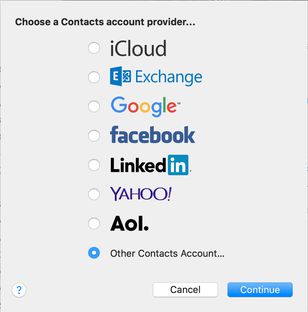
- Figure 277: Using CRMSync with macOS (CardDAV)
- Choose CardDAV from the first dropdown option, and Advanced for your Account Type. Then enter your 1CRM login User Name and Password. (If you have set the optional DAV Password, then use that password instead of your normal one.) Leave Port as Auto, and check the Use SSL option if it is available on your 1CRM server (it is available if you are using the 1CRM Cloud).
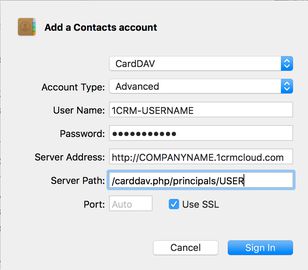
- Figure 278: Using CRMSync with macOS (CardDAV)
- Then enter your Server Address and Server Path. Use the Principal URL, as illustrated in Figure 284 below, but of course use the actual Principal URL value shown on your own My Account - Integration tab in the CRMSync (CardDAV Server) section. Split the URL into the Address and Path sections, as shown in the Figure above. In our example here we use: http://COMPANYNAME.1crmcloud.com and /carddav.php/principals/USER.
- Click on Sign In, and you are finished - your 1CRM Contacts should now become visible within the Contacts application. You can edit them either in 1CRM, or in Contacts, and the changes will be reflected everywhere.
- Syncing Contacts Using CRMSync and Android (Android 8 - Oreo)
- In the Google Play Store you will find a few solutions known to work. You can search for CardDAV, and install the CardDAV-Sync free app by dmfs.org, which we document here. (Or the DAVX5 app is also an inexpensive solution known to work well.) When run it automatically displays the Add Account screen. Select CardDAV as the type of Account.
- Enter your Server name using the Principal URL, as shown in Figure 284 below, but using the Principal URL shown on your own My Account - Integration tab in the CRMSync (CardDAV Server) section.
- In our example here we use http://demo.1crmcloud.com/carddav.php/principals/admin.
- Then enter the User Name and Password you use to login to 1CRM (if you have set the optional DAV Password, then use that password instead of your normal login password), then click on Next. Your account settings will be verified, and if they check out properly you just need to add an account name, and to uncheck Sync from server to phone only. Then click on Finish and you are all done. (The app will ask you to carry on and tune up your sync settings, which you may well want to do.)
- Your 1CRM Contacts should now become visible within the Contacts app. It may take a while for all of your contacts to sync if you have a lot of them. You can edit these contacts either in 1CRM, or in People, and the changes will be reflected everywhere.
- Note: This provides a great offline mode for all your 1CRM Contact data. On your Android phone or tablet you can add new contacts, or edit existing ones, even while offline. Once you are back online any changes will be sync’ed back up to your 1CRM server.
- Syncing Contacts Using CRMSync and Microsoft Outlook
- To use CRMSync to sync 1CRM Contacts with Microsoft Outlook 2007/2010/2013/2016, we recommend the use of:
- Memotoo Premium - $18/user/year (syncs to many other services as well)
- Note: Full instructions on using Memotoo with 1CRM are on the Memotoo page of our website.
- Note: Once you have added a CardDAV account with server address, user name and password, and have the account sync’ed with 1CRM, do not change the user name in your CardDAV client. If you need to sync to another 1CRM user, or if you change your user name inside 1CRM, create a new account in your CardDAV client on iOS, macOS, Android, or Outlook. Otherwise the sync may not work properly.
- 10.1.18 CRMSync for Calls, Meetings, Tasks (CalDAV Server)
- The CRMSync feature in 1CRM also offers a CalDAV server to provide data sync capabilities for 1CRM Calls, Meetings and Tasks. To use the CRMSync feature for Calls and for Meetings, simply set the dropdown options here to choose what Calls and Meetings to sync: Assigned To Me, All I Am Invited To or All I Can See. For Tasks your options are just Assigned To Me and All I Can See.
- Then in any other system that supports CalDAV, such as Calendar and Reminders on macOS, or iOS (for iPhone and iPad), Android phones and tablets, or Microsoft Outlook (via a number of Outlook add-on options), simply subscribe to the CalDAV service by using your login credentials for your 1CRM server (if you have set the optional DAV Password, then use that password instead of your normal one) plus one or more of the CalDAV URLs as shown in Figure 284 below. Of course, use the actual Principal URL value shown on your own My Account - Integration tab in the CRMSync (CalDAV Server) section.
- Different applications use different URLs. For example, the macOS Calendar app requires the Principal URL, and adds all 3 calendars. In Mozilla Sunbird, you add all 3 calendars separately, using the corresponding URLs for Calls, Meetings and Tasks.
- Syncing Calendars Using CRMSync and iOS (10.1) for iPhone & iPad
- In iOS go to the general Settings screen (using the Home screen icon for Settings) and scroll down to select Calendar in the left column. Tap on Accounts, then on Add Account, and select Other for the kind of Account. Then choose Add CalDAV Account under Calendars.
- Enter your Server name using the Principal URL as illustrated in Figure 284 below, but of course use the actual Principal URL value shown on your own My Account - Integration tab in the CRMSync (CalDAV Server) section. In our example we enter:
http://demo.1crmcloud.com/caldav.php/principals/admin.
- Then enter the User Name and Password you use to login to 1CRM. (If you have set the optional DAV Password, then use that password instead of your normal one.) Enter any Description you like or leave the default, then click on Next. Your account settings will be verified, and if they check out properly you are all done. Your 1CRM Calendar entries should now become visible within the Calendar app. You can edit them either in 1CRM, or in the Calendar app, and the changes will be reflected everywhere.
- Note: The iOS Reminders app will also show your 1CRM tasks, and can also sync bidirectionally.
- Note: This provides a great offline mode for all your 1CRM Calendar data. On your iPhone or iPad you can add new appointments or tasks, or edit existing ones, even while offline. Once you are back online any changes will be sync’ed back up to your 1CRM server.
- Syncing Calendars Using CRMSync and macOS (Sierra)
- In macOS go to the Calendar application and choose Add Account from the Calendar menu option. From the options presented, choose Other CalDAV Account.., and click on Continue.
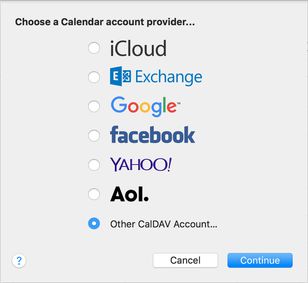
Figure 279: Using CRMSync with macOS (CalDAV)
- Choose Advanced from the dropdown option, then enter your 1CRM login User Name and Password. (If you have set the optional DAV Password, then use that password instead of your normal one.) Set Port to 80, uncheck the Kerberos V5 option, and uncheck the Use SSL option.
- Then enter your Server Address and Server Path. Use the Principal URL, as illustrated in Figure 284 below, but of course use the actual Principal URL value shown on your own My Account - Integration tab in the CRMSync (CalDAV Server) section. Split the URL into the Address and Path sections, as shown in the Figure below. In our example here we use: http://COMPANYNAME.1crmcloud.com and /caldav.php/principals/USER.
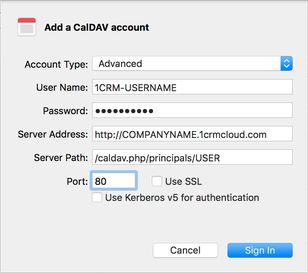
- Figure 280: Using CRMSync with macOS (CalDAV)
- Click on Sign In, and you are finished - your 1CRM Calendar should now become visible within the macOS Calendar application. You can edit your Calendar entries either in 1CRM, or in the Calendar application, and the changes will be reflected everywhere.
- Note: The macOS Reminders application will also show your 1CRM tasks, and can also sync bidirectionally.
- Syncing Calendars Using CRMSync and Android (Android 8 - Oreo)
- In the Google Play Store search for CalDAV, and install the CalDAV-Sync app by dmfs.org, which we document here. When run it automatically displays the Add Account screen. Select CalDAV as the type of Account.
- Enter your Server name using the Principal URL, as shown in Figure 284 below, but using the Principal URL shown on your own My Account - Integration tab in the CRMSync (CalDAV Server) section.
- In our example here we use http://demo.1crmcloud.com/caldav.php/principals/admin.
- Then enter the User Name and Password you use to login to 1CRM (if you have set the optional DAV Password, then use that password instead of your normal one), then click on Next. Your account settings will be verified, and if they check out properly you then see a screen where you must select checkboxes to indicate that both Calls and Meetings should be synced. Click Next again, then you just need to add an account name, and to uncheck Sync from server to phone only. Then click on Finish and you are nearly done. On the Congratulations screen you are on now, click on Install Task App Now. This will install OpenTasks, by dmfs.org, Your 1CRM Calendar entries should now become visible within the Calendar app, and your Tasks within the Tasks app. You can edit them either in 1CRM, or in the Calendar/Tasks apps, and the changes will be reflected everywhere.
- Note: This provides a great offline mode for all your 1CRM Calendar data. On your Android phone or tablet you can add new appointments or tasks, or edit existing ones, even while offline. Once you are back online any changes will be sync’ed back up to your 1CRM server.
- Syncing Calendars Using CRMSync and Microsoft Outlook
- To use CRMSync to sync your 1CRM Calendar with Microsoft Outlook 2007/2010/2013/2016, we recommend the use of:
- Memotoo Premium - $18/user/year (syncs to many other services as well)
- Note: Full instructions on using Memotoo with 1CRM are on the Memotoo page of our website.
- Note: Once you have added a CalDAV account with server address, user name and password, and have the account sync’ed with 1CRM, do not change the user name in your CalDAV client. If you need to sync to another 1CRM user, or if you change your user name inside 1CRM, create a new account in your CalDAV client on iOS, macOS, Android, or Outlook. Otherwise the sync may not work properly.
- 10.1.19 GoToMeeting Credentials
- If you plan to make use of the integration between 1CRM and the GoToMeeting online web meeting service from Citrix, enter your personal GoToMeeting account credentials here. After you Save the Integration tab, the password field will change to show the system’s connection status with your GoToMeeting account. Using this connection, 1CRM can create and remove meetings from the GoToMeeting system automatically as you create meetings and add or remove the checkbox for an associated GoToMeeting session.
- 10.1.20 DropBox Integration Settings
- If you plan to make use of the integration between 1CRM and DropBox you can link to your DropBox account here. In order to allow 1CRM access to Dropbox, 1CRM must first be authorized. Click the Authorize button to go to the DropBox web site. When the DropBox screen appears, click on the Allow button to generate your access token. Copy the generated token, and paste it into the box labelled Authorization Token back on the 1CRM screen, and then click Save to save your Integration tab settings.
- Note: You may need to login to your DropBox account first before doing this.
- 10.1.21 LiveChat Integration Settings
- For full details of how to configure the LiveChat integration, see this webpage. Your system administrator needs to enable the LiveChat integration first, and then you will see the LiveChat section on the My Account - Integrations tab.
- The settings in this panel enable the 1CRM LiveChat integration to assign 1CRM chat transcript records to the correct 1CRM user matching the LiveChat agent that handled the chat.
- Each 1CRM user needs to edit their My Account settings, on the Integrations tab. At the bottom of the Integrations tab is the LiveChat panel, where you set the LiveChat User Name to the email address of the corresponding LiveChat agent. The API key is currently not used, and can be left blank.
- 10.1.22 My Account Settings Screen Images
- Figure 281: The ‘My Account’ Screen - General Tab
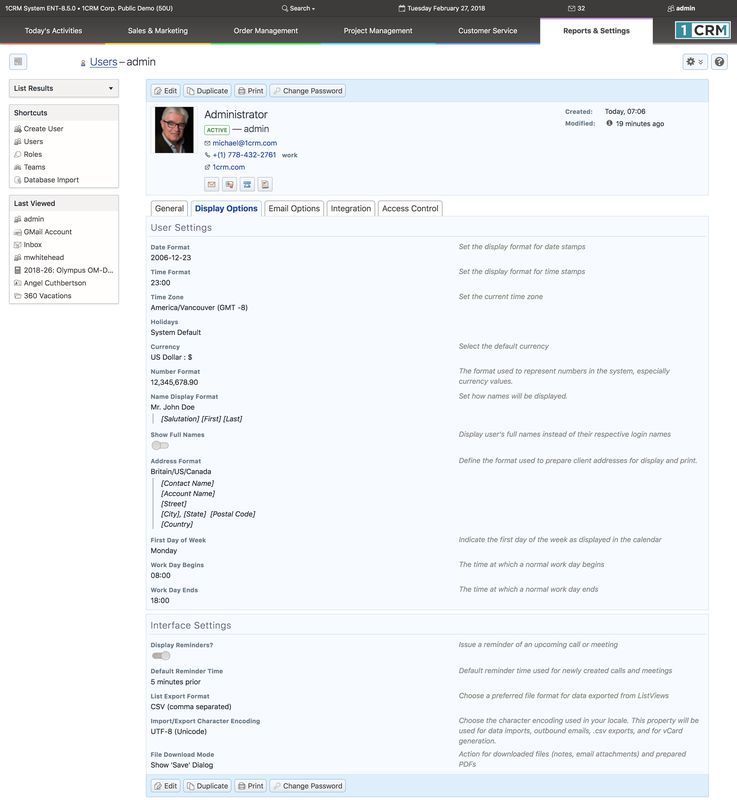
- Figure 282: The ‘My Account’ Screen - Display Options Tab

- Figure 283: The ‘My Account’ Screen - Email Options Tab
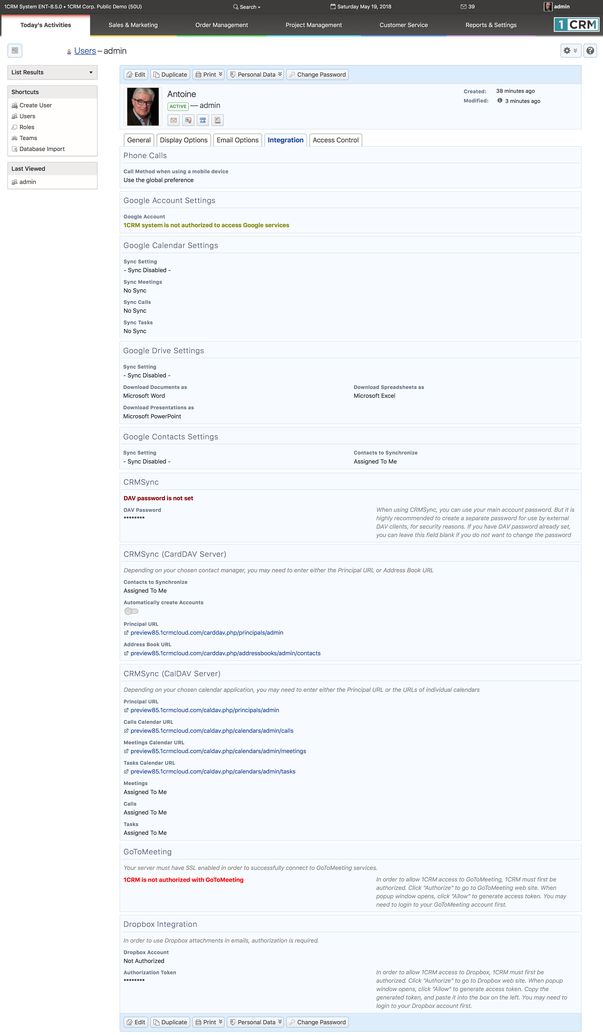
- Figure 284: The ‘My Account’ Screen - Integration Tab
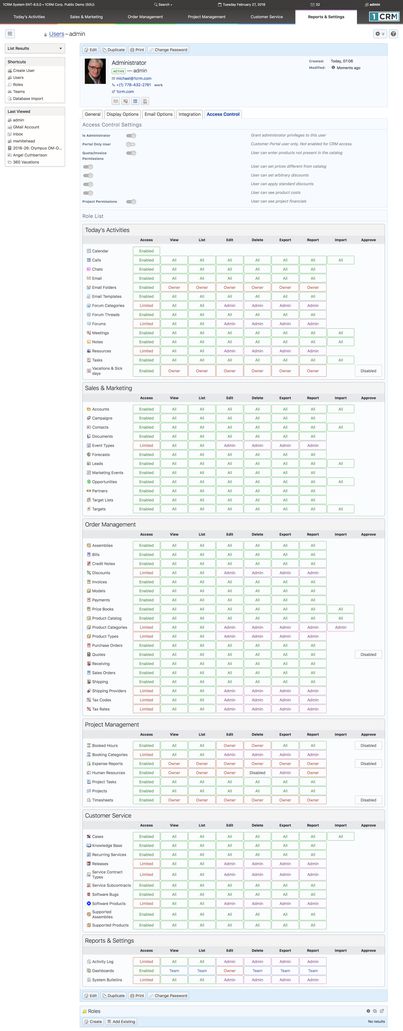
- Figure 285: The ‘My Account’ Screen - Access Control Tab
- 10.2 Directory
- To view the Company Directory, click the Directory link (see highlighted item 1, on Figure 286 below). Note that the Admin link before it is only displayed for Users with Administrator capability. Figure 286 below shows the Directory Thumbnail View screen.
- To see more information about a specific Employee, simply click on the image of the Employee within the Thumbnail View, to bring up their Business Card View. There are also shortcuts to choose Thumbnail or Business Card View for all selected Employees.
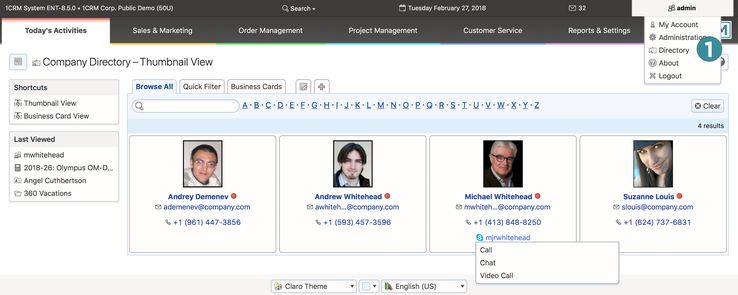
- Figure 286: The Directory, Thumbnail View
- Like most of the modules within 1CRM, the Directory has a
 Help icon on the title bar at the top of the main screen body, followed by a choice of layout tabs, and a list of all or selected Employees. Note that the Directory only displays those Users with Show in Directory checked in their profile by the system Administrator. Those Employees with no photo in their profile will have a standard ‘no photo’ image displayed. Camera-shy Employees are encouraged to personalize this ‘no photo’ image for submission.
- The Employees list may be filtered using the search controls, to see only those Employees in a given department, for example – or to find people by first or last name.
- As well, the Directory Thumbnail View also has a red/green indicator light for each Employee, to show if they are online within the 1CRM system. Note that when Employees do not log out of the system (but simply close their browser), they may be incorrectly shown as online until their 1CRM session times out – usually about 10 minutes or so.
- The Employee list is paginated if it contains more items than may be listed on the display and controls are provided to go to the start or end of the list, or step to the next or previous page.
- Clicking on the email address for any Employee brings up your chosen email client to send a message to that Employee. Clicking on their phone number will bring up a dialog box to log an outgoing call, with a button to place the call via SkypeOut. Hovering on their Skype ID will offer the ability to contact the Employee via Skype Chat, Call or Video Call, as seen above.